AI Automatizer Agent
The new AI Automatizer Agent introduces AI-powered capabilities into the management of workflow processes. This powerful new feature allows users to create, update, and manage processes using natural language prompts. The system provides new UI components for AI interaction, process review and differential analysis before publishing, and enhanced options for saving and copying processes.
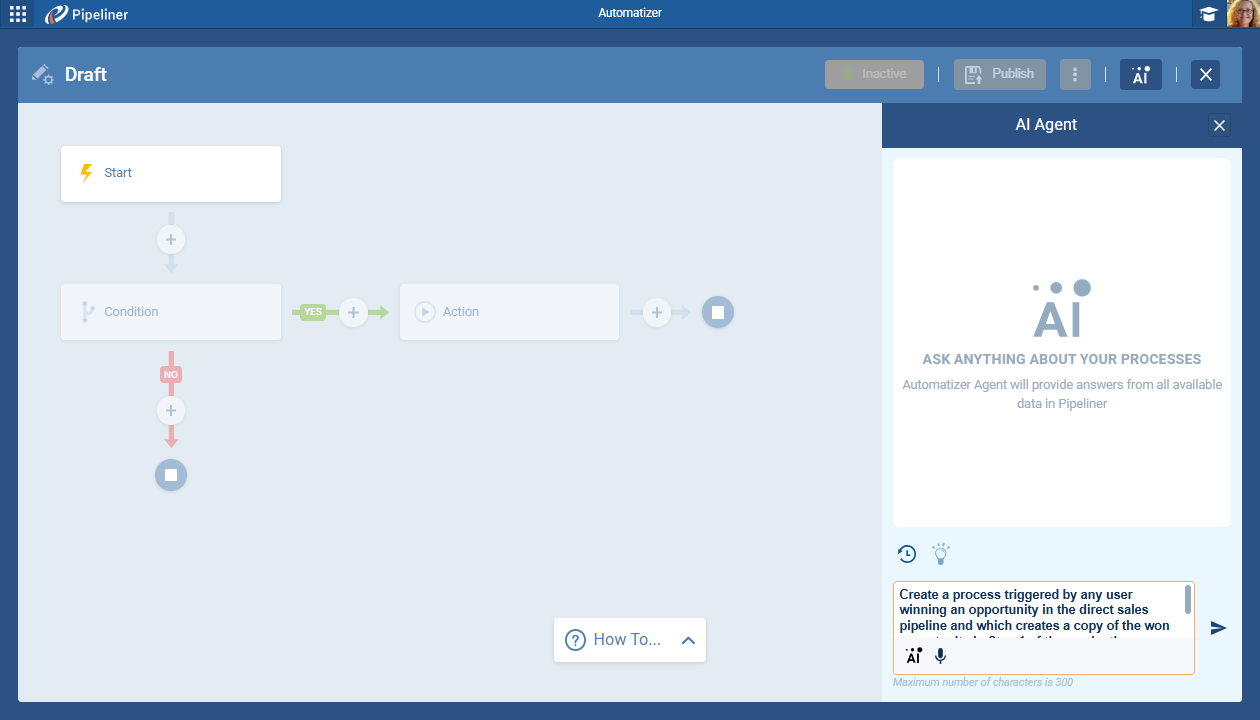
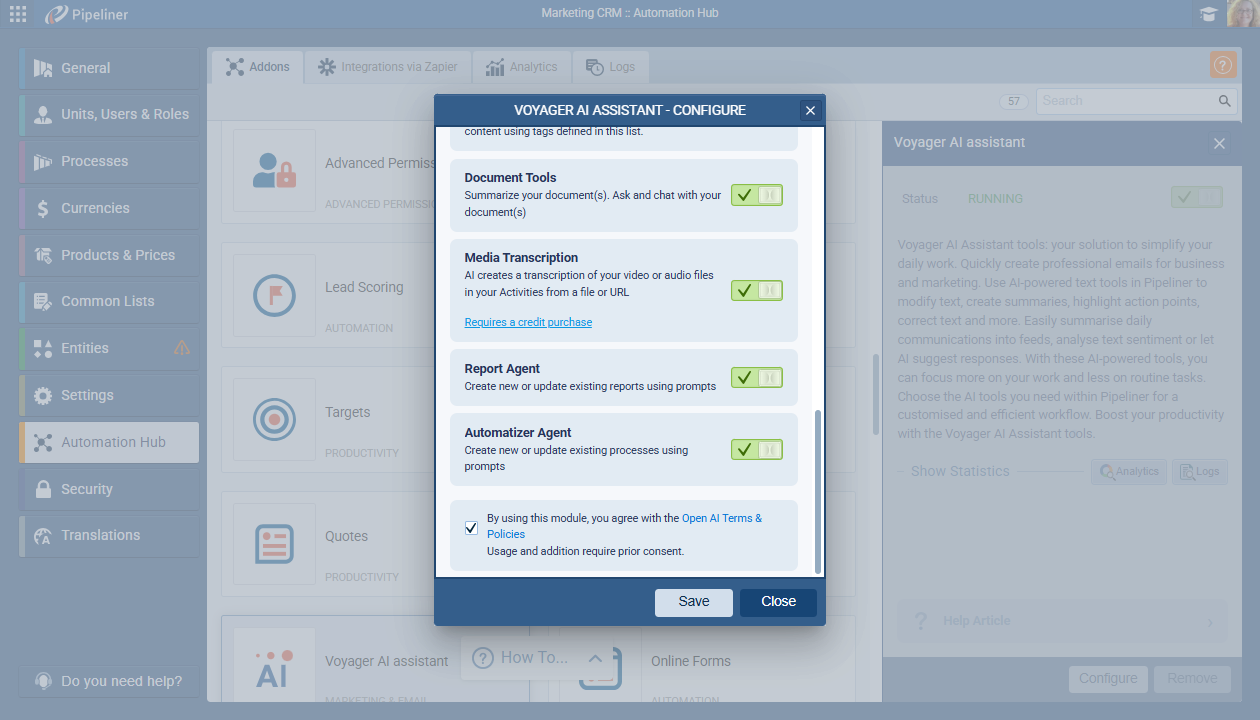
The Automatizer Agent is enabled from the Configure options when selecting the Voyager AI Assistant in the Automation Hub. A toggle switch controls the feature's availability. It is turned ON by default. When enabled, the "Create with AI" action appears in the Automatizer, and the "AI Agent" button is visible in the process editor.
Creating a new process using the Automatizer AI Agent
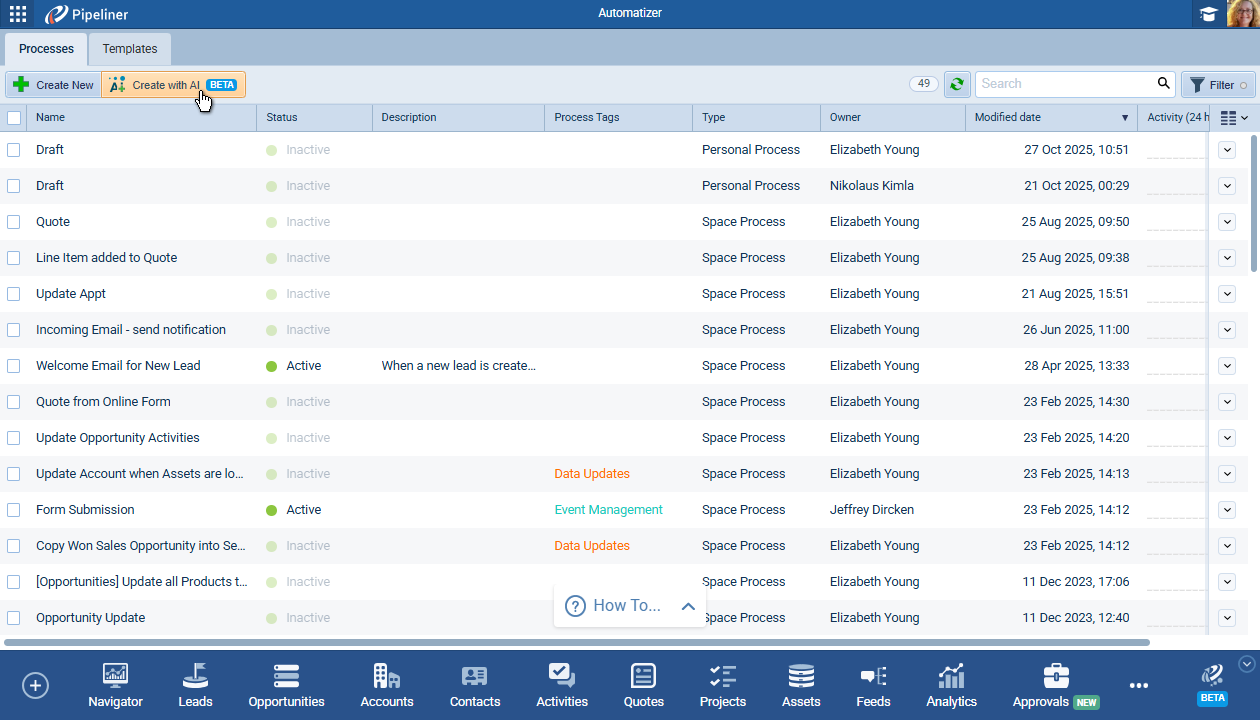
Click on the "Create with AI" button to initiate the creation of a new process with AI assistance. All new processes created by the agent default to a Personal process owned by the Current UserUser User means a person who uses or consumes a product or a service, usually a digital device or an online service., named "Draft" and in the unpublished draft status.
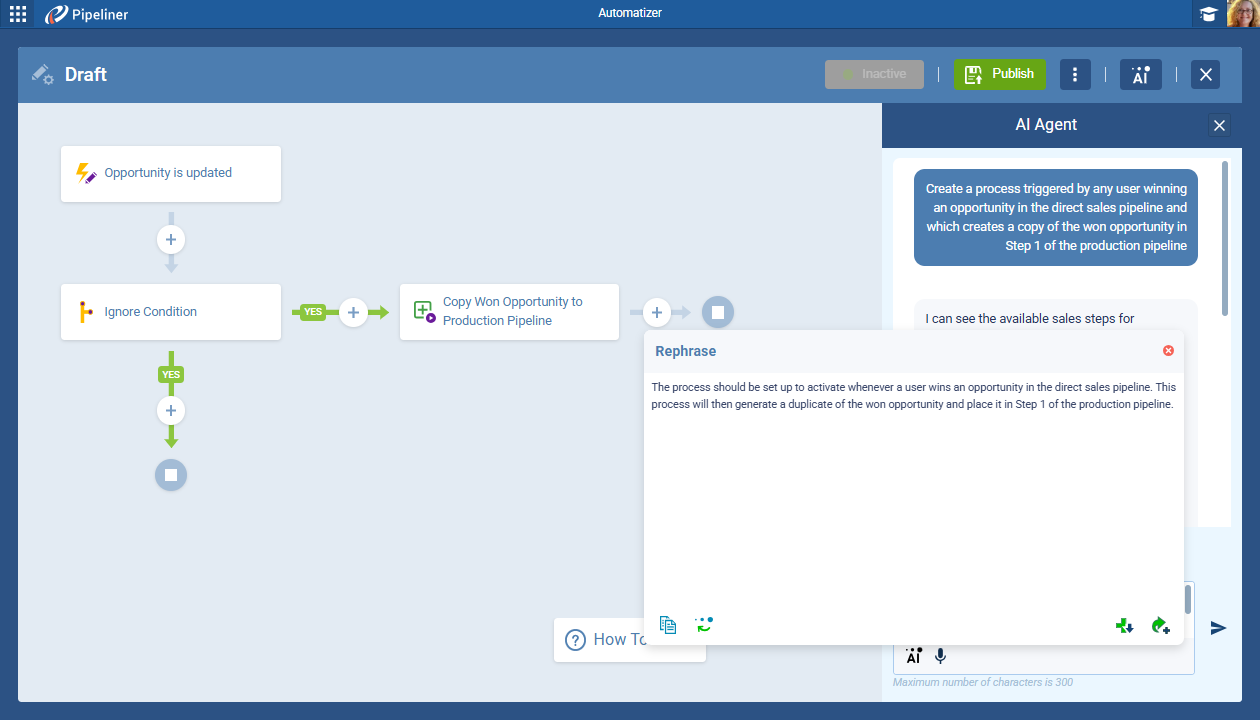
Users can type — or speak — their prompts to the text input area in the AI Agent side panel. Note there is a 300-character limit for user prompts.

Users can also use AI to help with prompt creation by clicking on the AI icon.
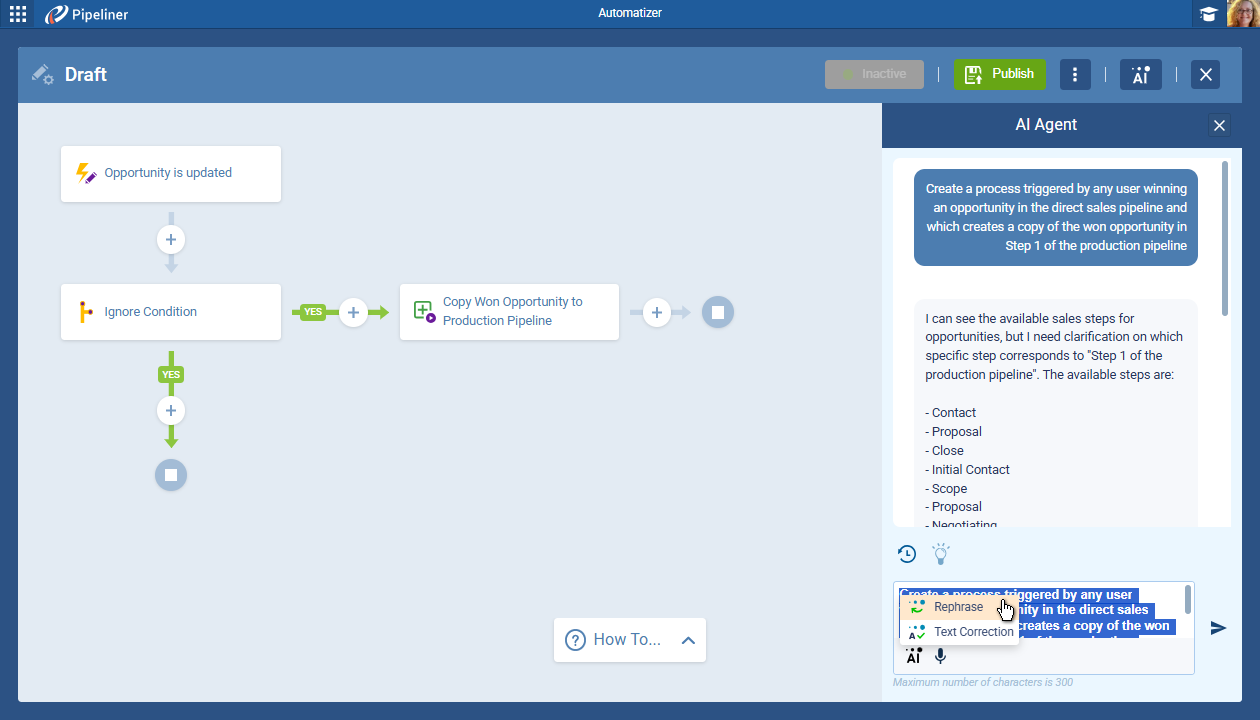
Use "Rephrase" to help reword the prompt or "Text Correction" to improve the grammar and structure of the prompt.
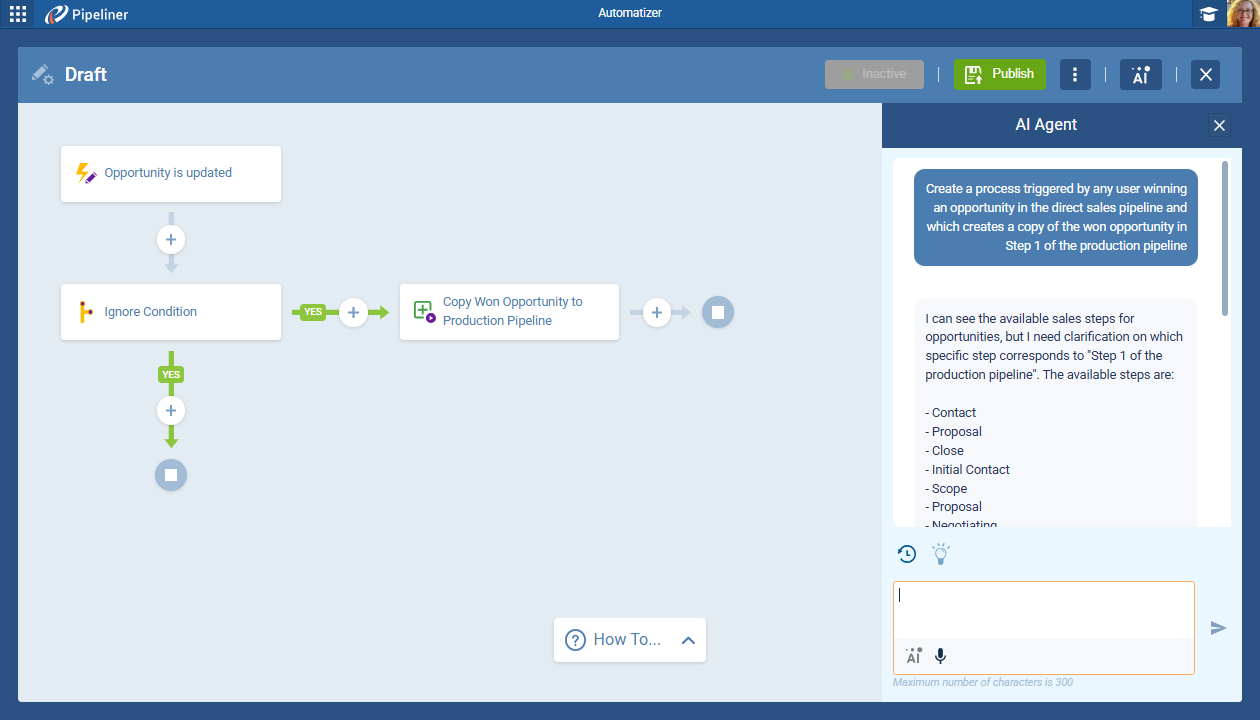
The AI will guide the user to define the minimum requirements for publishing a process: Trigger, Condition, and Action.
- Trigger: Must be defined (Entity, Type).
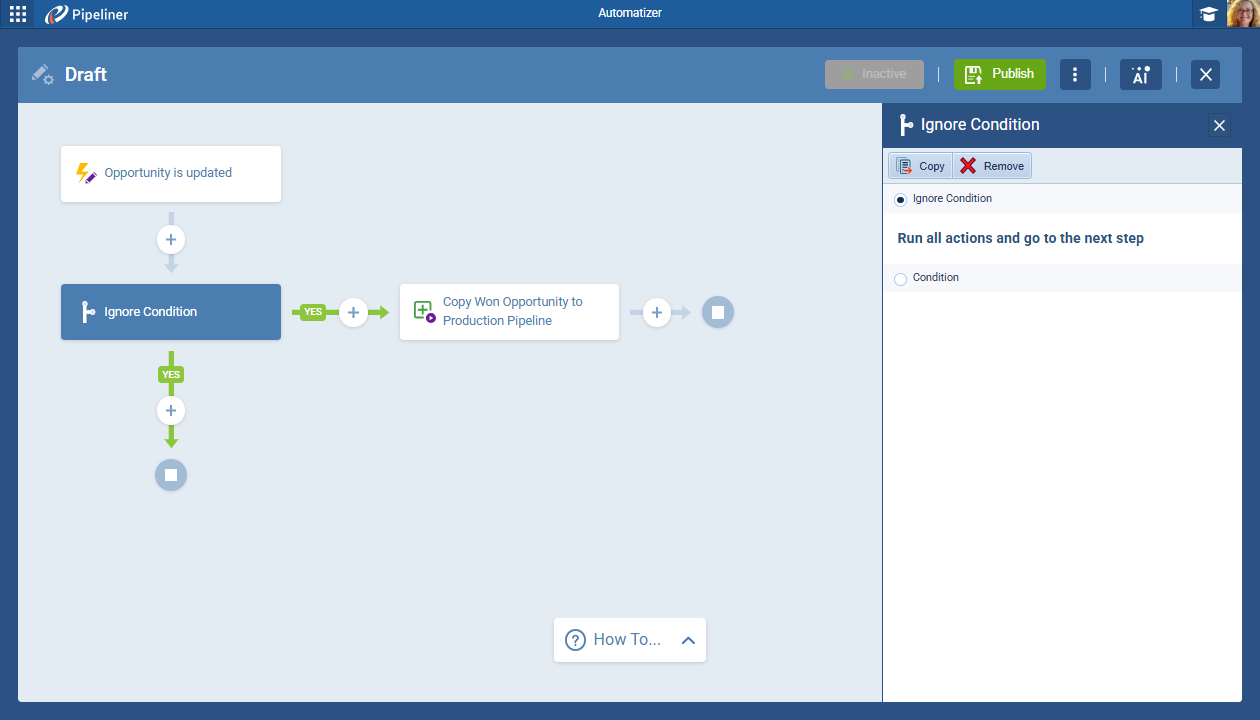
- Condition: The AI should generate a "Condition Name" based on fields and values. If no condition is defined, it defaults to the "Ignore Condition" state.
- Action: At least one action must be defined. The AI generates an "Action Name" based on its type and parameters.
For the 5.20 release (October 2025) the supported functionalities are:
|
Component |
Supported Functionality |
| Trigger | Primary record, PPI trigger. |
| Condition | Full support. |
| Actions | Create Record, Create Related Record, Update Record, Update Related Record, Link Record as Related, Send Email, Archive Record, Enroll/Unenroll in Email Sequence, Trigger Another Process, Copy Record, Change Ownership. |
The AI will respond to the user with questions if there is any ambiguity or the instructions in the prompt are unclear and will help the user to provide clarification. The chat interface displays a history of user prompts and AI responses, similar to the Report AI Agent and, when first opened, the view will scroll to the newest message.
Clicking into the process itself will close the AI side panel — it can be re-opened by clicking on the AI icon in the top right.
The AI generated process can be copied at any point by clicking on the three dots icon.
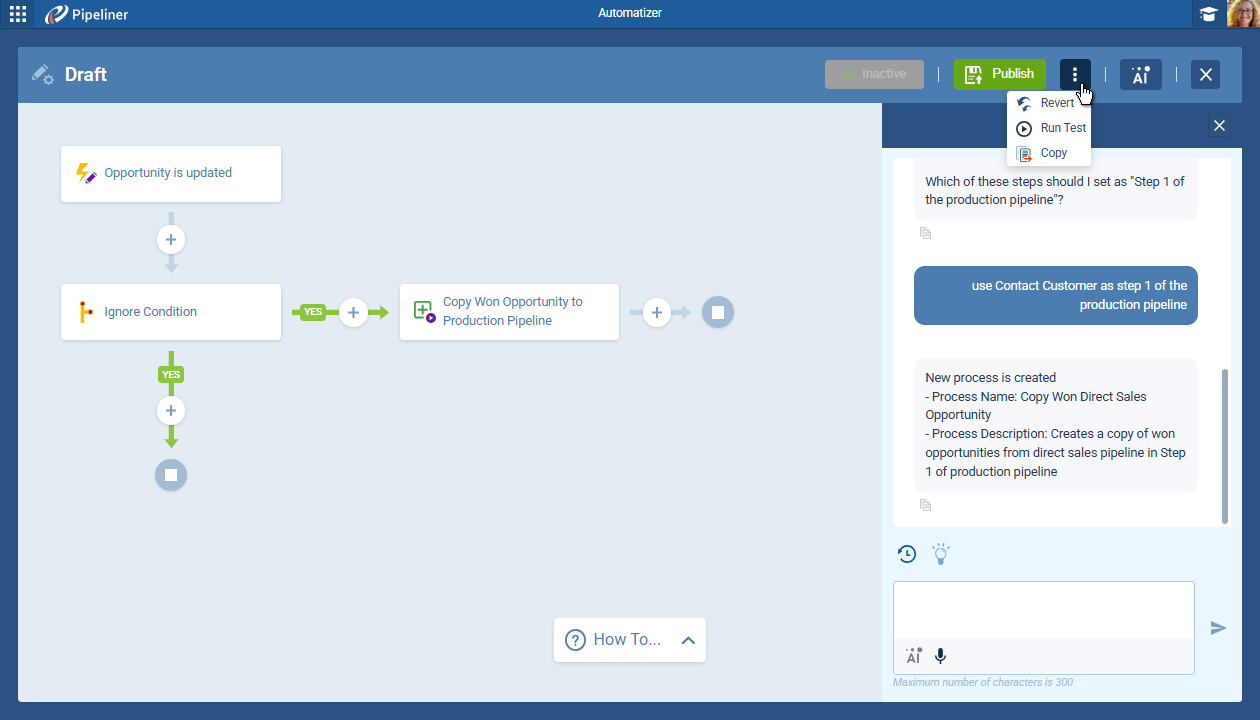
Clicking "Copy" opens the standard "Copy Process" dialog which includes a checkbox "Include unpublished changes to the copy". This is checked by default.
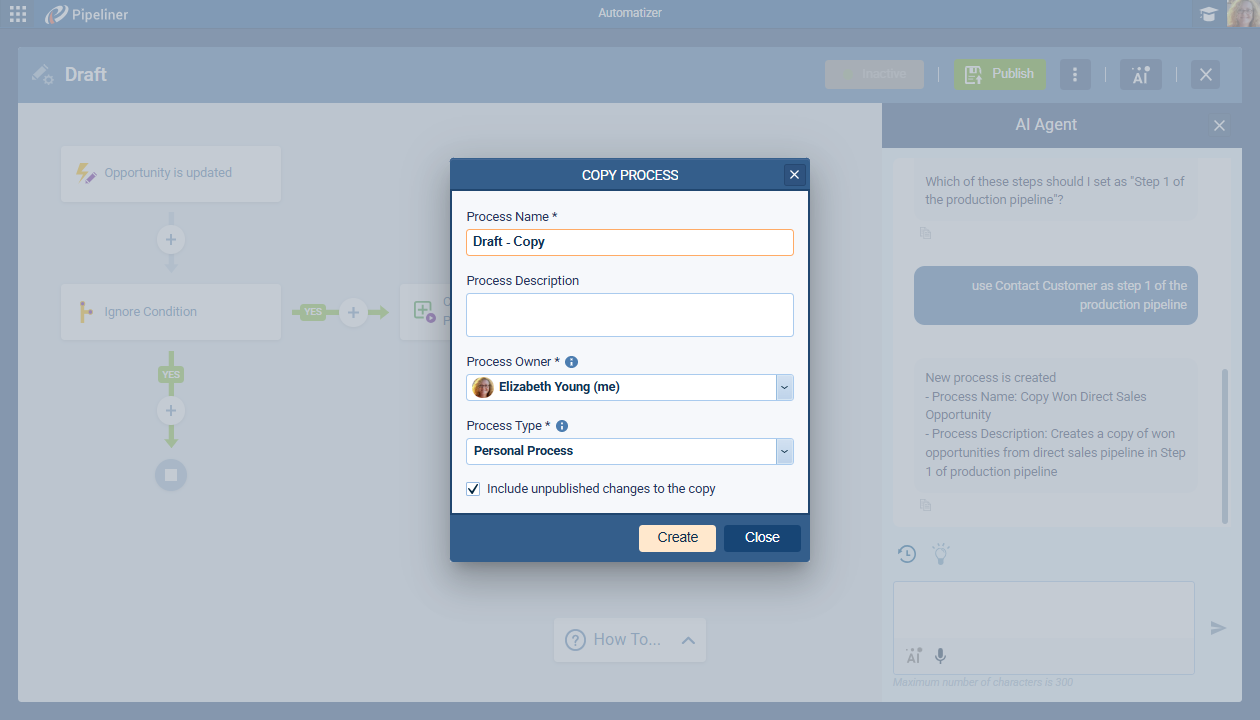
When the user clicks on "Create" a notification appears "A copy of the process has been created" and the new process can be accessed from the Open button in the notification (this opens the new process copy in the same window, triggering a close confirmation for the current process).
Publishing a process
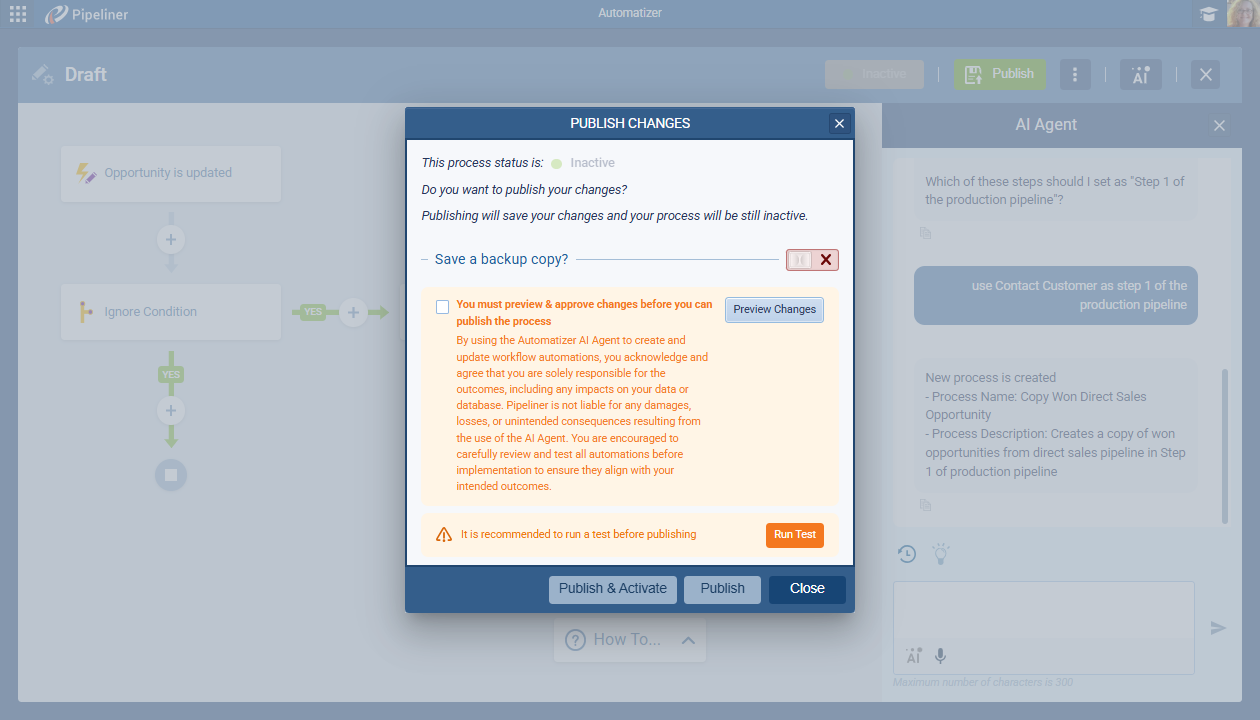
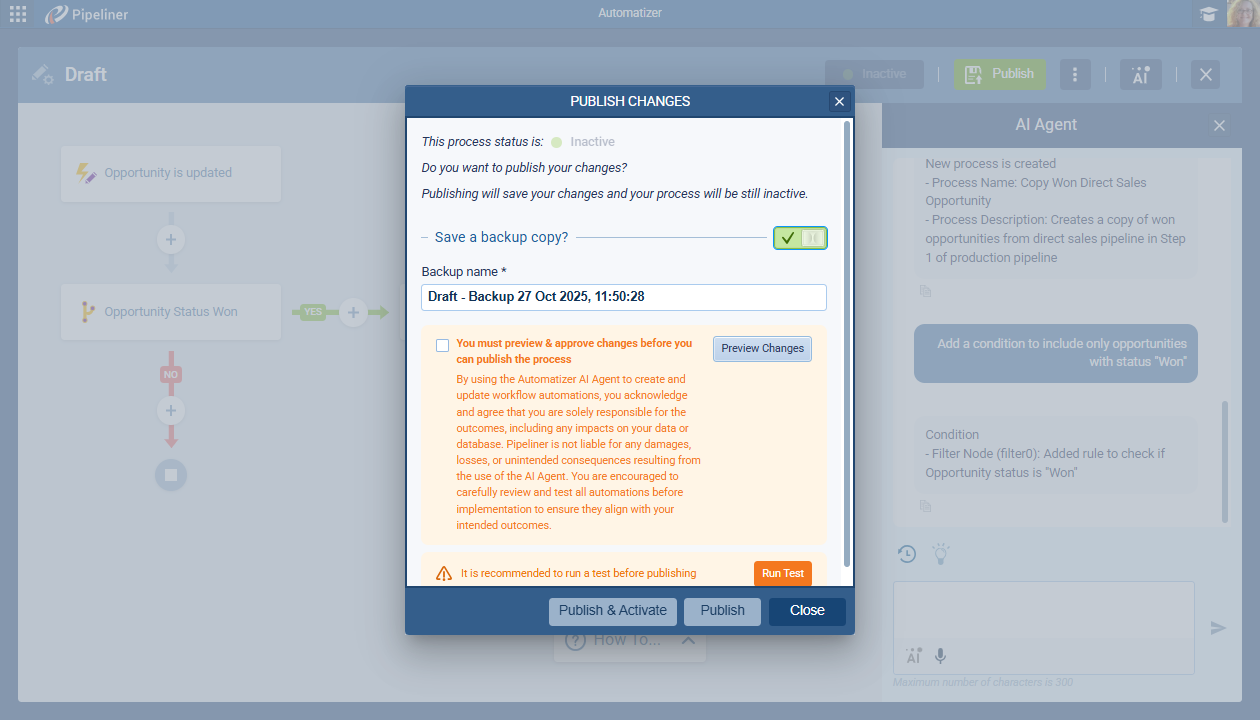
When the user is happy with the draft process, they will click on "Publish". For AI-generated processes, the user must preview and approve the process by ticking the acknowledgement.
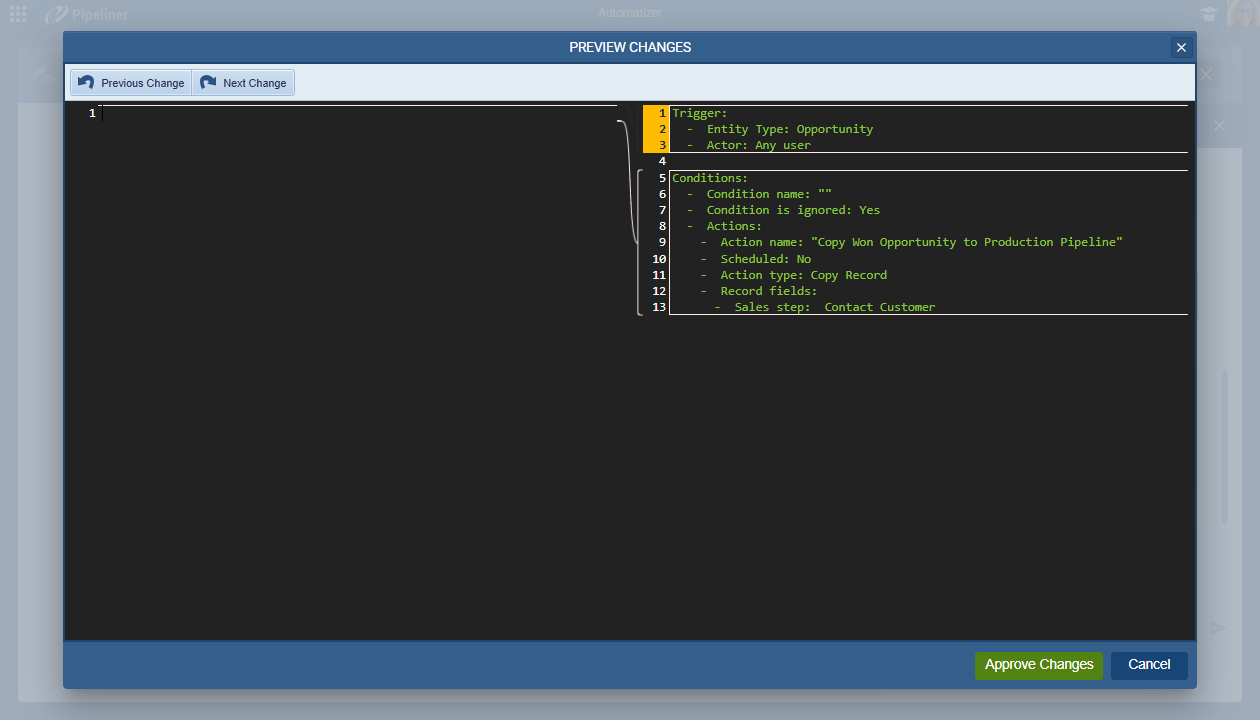
Until the process is approved, the `Publish` and `Publish & Activate` buttons are disabled and the agreement has an orange background. Checking the box opens the "Preview Changes" dialog. The user should review the process steps and then click on "Agree Changes". Once approved, the checkbox appears checked with a green background, and the `Publish` and `Publish & Activate` buttons are enabled.
The "Preview Changes" dialog displays a side-by-side comparison of the published process (left) and the unpublished changes (right). This dialog includes an "Approve" button, visible only if opened via the AI agreement checkbox. Clicking it closes the dialog and enables publishing.
Note that for manually-created processes, users can now access the Preview Changes option to review prior to publishing or publishing and activating as normal.
When publishing, users can opt to create a backup copy of the current process. The toggle to "Save a backup copy?" is OFF by default. When switched on, an input name for the backup copy appears which is pre-filled with " – Backup ".
If selected, the backup copy is created when either the "Publish" or "Publish & Activate" button is pressed. The functionality uses the standard process copy feature without unpublished changes.
Fullsize Screenshots ⤵
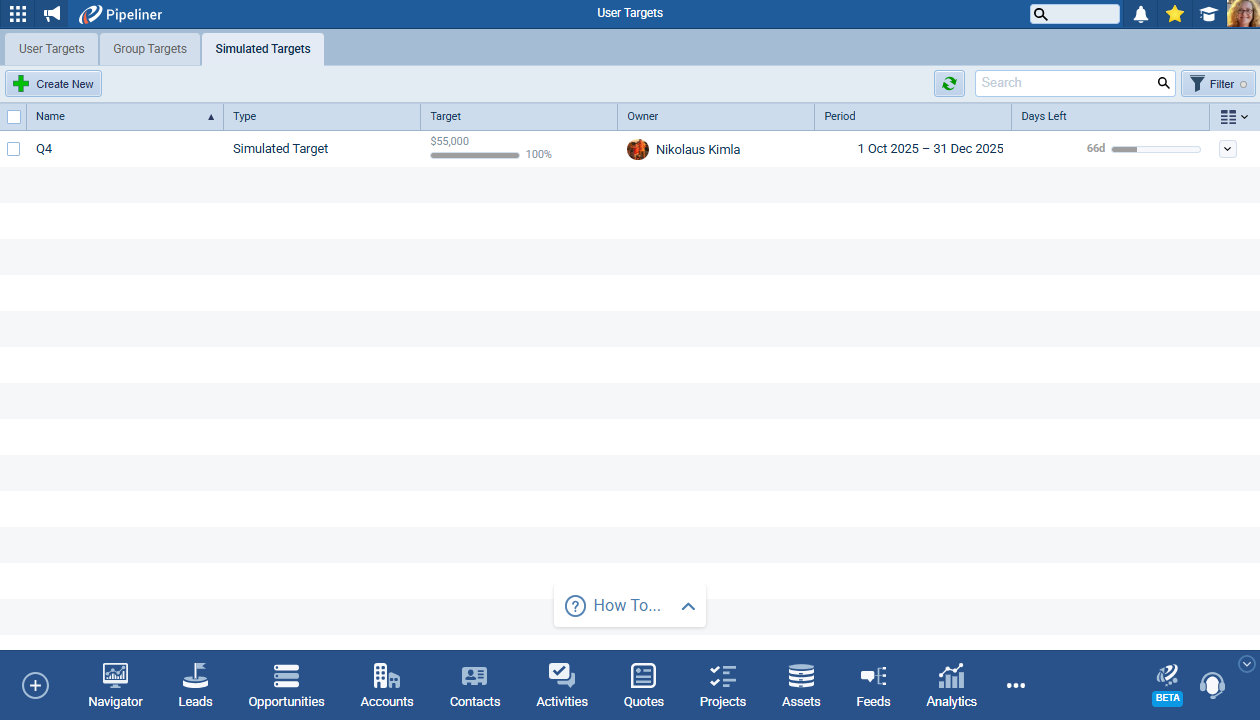
Target
In addition to an improved wizard-driven creation process for User and Group Targets, in this release we have added a new Target type, Simulated Targets, which allow sales managers to model and estimate target performance without being tied to a user’s historical dataData Data is a set of quantitative and qualitative facts that can be used as reference or inputs for computations, analyses, descriptions, predictions, reasoning and planning.. We’ve also added the ability to create targets directly from the Forecast Setup wizard.
Simulated Targets
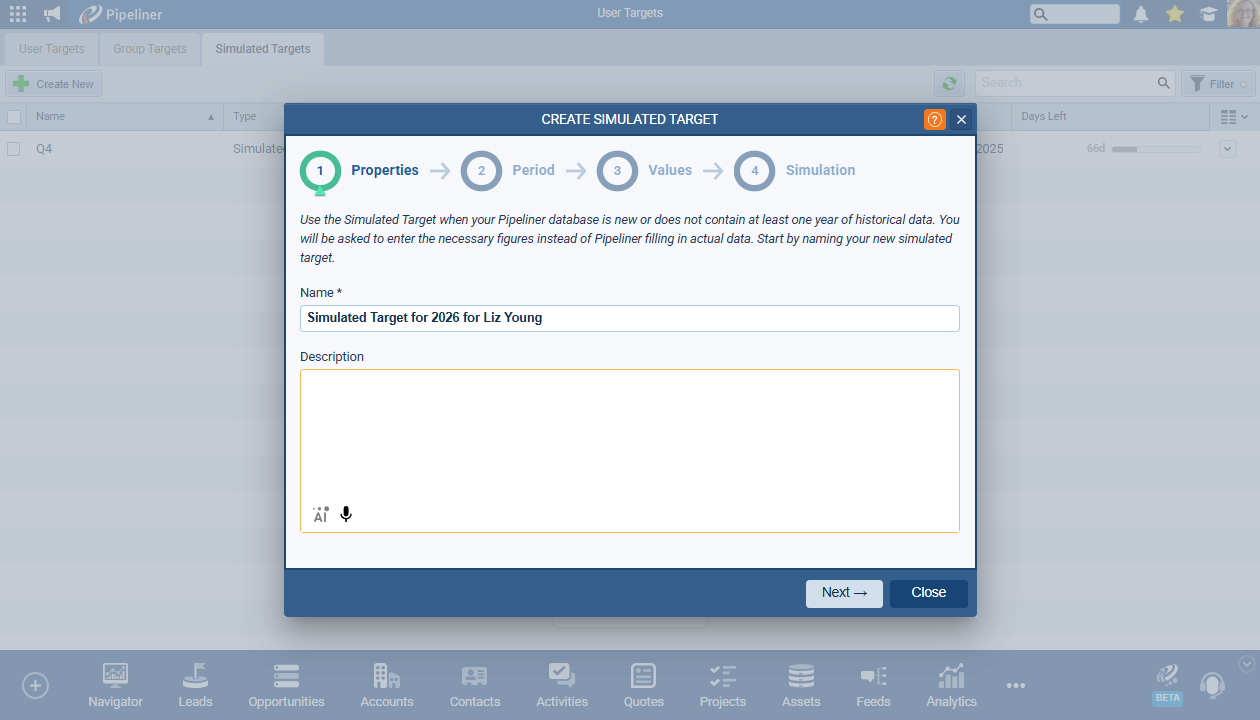
Creating a Simulated Target allows users to fill in input fields for LeadLead Lead refers to a prospect or potential customer (who can be an individual or organization) that exhibits interest in your service or product; or any additional information about such entity. Indicators and/or Opportunity Indicators that simulate historical data to calculate target metricsMetrics Metrics are quantities that are measured and used to:. This is particularly useful when your organisation is new to using Pipeliner or you are setting up a Target for a new user and do not have sufficient historical data on Leads and Opportunities to populate the recommended Target values.
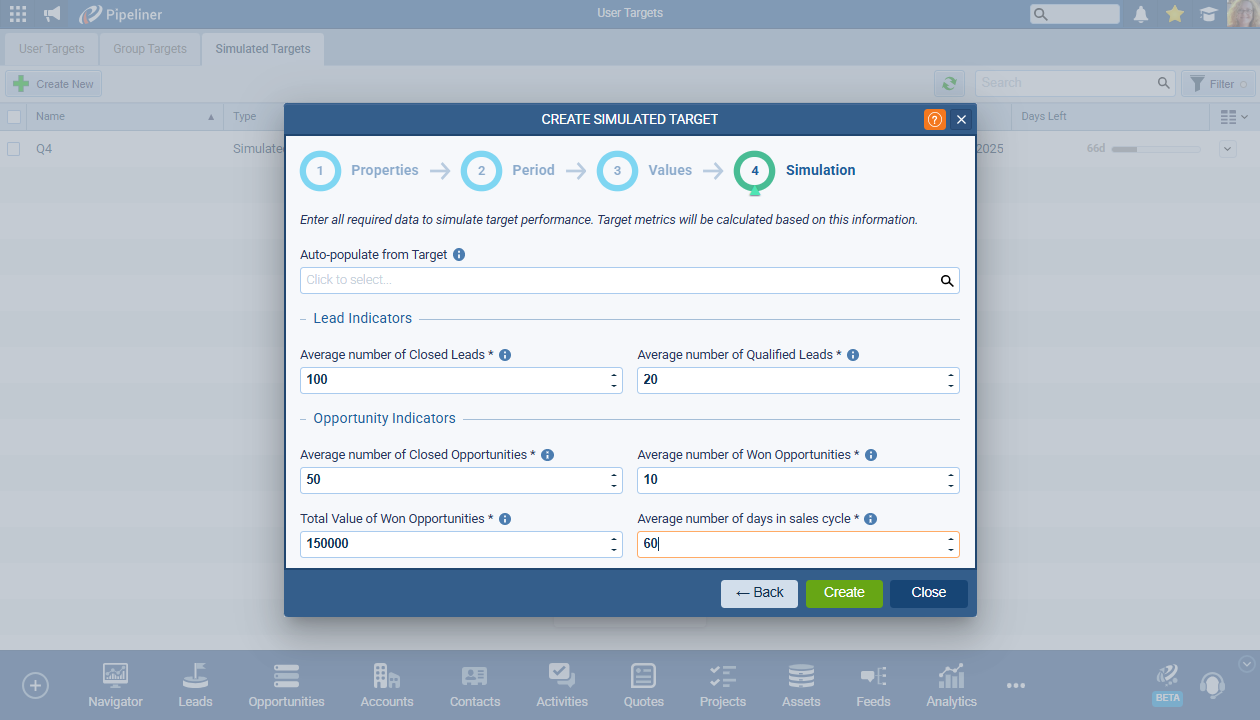
Creating a Simulated Target uses the same four-step wizard as is used for User or Group Targets but the final step 4 “Simulation” is used to enter the simulated data rather than selecting a user or group.
Step 1: Properties — add the simulated target’s name and (an optional) description
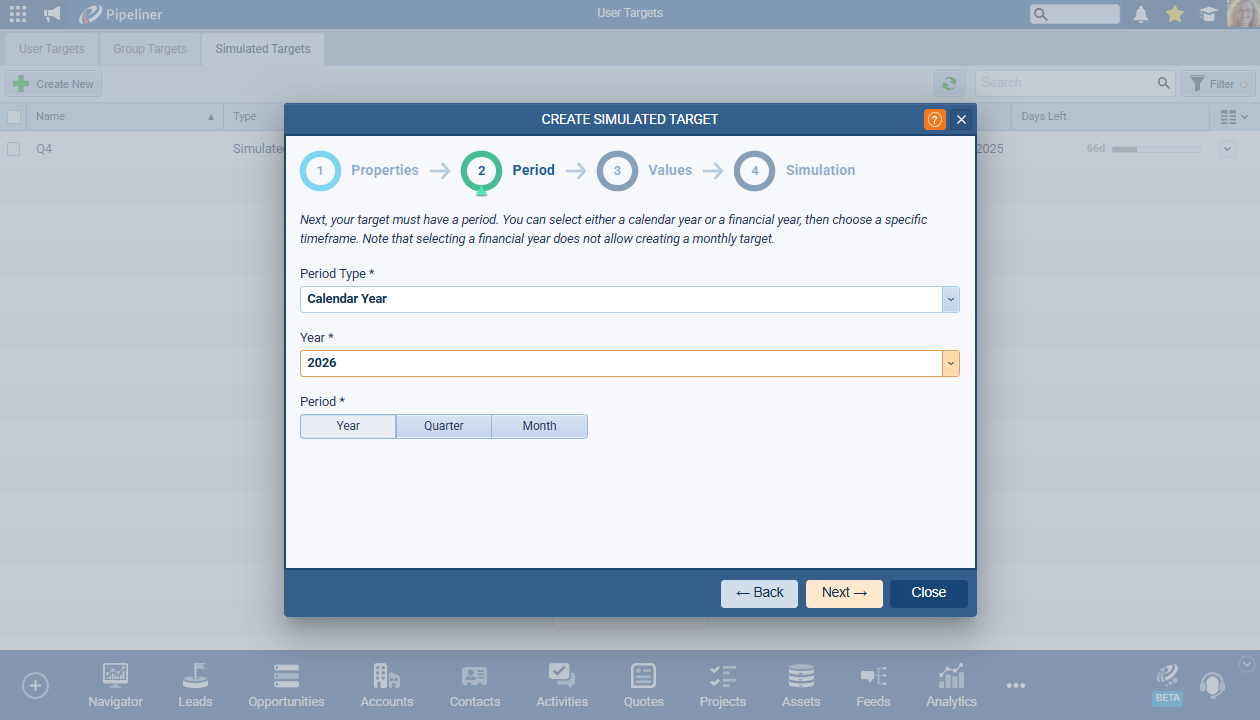
Step 2: Period — select from the Period Type options ‘Calendar Year’ (default) and ‘Financial Year‘ and Period – ‘Month‘, ‘QuarterQuarter Quarter is a three-month period in a company’s fiscal year commonly used to make comparative performance analyses, detect or forecast business trends, report earnings, and pay shareholder dividends.‘, and ‘Year’ (default).
Step 3: Values — choose from the Target Type options ‘Leads Created‘, ‘Leads Qualified‘, and ‘RevenueRevenue Revenue is the amount of money a business generates during a specific period such as a year or a quarter; also called sales.‘ (default) and, if Revenue is selected, the currency for the Target from a dropdown list of enabled currencies.

Step 4: Simulation
Features an “Auto-populate from Target” section, which allows filling indicator fields below with data from a compatible User or Simulated Target. Compatibility is based on settings in the Period and Values steps.
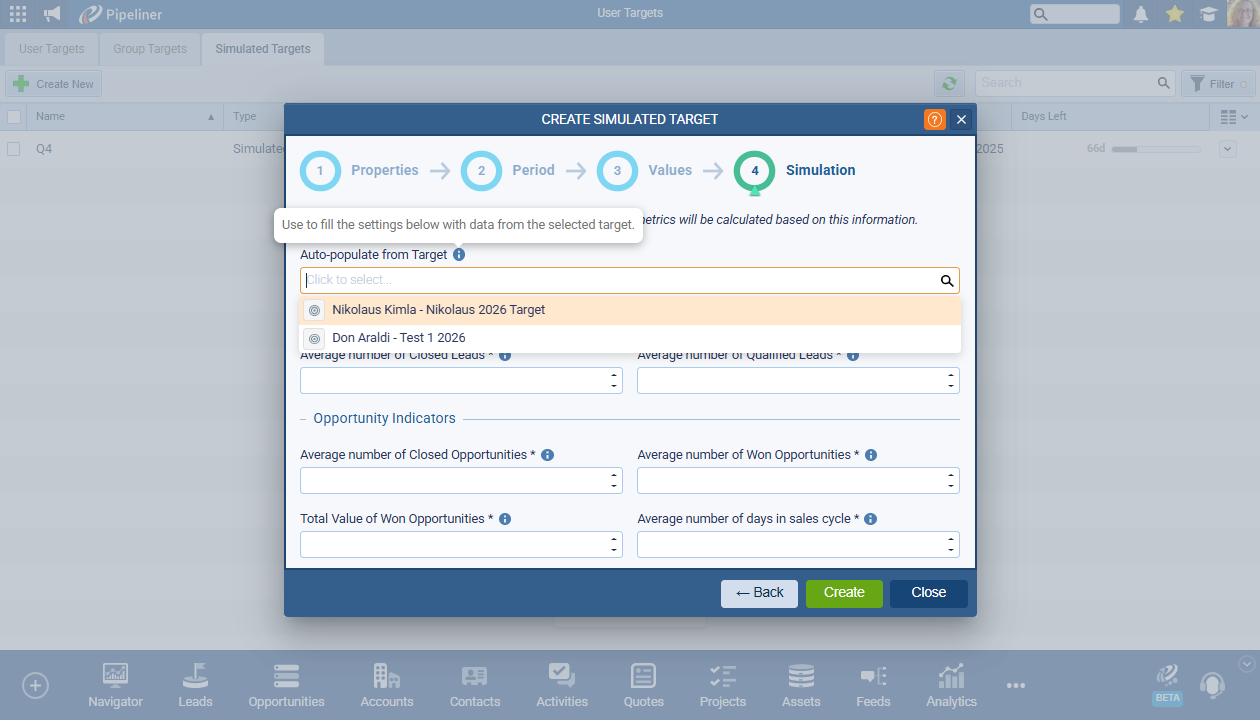
If you don’t have an existing compatible Target that you want to use, you can fill in the input fields for Lead Indicators and Opportunity Indicators to simulate historical data to calculate target metrics. The visibility of fields depends on the selected `Target Type`. Click on “Create” to created the Simulated Target.
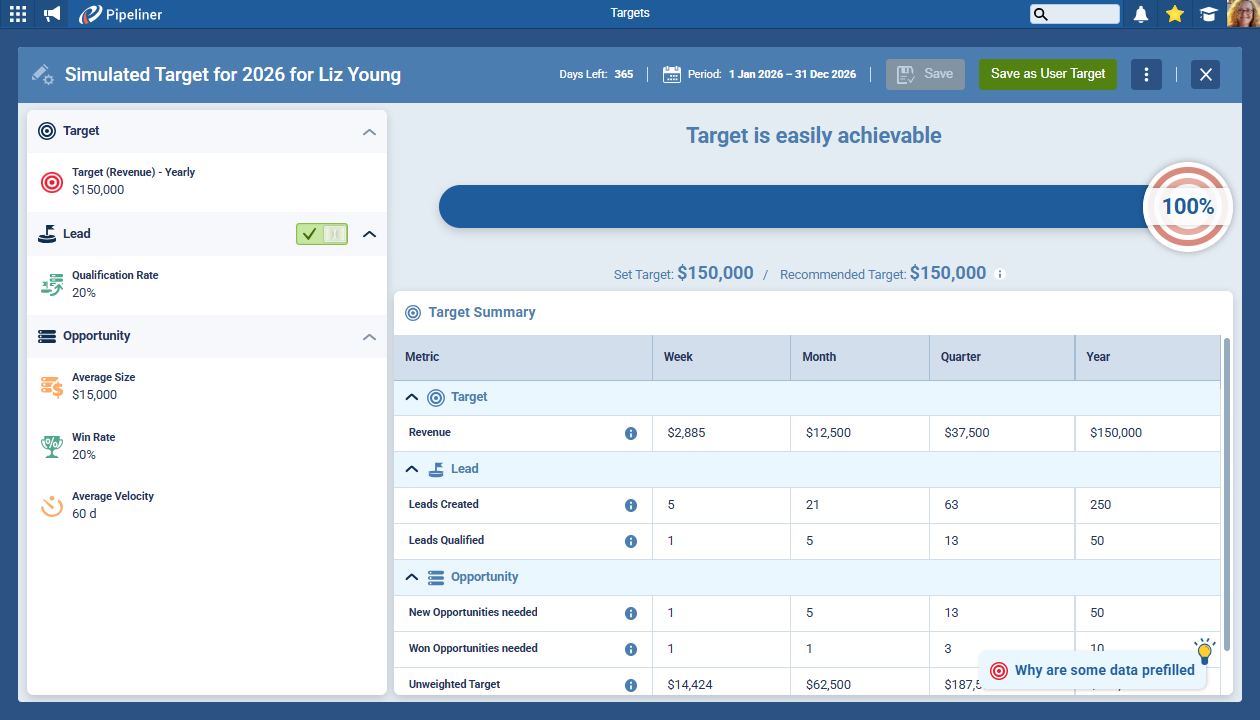
The detail view for a simulated target does not display user or status information, as all simulated targets are considered drafts. The “Activate” button is replaced with a “Save as User Target” button. Clicking this button opens the “Create User Target” wizard, pre-filled with the data from the simulated target. This action creates a new copy of the target as a draft User Target; the original simulated target is not deleted. Data from the simulation step is carried over as “Recommended Values” in the new User Target.
General Target Improvements
We’ve made some updates to the Target Detail view. We’ve removed the “Working Time” section and its related KPIs and reordered the Opportunity metrics in the Target Summary to:
- New Opportunities needed
- Won Opportunities needed
- Unweighted Target
- Unweighted Target by Velocity
The progress bar has been updated with colored background milestones to indicate target achievability.
- Milestones and colors
- 0-49% (Red)
- 50-69% (Orange)
- 70-89% (Yellow)
- 90-100% (Green)
- 101%+ (Blue)
- A grey color is used when there is not enough data.
As the slider moves, it fills the bar with a solid color, and the validation text changes upon passing a milestone. We’ve also changed the labels of the validation text to make them clearer:
- “Target” is renamed to “Set Target“
- “Estimated Target” is renamed to “Recommended Target“
- “Reload Estimated Values” is renamed to “Reload Recommended Values“
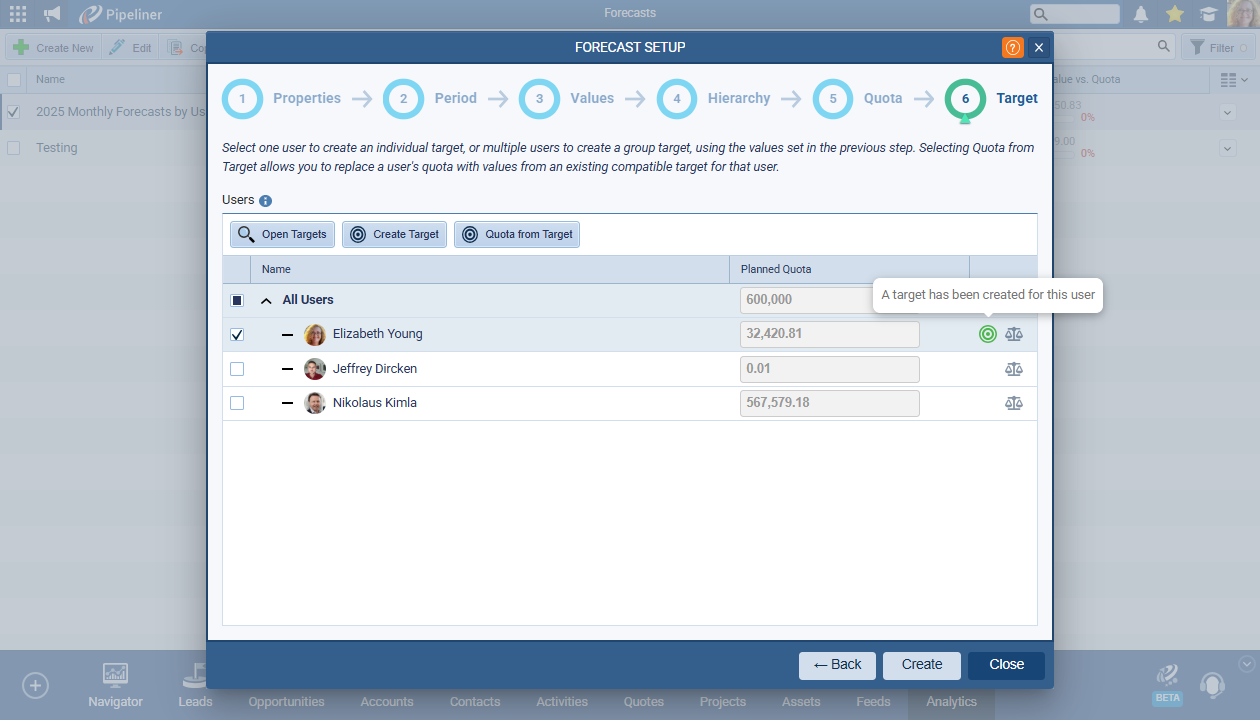
Forecast Setup Wizard Integration
A new sixth step, “Target“, is added to the Forecast Setup wizard.
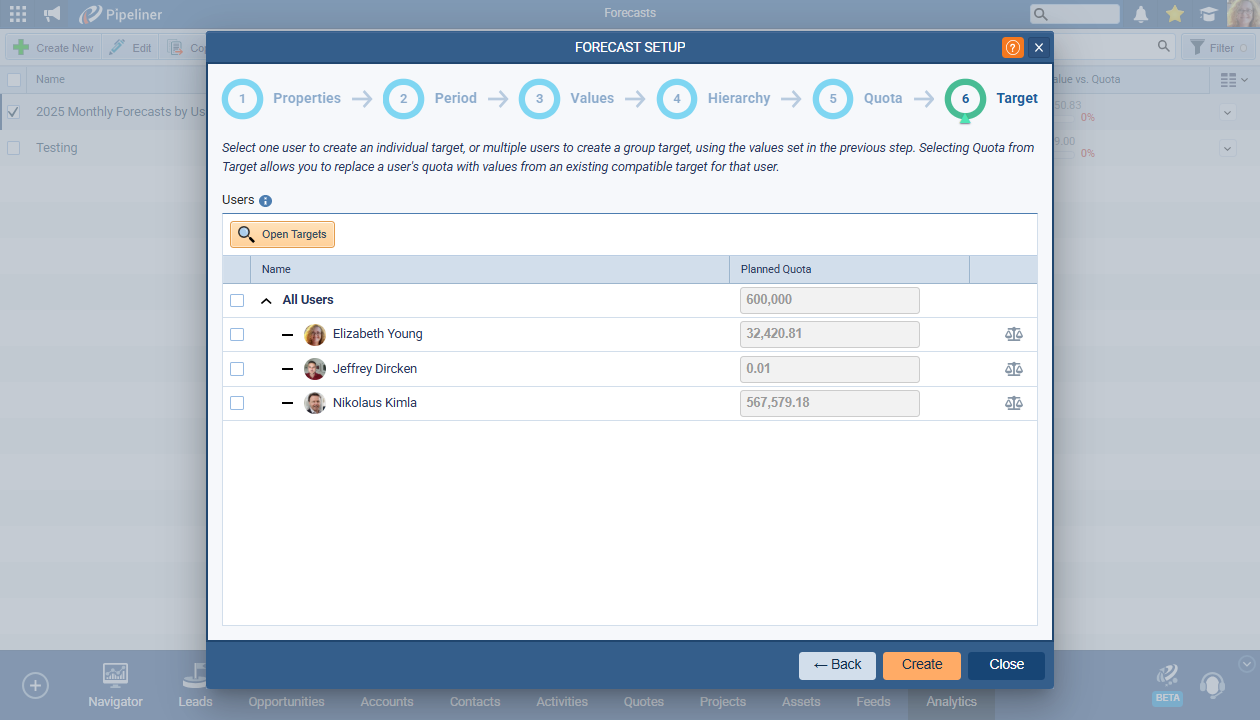
In the Target step, domain actions appear based on user selection:
- Open Targets: Always visible and opens Targets in a new tab.
- Create Target: Visible when 1 user is selected. Opens a pre-filled Create User Target wizard.
- Create Group Target: Visible when 2 or more users are selected. Opens a pre-filled Create Group Target from Users wizard.
- QuotaQuota Quota is a predefined benchmark indicating the amount of sales a selling unit such as a sales rep or a regional sales team should achieve within a given period, often used as a measure of success, performance and eligibility for commissions and other rewards. from Target: Visible when 1 user is selected; replaces their quota with data from an existing compatible target.
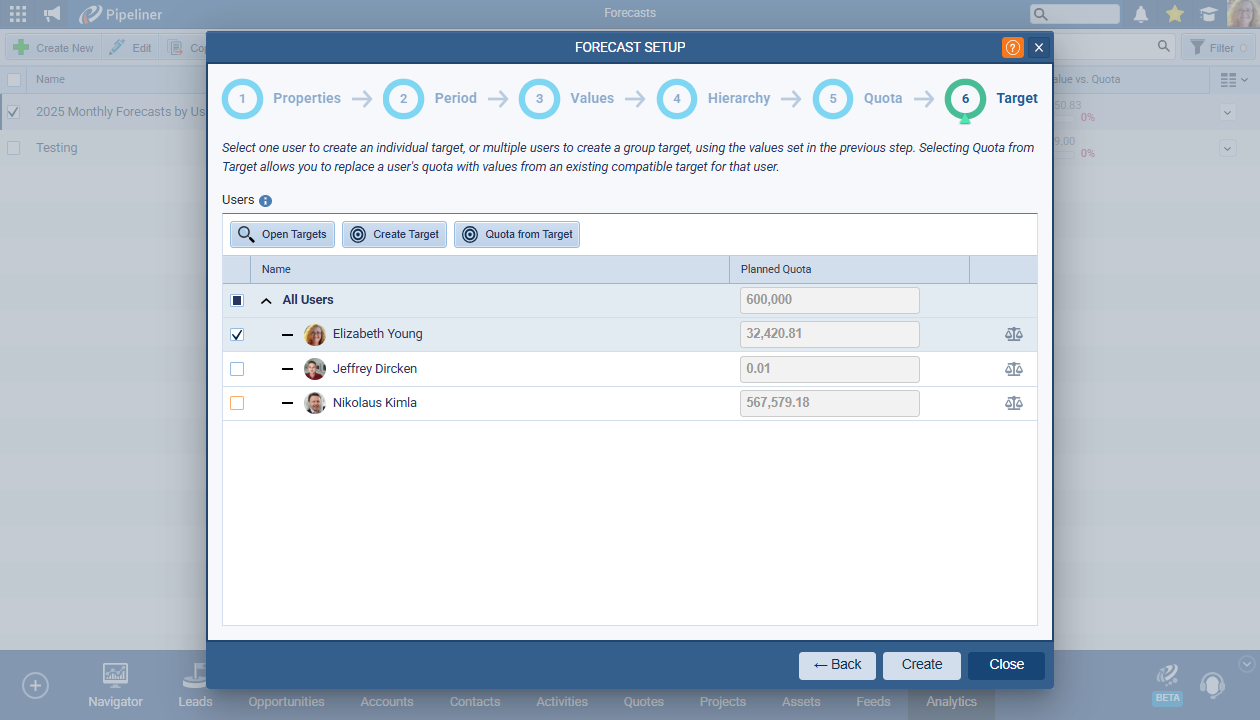
An icon will appear next to a user’s name to indicate that a target has been created for them during the current wizard session.
Forecast & Target Compatibility
The Target step during the creation of a forecast is only enabled if users are included in the forecast hierarchy and Forecast Period settings are compatible with Target Period settings. Targets created from forecasts will always have Period Type set to ‘Calendar Year‘. If compatibility checks fail, the Target step will display a placeholder instead of the user list. The user can still skip the step and create the forecast.
Period Settings Compatibility Table
- Forecast Start and End Date must be within the same calendar year
- Full settings compatibility for 2025 as an example is shown in the table below
|
Created Forecast Period Settings |
Created Target Period Settings |
||||
|
Forecast Period |
Forecast Start Date | Forecast End Date | Target Year | Target Period (1st setting) |
Target Period (2nd setting) |
|
Monthly |
January, 2025 | December, 2025 | 2025 | Year |
– |
| Monthly | January, 2025
Any month |
January, 2025
Same month |
2025 | Month | January
Same month |
| Monthly | January, 2025 | March, 2025 | 2025 | Quarter | Q1 |
| Monthly | April, 2025 | June, 2025 | 2025 | Quarter | Q2 |
| Monthly | July, 2025 | September, 2025 | 2025 | Quarter | Q3 |
| Monthly | October, 2025 | December, 2025 | 2025 | Quarter | Q4 |
| Quarterly | Q1, 2025 | Q4, 2025 | 2025 | Year | – |
| Quarterly | Q1, 2025 | Q1, 2025 | 2025 | Quarter | Q1 |
| Quarterly | Q2, 2025 | Q2, 2025 | 2025 | Quarter | Q2 |
| Quarterly | Q3, 2025 | Q3, 2025 | 2025 | Quarter | Q3 |
| Quarterly | Q4, 2025 | Q4, 2025 | 2025 | Quarter | Q4 |
| Yearly | 2025 | 2025 | 2025 | Year | – |
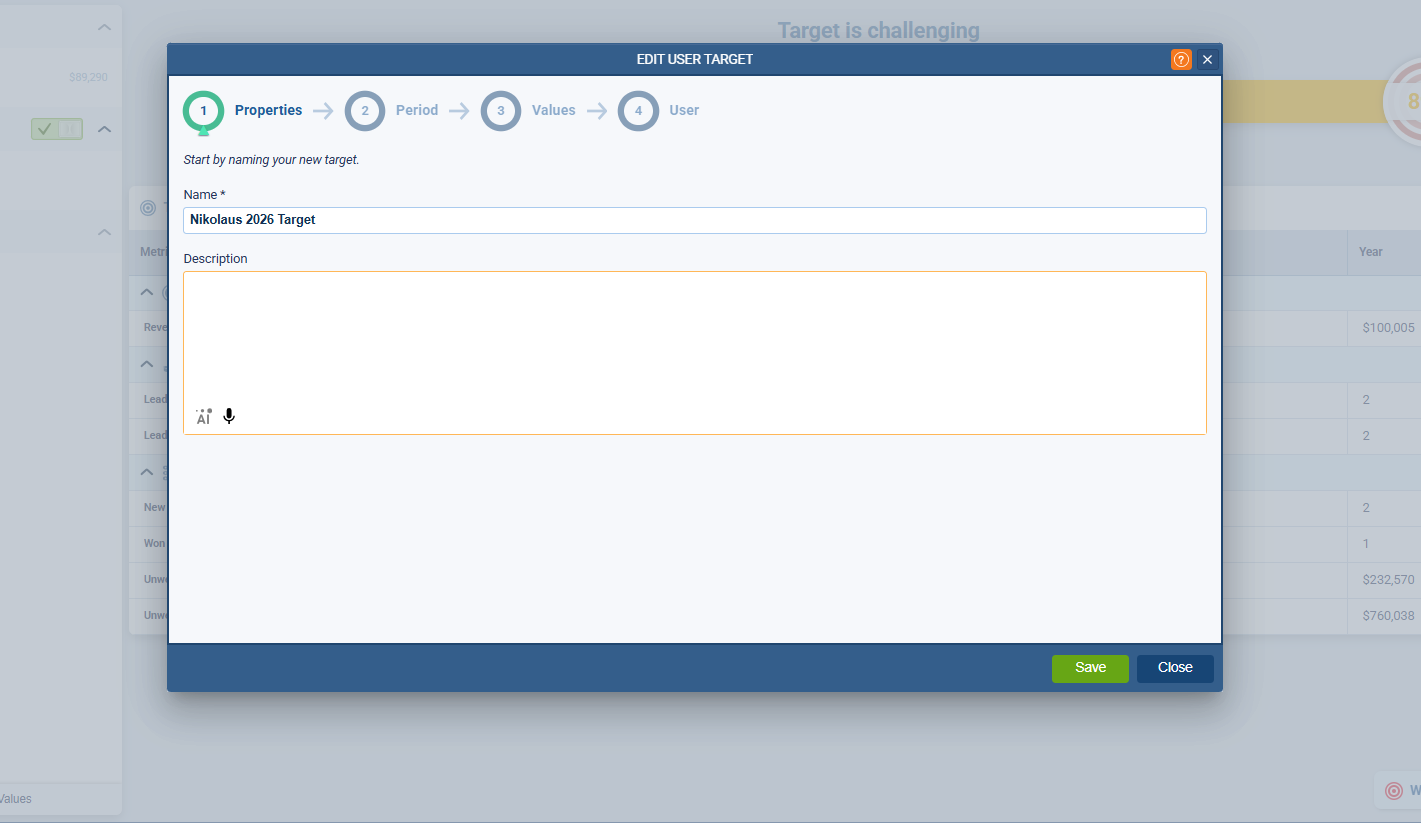
Create User Target Wizard
The Target creation process is restructured into four steps:
- Properties
- Period
- Values
- User
The User selector has been moved from the first step to the new final “User” step.
The PipelinePipeline Sales pipelineis a visual representation of the stage prospects are in the sales process. / Lead process selector has been moved from the “Properties” step to the “Values” step.
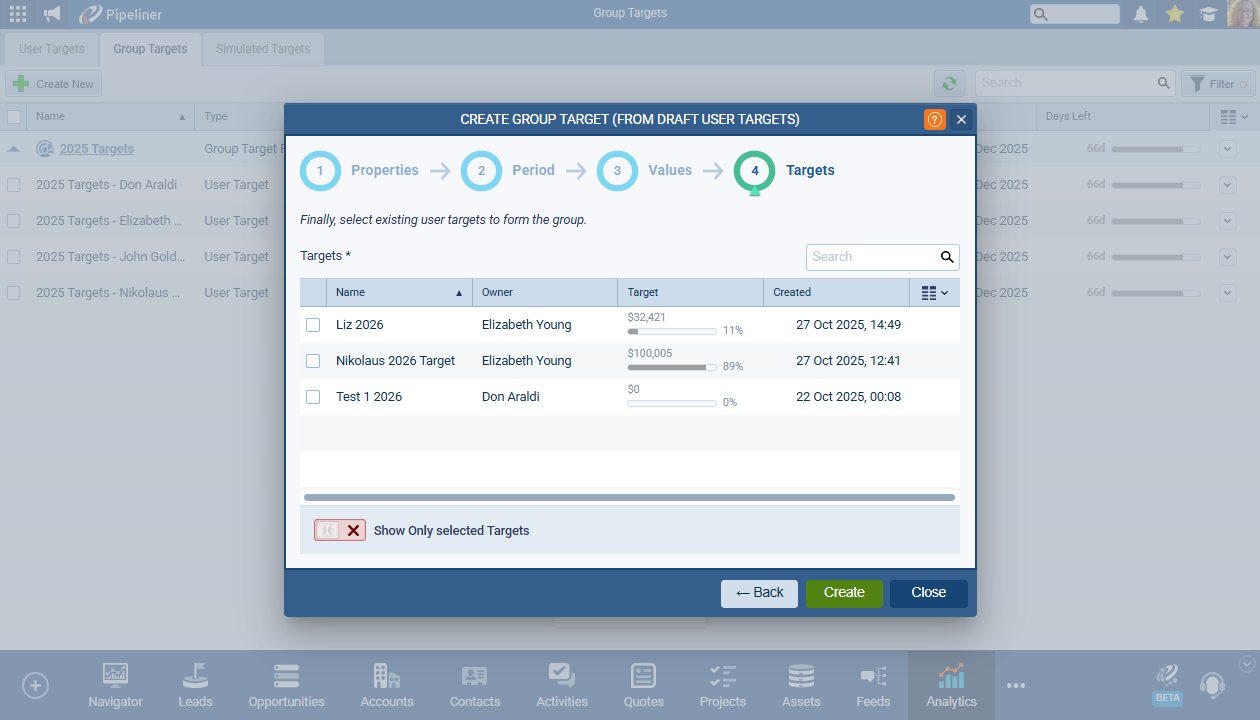
Create Group Target Wizard
The wizard flow adapts based on whether the group target is created from a selection of users or a selection of existing targets. The wizard steps are as follows:
|
Step |
Group Target from Users |
Group Target from Targets (both Draft and Active) |
| 1 | Properties | Properties |
| 2 | Period | Period |
| 3 | Values | Values |
| 4 | Users | Targets |
The wizard flow adapts based on the creation context (from Users or from existing Targets). The fourth step is either “Users” or “Targets” accordingly. When creating from existing targets, the final step replaces the previous target selection dropdown with a full grid. This new grid includes multi-selection, search, configurable columns, and a toggle to “Show only selected Targets“.
Fullsize Screenshots ⤵
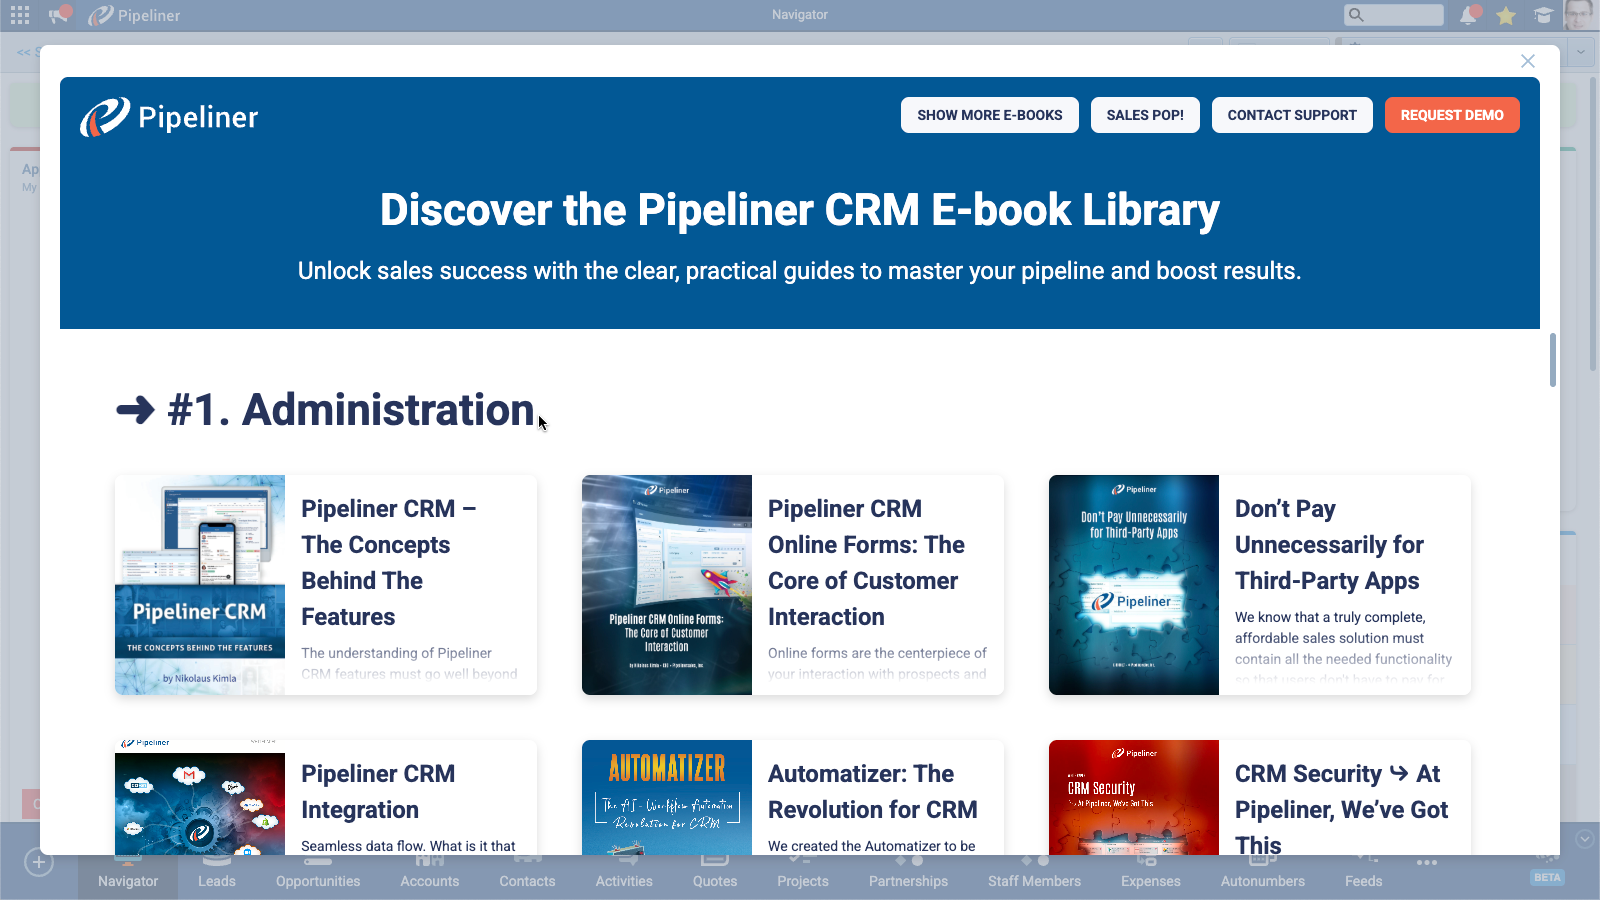
E-Book Library
We’ve added another new item, “E-book Library,” to the University dropdown menu.
Clicking the “E-book Library” item opens the main library window giving access via a PDF viewer to a comprehensive suite of E-books from the Pipeliner Library. From the Library, you can also click on buttons to:
- Request demo
- Contact support
- Access Sales POP!
- Show More E-books
Fullsize Screenshots ⤵
Various Improvements
As part of our ongoing usability enhancement program, we've updated the following features.
Managing Exchange Rate Updates
This release introduces a new workflow for updating currency exchange rates within the Admin section. It provides administrators with the choice to either retroactively apply new rates to all active records or to maintain historical values, ensuring data integrity while offering flexibility.
When an Exchange Rate List is updated and saved, the Admin can choose between two options for handling the update:
- "Update all currency fields on active records": This option triggersTriggers Triggers are a set of signals or occurrences that meet certain criteria to be considered an opportunity to make a sale. a backend process to recalculate currency fields on all records that are not in a "Won," "Lost," or "Archived" state. "Active records" are defined as all records based on Entities in the Admin section.
- "Don't update currency fields": This option saves the new exchange rates but does not apply them to existing records. The new rates will only be used for records created or updated going forward.
A "Finish" button confirms the selected option, and a "Cancel" button closes the dialog without saving.The "Save" button in the Exchange Rate List will be disabled if no changes have been made to the rates.
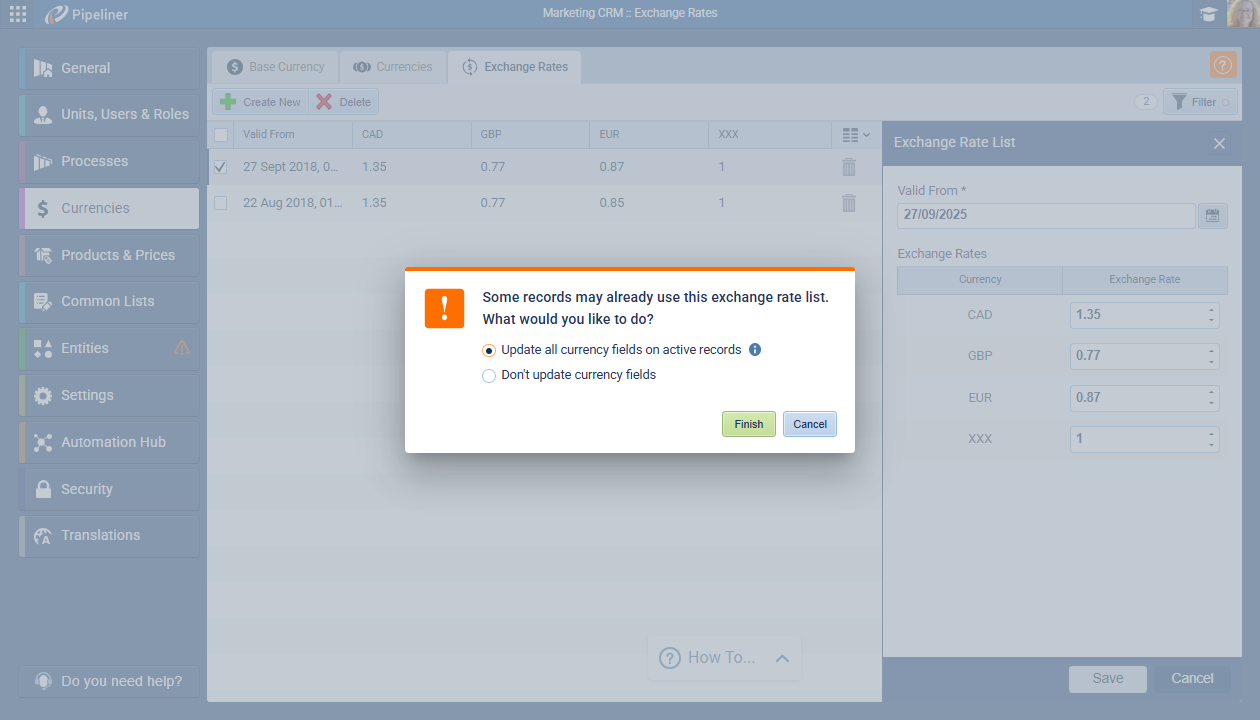
If the user makes changes to the exchange rates and then clicks the "Cancel" button for the main list view, a confirmation dialog "Do you want to save modifications?" will appear which offers "Yes," "No," and "Cancel" options.
Copy button available in all views
This feature adds a "Copy" action to various list and detail views across the application. This allows users to duplicate a single selected record without needing to open its full detail view, streamlining data entry for similar records. Note that batch copy for multiple records is out of scope.
The visibility of the "Copy" action is controlled by user role permissions for each entity. If the "Copy" permission is unchecked for a specific entity in the user role settings, the button will not be displayed.
The "Copy" domain action has been added to the following application views:
Leads
- List View
- Compact View
- Board View
- Map View
Opportunities
- List View
- Compact View
- Pipeline View
- Map View
- Bubble Chart View
Accounts
- List View
- Compact View
- Matrix View
- Map View
Contacts
- List View
- Compact View
- Map View
Activities (Tasks & Appointments)
- List View
- Taskboard View
- Calendar View
- Task Detail
- Appointment Detail
Projects
- Default View (Grid View)
Email Sequences/Automatizer
- Default View (Grid View)
Quotes
- All views
Custom Entities
- List views
Drilldowns
- The copy action should be available within drilldown views where applicable.
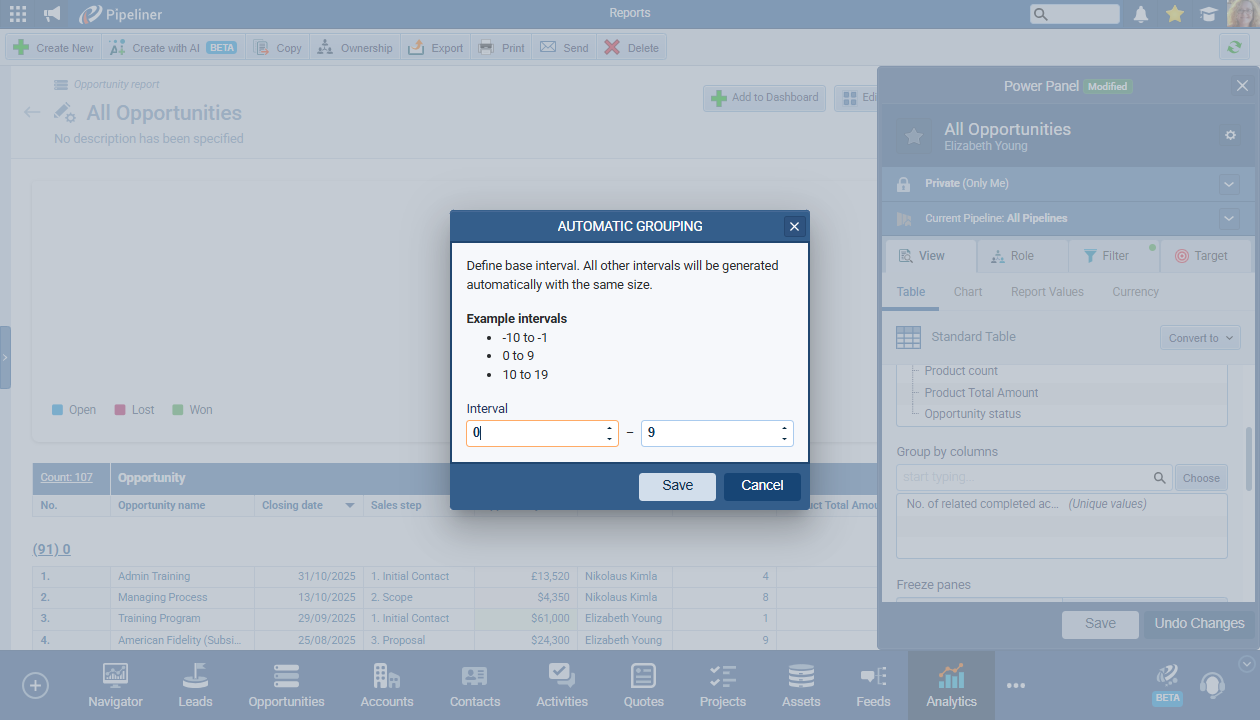
Report Grouping by numeric fields
This feature enhances reporting capabilities by introducing advanced grouping options for all numeric "Value" fields (Integer, Float, Currency, Currency Foreign). Users can now group data by unique values, automatically generated intervals, or manually defined custom intervals, providing more powerful data analysis in Spreadsheet and Pivot reports.
The new grouping options will be available for all System, Custom, and Virtual fields of type Integer, Float, Currency, and Currency Foreign. These options are accessible in the "Group by" columns for Spreadsheet reports and in "Rows" and "Columns" for Pivot reports. For any selected "Value" field, a dropdown will offer three grouping methods: "Unique Values," "Automatic Grouping," and "Manual Grouping."

Grouping Options
Unique Values –
- This is the default behavior. Each record is grouped by its exact field value. The currency symbol is ignored for grouping purposes.
Automatic Grouping
- This option automatically generates a continuous list of equally sized intervals.
- A configuration dialog allows the user to define a base interval by setting its start and end values. All other intervals are generated based on the size of this base interval.
- Default base intervals are:
- 0-9 for Integer fields.
- 0-10 for Float fields.
- An example of the generated intervals is displayed (one before the base, the base interval, and one after).
- For integer fields, intervals are inclusive of both start and end values.
- For float fields, intervals are inclusive of the start and exclusive of the end.
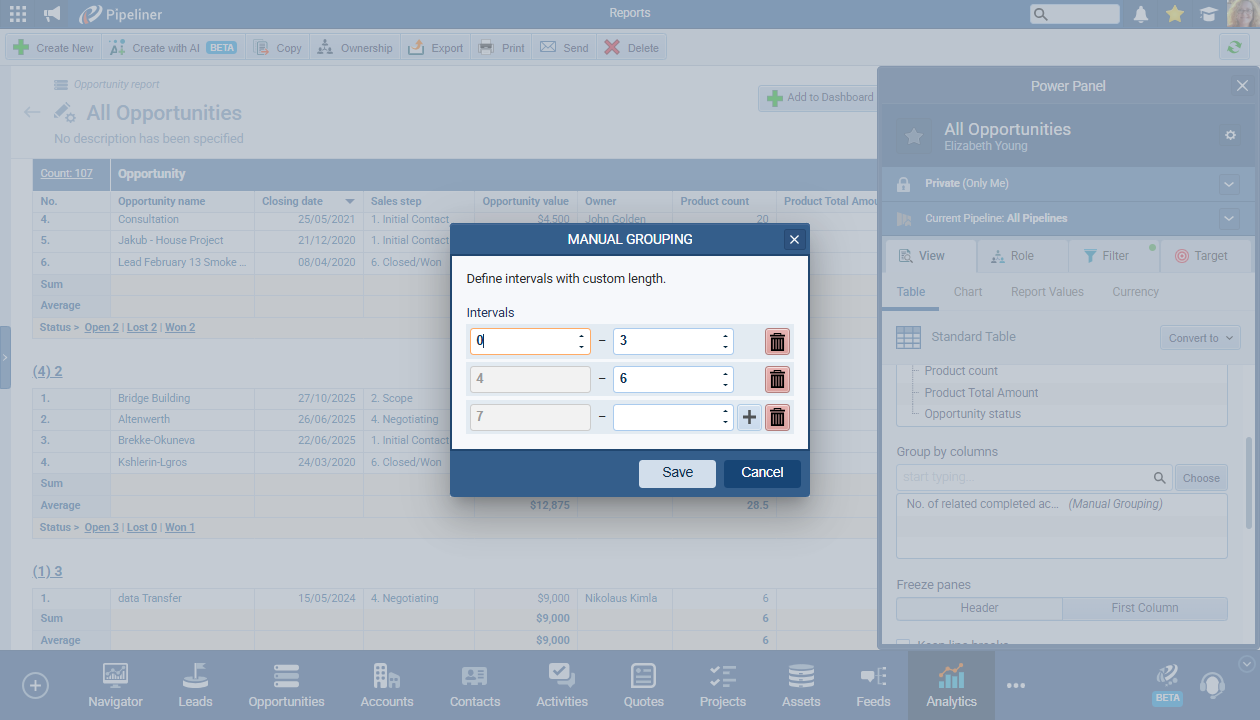
Manual Grouping
- This option allows the user to define one or more value intervals with custom lengths.
- By default, a single interval covering all values (-inf to inf) exists.
- Users can add new intervals. An "Add" action is enabled on the last interval if its end value is defined.
- Users can remove intervals. A "Remove" action is present on all intervals and is enabled when two or more intervals exist.
- Validation: The end value of an interval must be greater than or equal to its start value.
- Behavior on adding a new interval:
- Integer fields: The start of the new interval is the next integer after the end of the previous one.
- Float fields: The start of the new interval is the same as the end of the previous one.
- The first interval can have an undefined start (-inf), and the last interval can have an undefined end (inf).
Grouping Naming Conventions within Reports
Integers:
- Standard interval: `[interval_start] to [interval_end]`
- Undefined start: `Less than [interval_end + 1]`
- Undefined end: `[interval_start – 1] +`
Floats:
- Standard interval: `[interval_start] to [interval_end – 0.01]` (or appropriate decimal precision)
- Undefined start: `Less than [interval_end]`
- Undefined end: `[interval_start] +`
Preselect AI default languages by General Language Setting
This feature improves the user experience for AI-powered functionalities by automatically pre-selecting the language in various AI tools based on the user's general language setting in their personal profile. This eliminates the need for users to manually select their preferred language each time they use an AI feature.
The system will read the selected language setting from the user's "Personal" settings page and apply the chosen language as the default pre-selected language in the language dropdowns of all specified AI features.

The language pre-selection logic is implemented in the following locations:
- Speech to Text (Rich Text Editor)
- Email Generator (Rich Text Email Editor)
- Online Forms AI Agent
- Document Summary
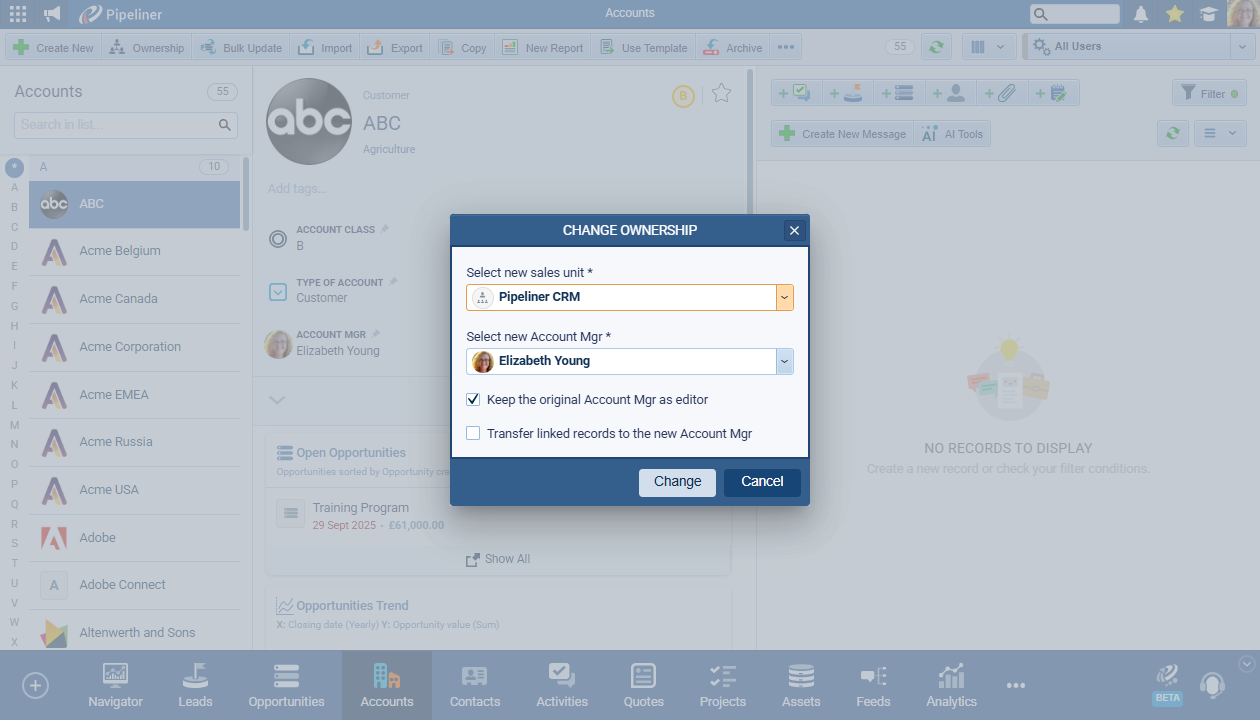
Translations: Support for more "Owner" markers
This feature extends the translation capabilities of the application to the "Owner" label. When an administrator renames the "Owner" field for a specific entity in Admin Translations, the new term will be reflected consistently across various UI components, including record detail views and the "Change Ownership" dialog. If no custom translation is set for an entity, the default label "Owner" should be used.
![]()
The new, translated "Owner" label will be applied to the following areas:
Record Detail View
The label next to the owner's name in the "Team" or "Ownership" section of a record's detail view. For example, "Owner" is translated to "AccountAccount Account refers to a record of primary and background information about an individual or corporate customer, including contact data, preferred services, and transactions with your company. Mgr".
Change Ownership Dialog
The labels within the "Change Ownership" dialog also use the translated term. For example:
- "Select new Account Mgr"
- "Keep the original Account Mgr as editor"
- "Transfer linked records to the new Account Mgr"
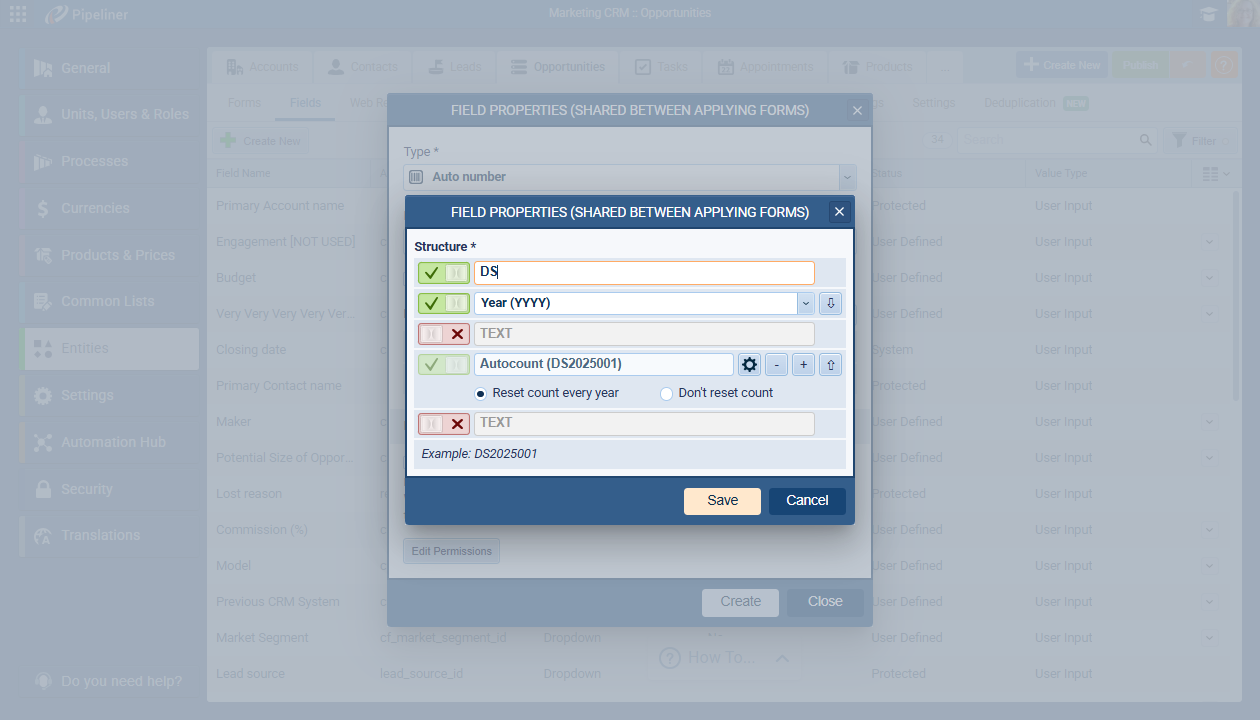
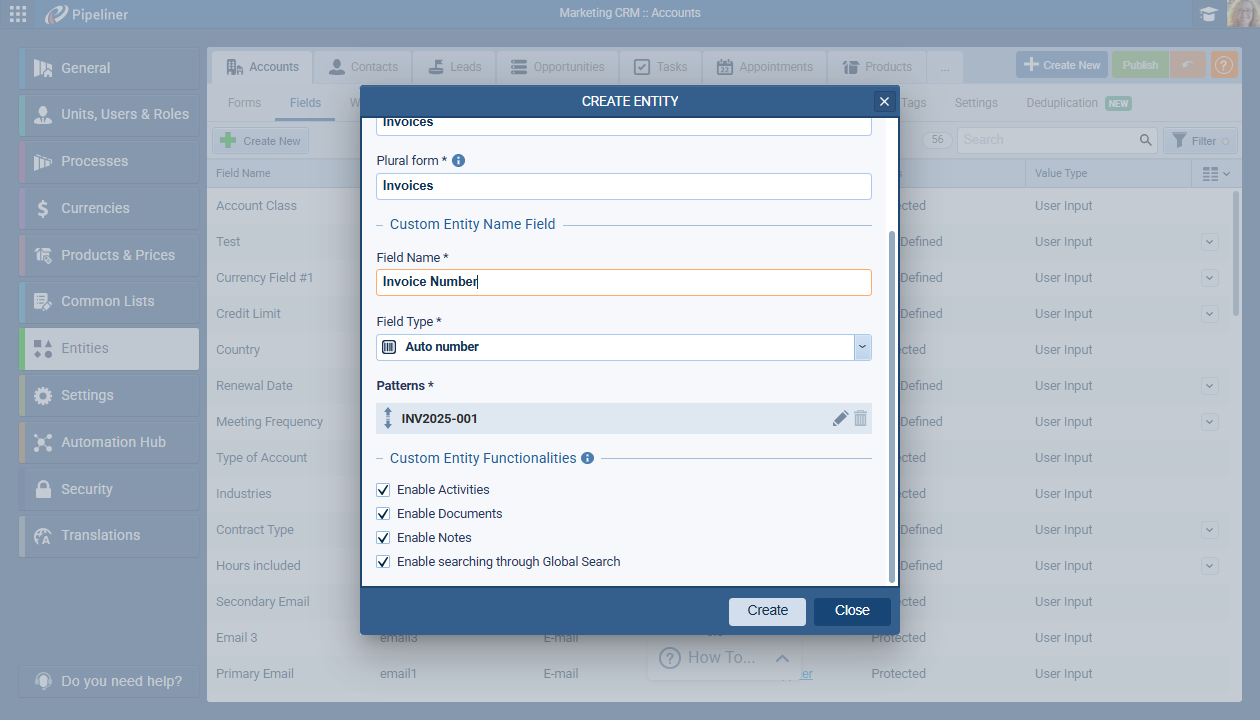
Autonumbering — Custom Patterns
This feature overhauls the Auto number field functionality, replacing the single "Structure" definition with a more powerful, filterable "Patterns" system. This allows for multiple, conditional auto-numbering formats to be applied based on record data, providing greater flexibility for complex numbering requirements. The changes apply to both standard custom fields and the name field of custom entities.
Check our Knowledge Base article to get more information about the Autonumbering
Creating a New Auto number Field
1. Patterns Section
- The "Structure" section is replaced with a "Patterns" section.
- By default, a single, non-deletable "base pattern" is present. This serves as the fallback if no other pattern's filter conditions are met.
- The default "base pattern" can be edited by clicking on the pencil icon.
- An "+Add" button allows users to add new, conditional patterns. New patterns are added to the top of the list.
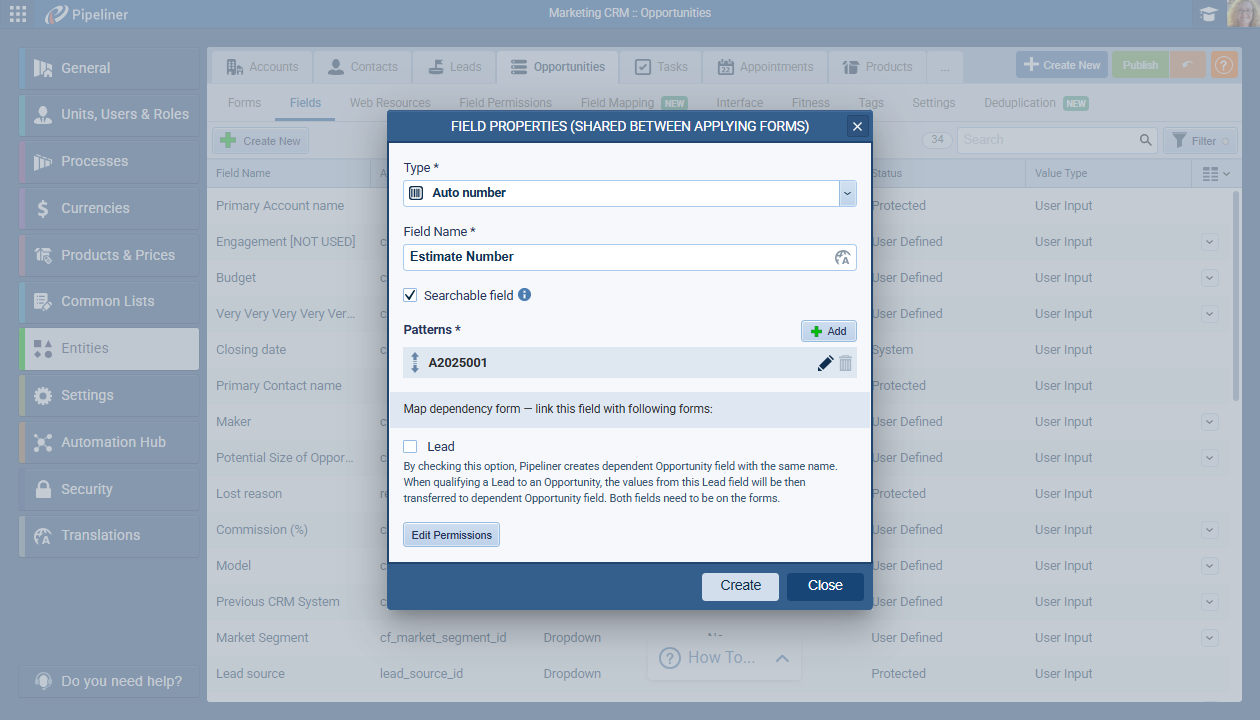
2. Pattern Configuration
- Priority: Patterns are evaluated from top to bottom. Users can reorder patterns (except the base pattern) using move actions.
- Label: Each pattern displays an example of the next generated value and its filter conditions (e.g., "B2025001 Filtered by: Account Type").
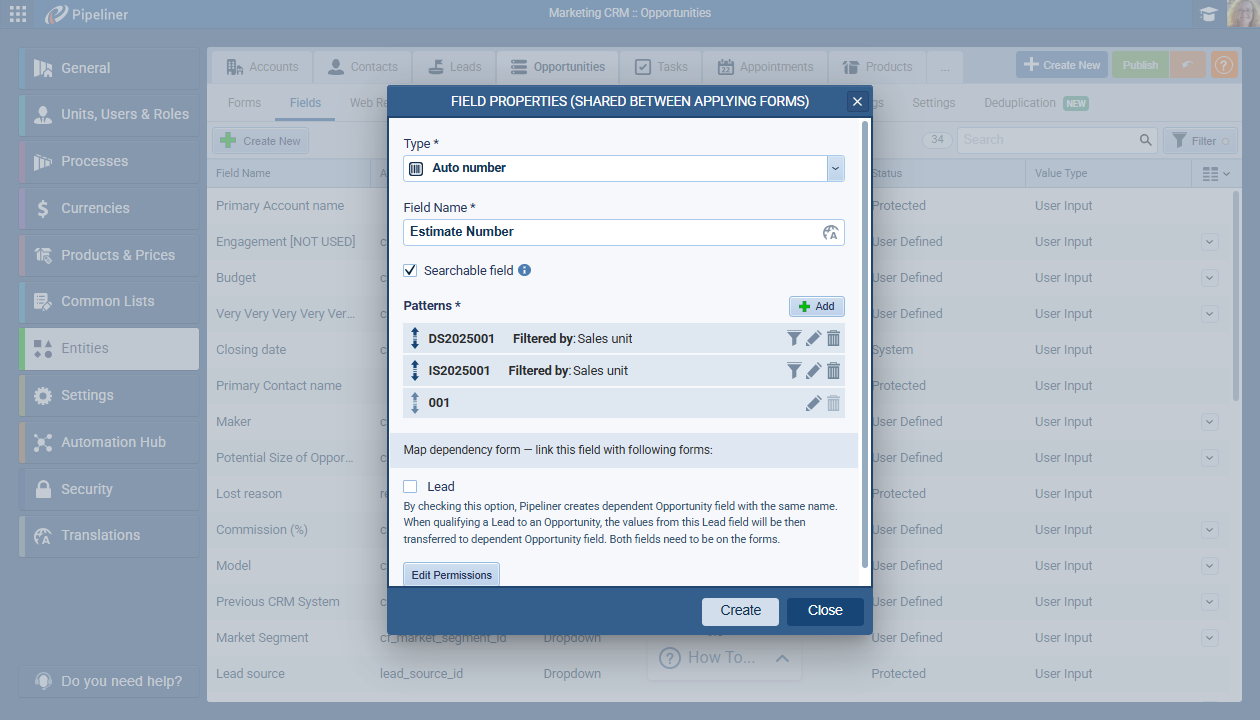
The action buttons beside each pattern allows admins to:
- Delete: Removes the pattern (not available for the base pattern).
- Settings: Opens the structure definition dialog for the pattern.
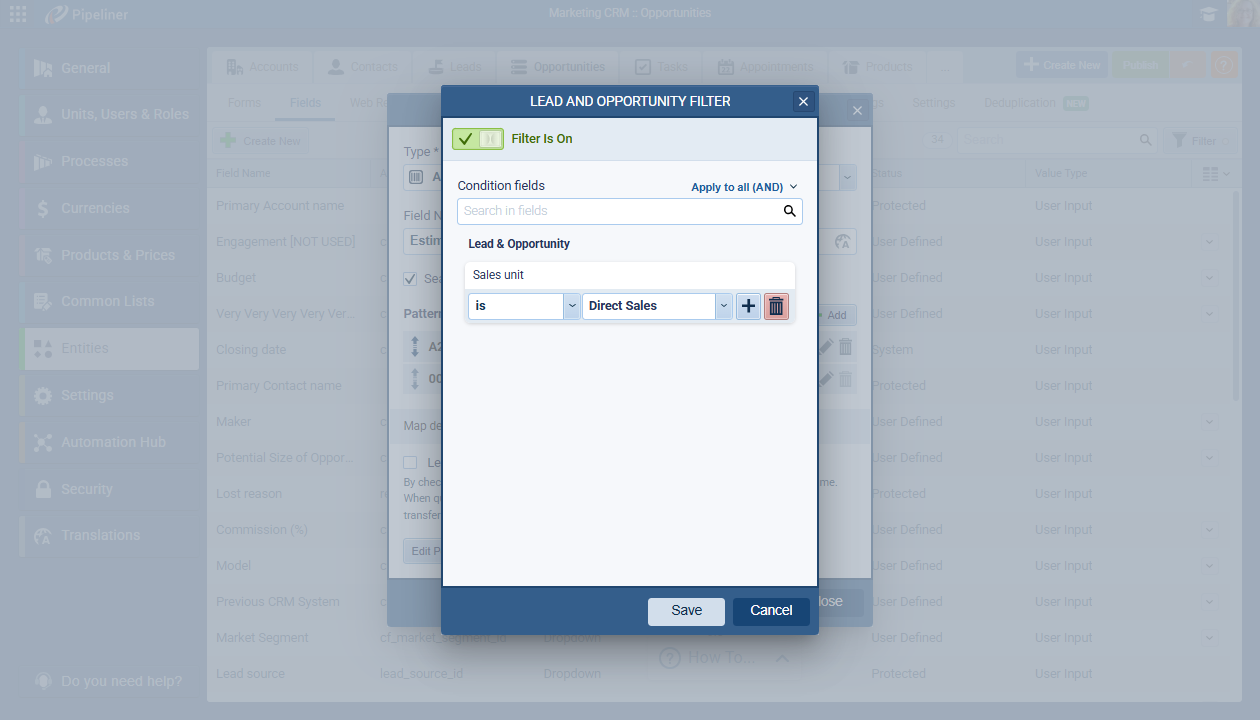
- Filter: Opens a filter dialog to set conditions for when the pattern should be applied. Only database fields from the field's parent entity can be used for setting filter conditions.
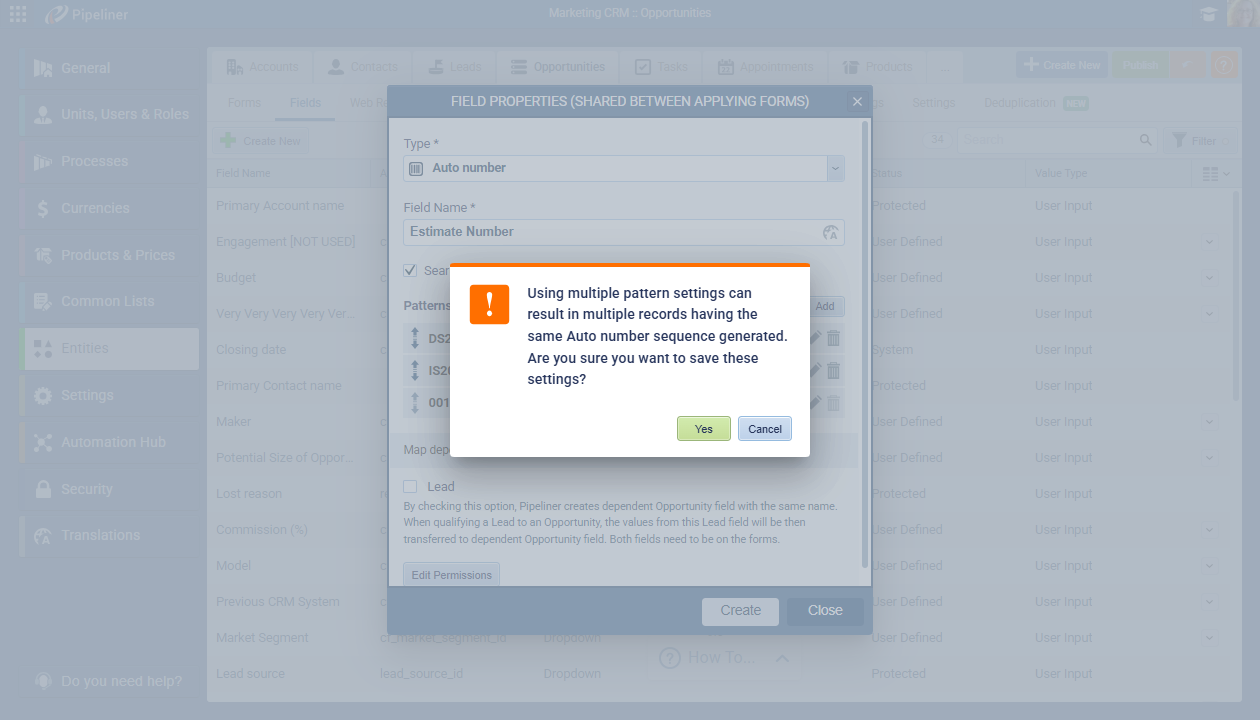
Warning on Save
When creating an Auto number field with more than one pattern, a warning dialog will be displayed.
Editing an Auto number Field
Unlike previously, users can now add, move, edit, and remove patterns after the field has been created.
The pattern label will display the *actual next value* based on the current counter for that pattern. For example, if a non-resetting pattern `B` was created in 2025 and 122 records have used it, in 2026 the label should show `B2026123`.
Admins can edit the structure and change the starting value of the `Autocount` part and when saving any changes to patterns, the same warning dialog as on creation will be shown.
Custom Entity Name Field
When creating a new Custom Entity and selecting "Auto number" as the name field type, the same "Patterns" configuration options as a standard Auto number field will be displayed and the same warning dialog will be shown on creation if multiple patterns are defined.
Editing the custom entity's name field follows the same rules as editing a standard Auto number field.
Field Mapping — Additional system fields can now be mapped
This feature enhances the Field Mapping and ConversionConversion Conversion is the process of turning a target consumer into a paying customer; or more generally, the point at which a user performs a specific action favorable to a marketer or a seller. forms by adding support for several key system fields: Owner, Share mode, Editors, and Watchers. This allows for more comprehensive record creation and conversion workflows. Additionally, the UI for these fields on detail forms will be updated for better visual indication.
Field Mapping and Conversion Forms
It is now possible to add the following fields to the field mapping and conversion forms (e.g., Lead conversion):
Owner
- This field allows mapping of the record owner.
- For the "Lead" and "Task" entities, the dropdown list of users include an empty value to represent "Unassigned".
- This field is unavailable for the "Appointment" entity.
Share mode
- Allows mapping of the record's sharing permissions (e.g., Private, Custom, Public).
Editors
- Allows mapping of users who can edit the record.
- This field is unavailable for the "Appointment" entity.
Watchers
- Allows mapping of users who are watching the record for updates.
- This field is unavailable for the "Appointment" entity.
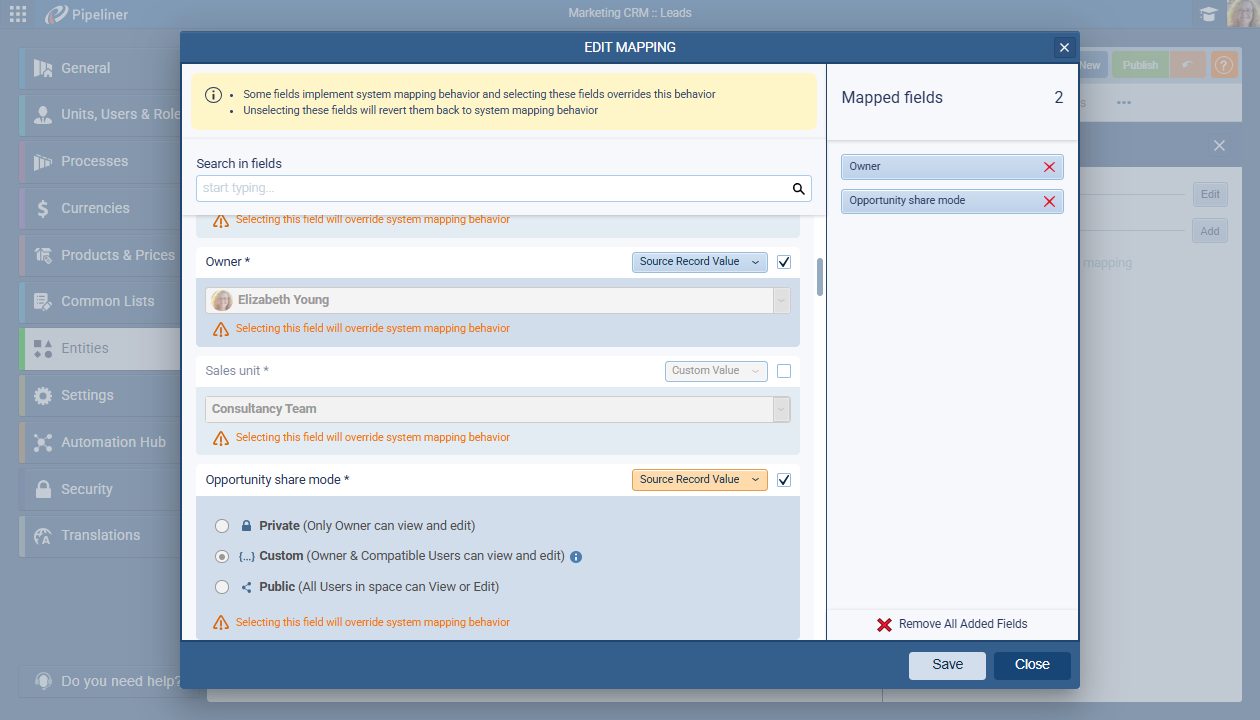
New Record Detail Form Behavior
- When these new fields are populated via mapping, conversion, Undo, or Populate actions, they behave like all other form fields.
- On the record detail view, the "Owner" and "Team" (Editors/Watchers) boxes have been updated to have a yellow pre-filled state to indicate that the values have been populated programmatically before the first save.
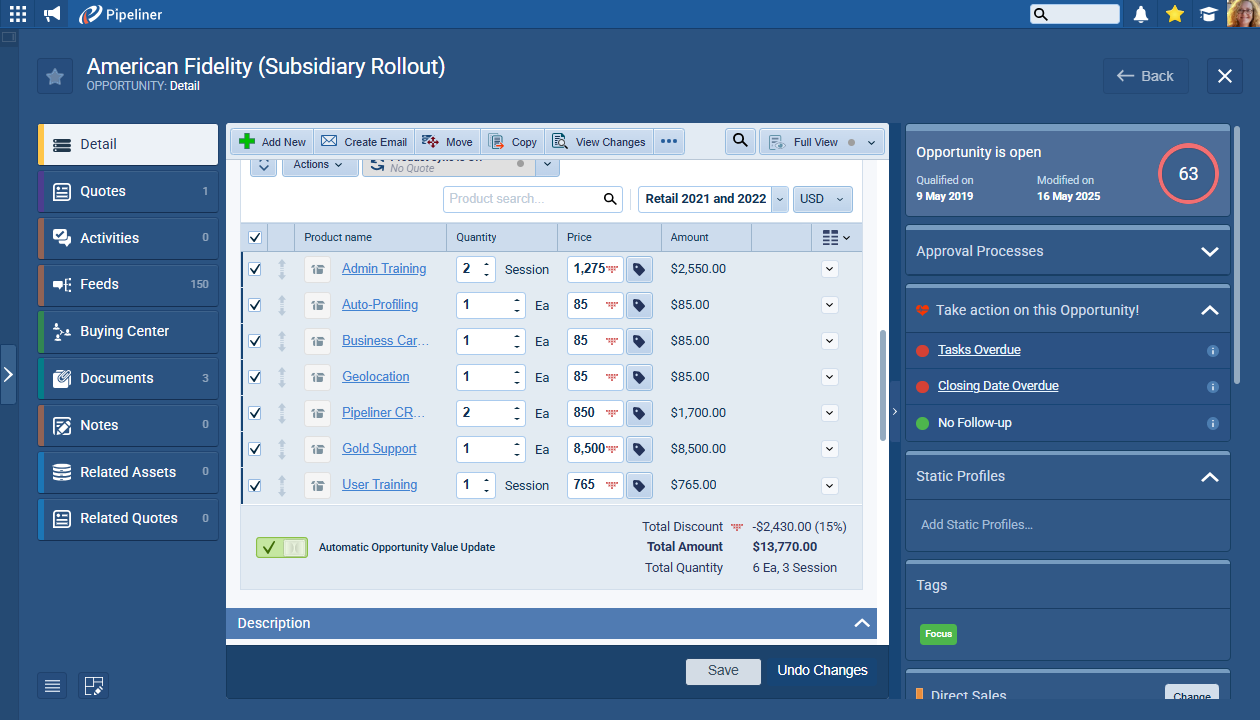
Opportunity: Apply a discountDiscount Discount means a promotional reduction in the cost of a product or service, commonly deployed to speed up sales. to the entire productProduct Product refers to anything (an idea, item, service, process or information) that meets a need or a desire and is offered to a market, usually but not always at a price. table
This feature introduces a bulk action to apply a percentage-based discount to multiple selected products within an Opportunity's product list. This streamlines the process of discounting, as users no longer need to apply discounts to each product individually.
When Products have been added to an Opportunity using a Price List, users can select one or more product rows and then select the option "Apply Discount".
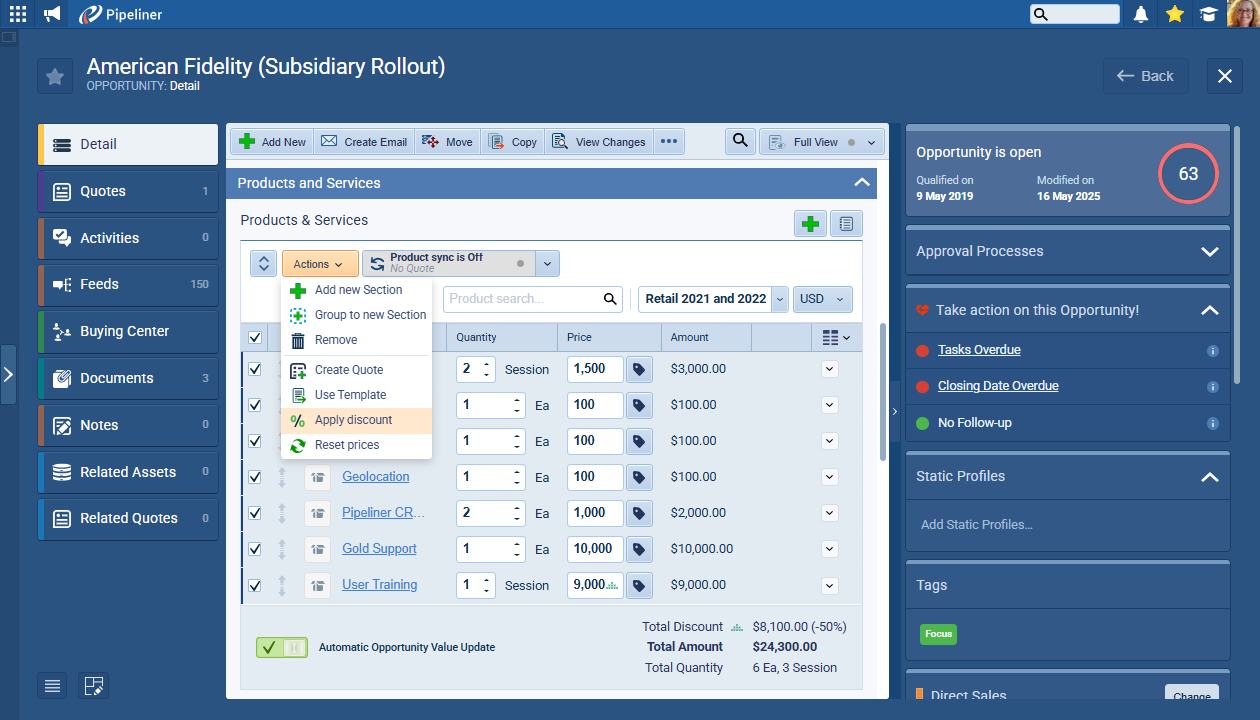
When this option has been selected, the user will be prompted to enter a discount % (up to 2 decimal places are allowed).
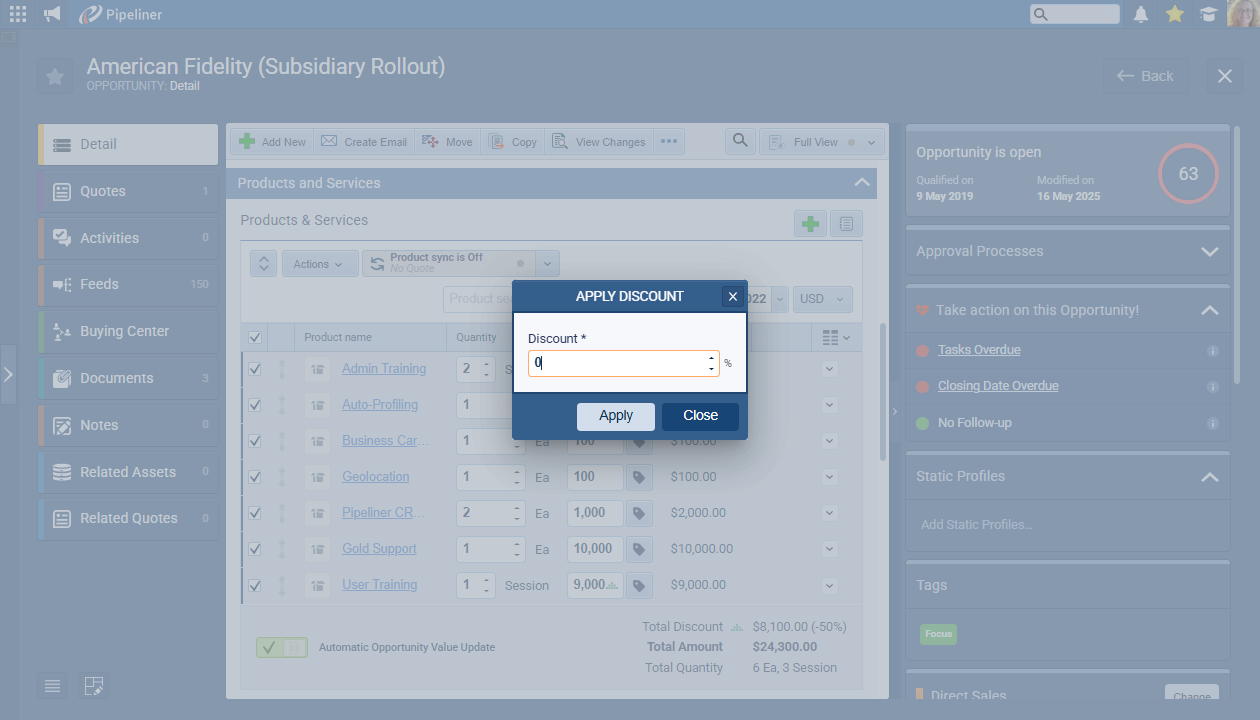
When the user clicks "Apply", the system calculates a new price for each selected product row based on the entered discount percentage. Note that this will overwrite any previously applied discount for the selected products by calculating a new final price. The discount percentage itself is not stored; only the resulting price is updated.
Navigator — Target Component — Replace Chart Type with "Pipeline Target"
This feature updates the visual representation of the "Target" component in the Navigator. The existing chart is being replaced with a new design that is visually consistent with the "Pipeline Target" chart, providing a more modern and informative display of target progress.
- The current Target chart component has been replaced with the new "Pipeline Target" visual style which displays the achieved value prominently in the center, with the target value shown below it.
- A percentage value indicating progress towards the target is also displayed. If the achieved value exceeds the target, this percentage will be over 100%.
- The circular progress bar visually represents the achieved percentage.
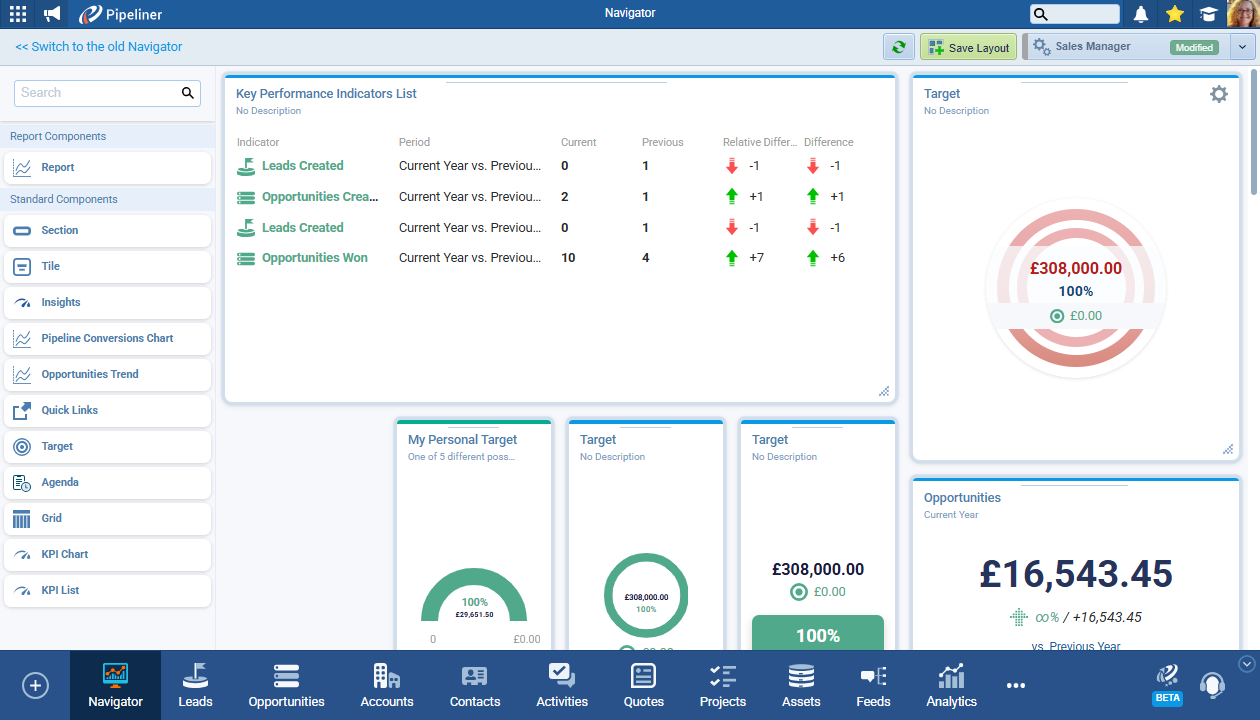
It will not be possible for users to change the color of this specific chart type.
Existing data for all "Target" components will be migrated to populate the new chart type. No data loss should occur.
Fullsize Screenshots ⤵