Online Forms › Products & Services
This release adds another valuable feature to Online Forms. Users can expose the “Products & Services” that are set up in Pipeliner on Online Forms using the responses to populate the “Products” field on “Opportunities” or “Quotes“. This addition opens up many new use cases including requests for quotations or even orders being requested via your Online Forms. Automatizer can then be utilized to manage the follow ups and notifications required by your business processes.
On the Online Form, the userUser User means a person who uses or consumes a product or a service, usually a digital device or an online service. will create a new field of type “Products”.
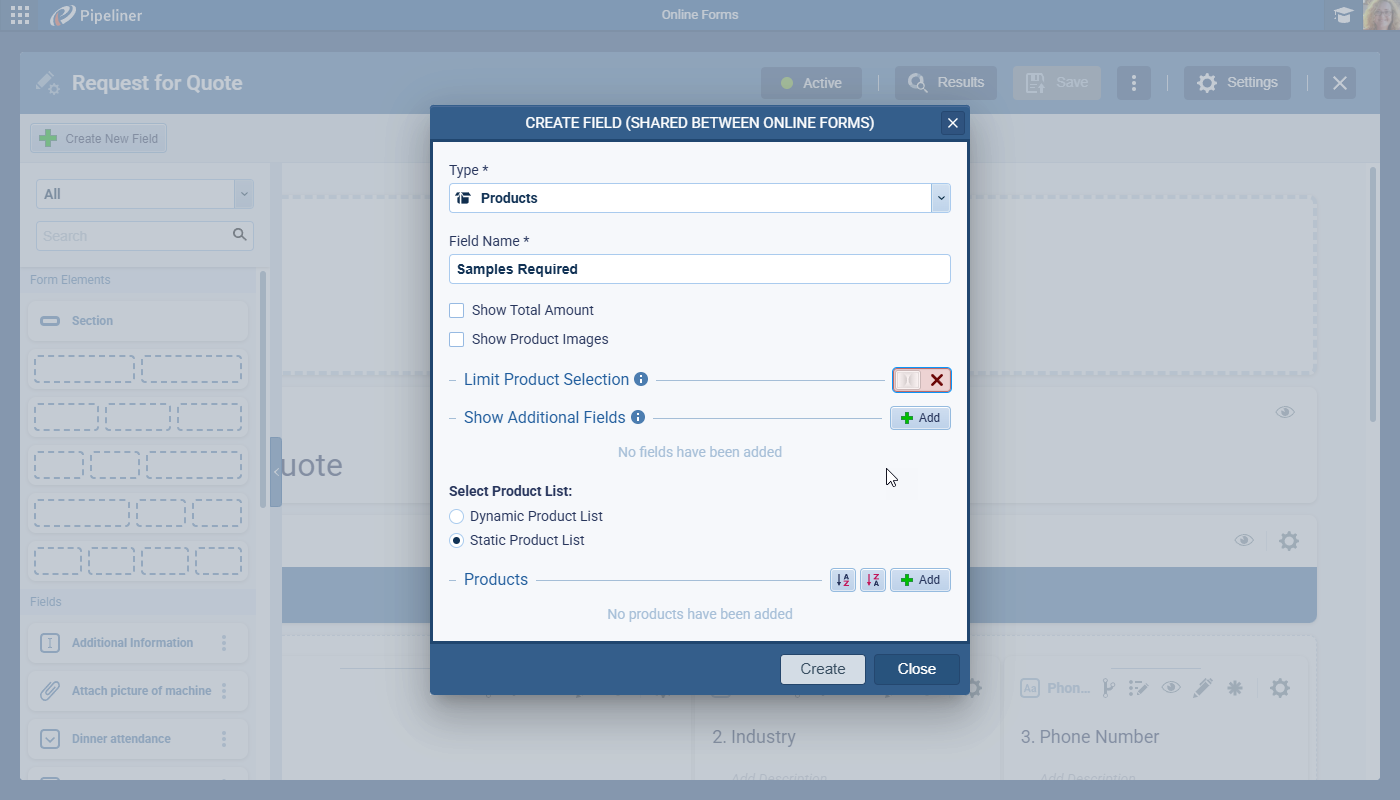
The following options are available:
- Show Total Amount › shows the total amount for all products selected by the respondent
- Show ProductProduct Product refers to anything (an idea, item, service, process or information) that meets a need or a desire and is offered to a market, usually but not always at a price. Images › displays product images next to the product name (if you have the images added to your Pipeliner Products & Services)
- Limit Product Selection › when this option is turned on, the user can limit the maximum number of products that the respondent can select
- Show Additional Fields › the user has the option to show additional fields for all products that the respondent selects in their response. For example, if Price is selected as an additional field, the respondent will see the Price per unit for all products they select.
When adding additional fields, all “Product” and “Product Line Item” fields that are of one of the following field type will be available to select:
- Dropdown
- Single Line Text
- Radio
- Long Text
- Number
- Checkbox
Some fields are intentionally not in the list as they will display by default:
- Product Image
- Product Name
- Quantity
- Product Unit
Select Product List › The user will now have to define what products will be visible for the respondent. Choose between “Dynamic Product List” or “Static Product List“.
Dynamic Product List › If the user selects “Dynamic Product List“, the user will need to set up filter criteria to identify the products that should be available for selection by the respondent. All products that match the filtering criteria will be automatically added to the product list. When a new product is created and it matches the criteria, it will be automatically visible on the product question.
Static Product List › if this option is selected, the user will need to manually select which products they want to display to the respondent. When a new product is created in Pipeliner, the user will need to go back to the field settings in the Online Form to add the new product manually. If the user wants to add products, they will need to use the “Add” button that will open a window with all products.
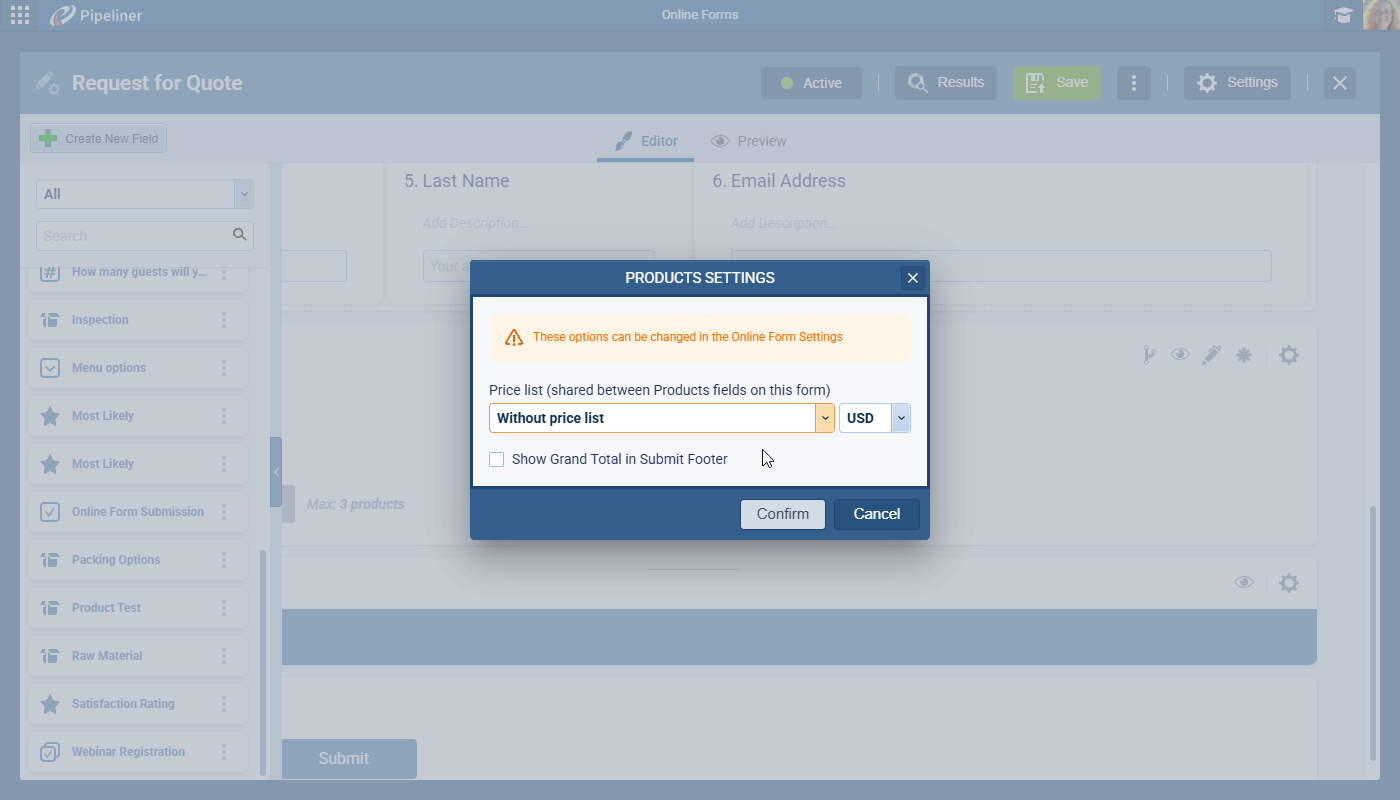
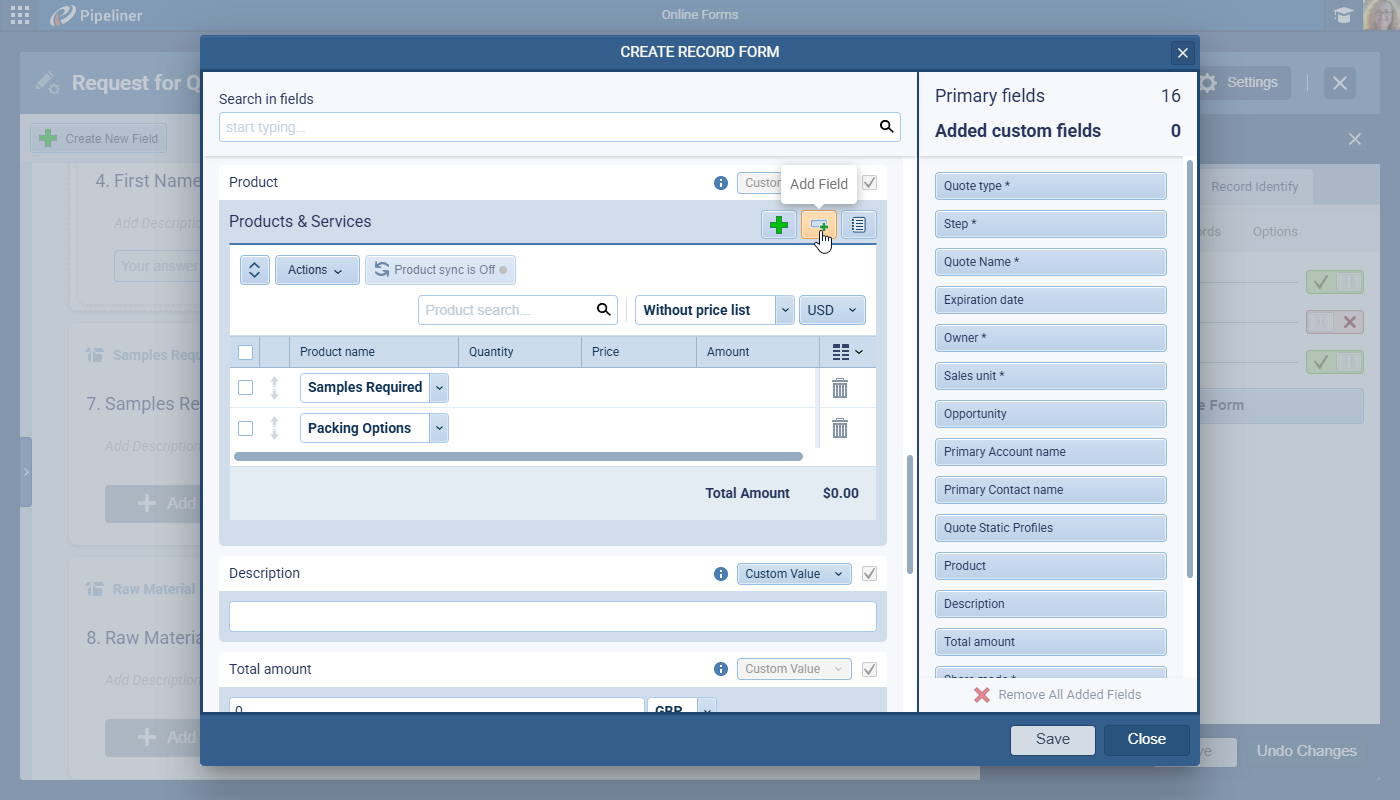
Once the user has chosen their preferred “Field Settings“, they will need to place the “Products” field onto the Online Form. If this is the first “Products” field to be placed on the Form, the user will be prompted to select a price list and currency. The selection will apply to all “Products” field placed on the form. This setting can be subsequently changed in “Online Form Settings › General › Options“. The user can also choose whether to show the “Grand Total” for all “Products” field on the form in the “Submit Footer“.
Once the field has been added to the form, selecting it will open up the right hand panel. The field will have the standard options in the “General” tab to allow for customization including:
- Question Title
- Question Description
- Image
- Visibility
- Required
- Read-only
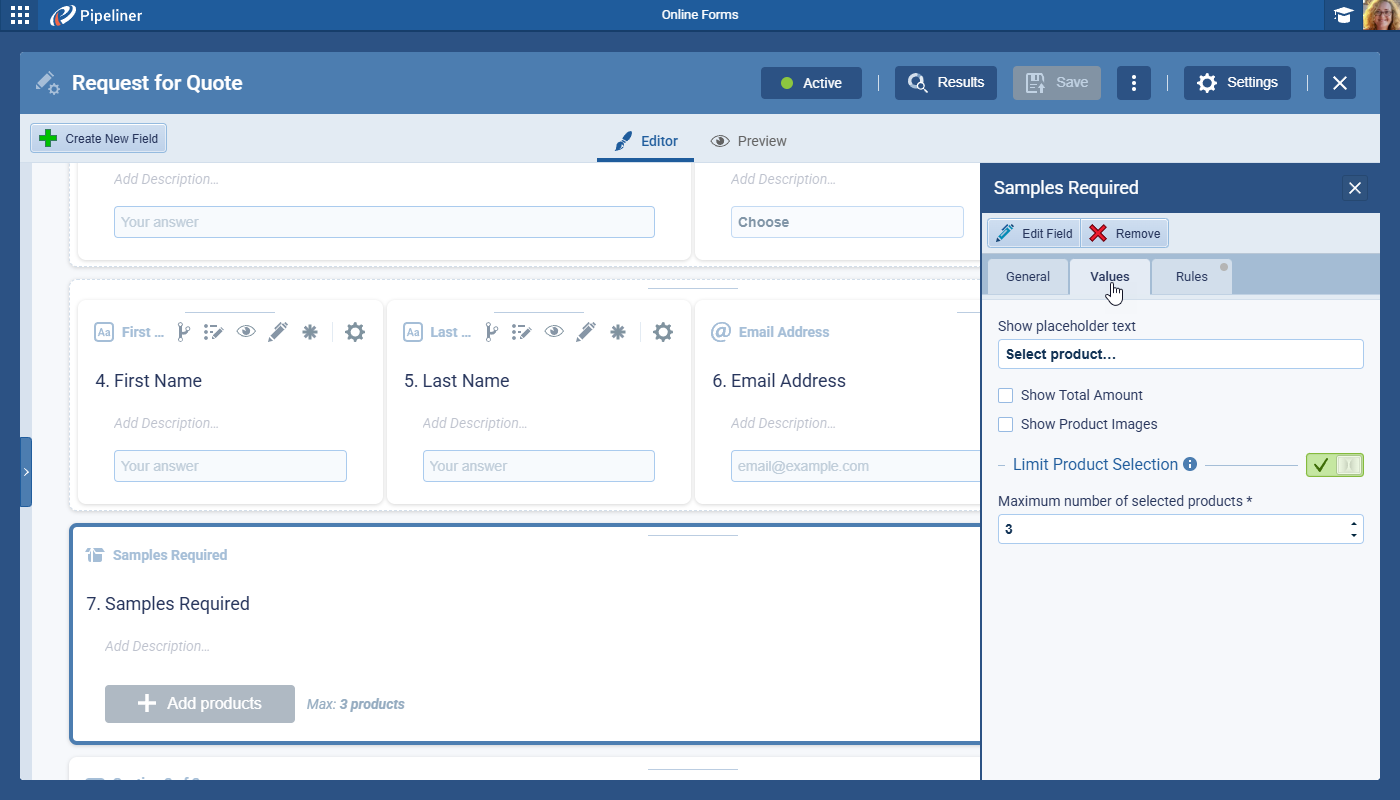
Clicking on the “Values” tab will allow the user to amend some of their previous selections:
- Placeholder Text
- Show Total Amount
- Show Product Images
- Limit Product Selection (the limit will be shown next to the Add Products button on the question)
Changing settings here will impact the field only on this individual Online Form.
The “Rules” tab allows the user to define what products must be selected in order for the other field to appear when visibility rules are set up for other fields and the “Products” field is selected to base the rules on. They can also define if “Any” or “All” of the products will trigger the condition.
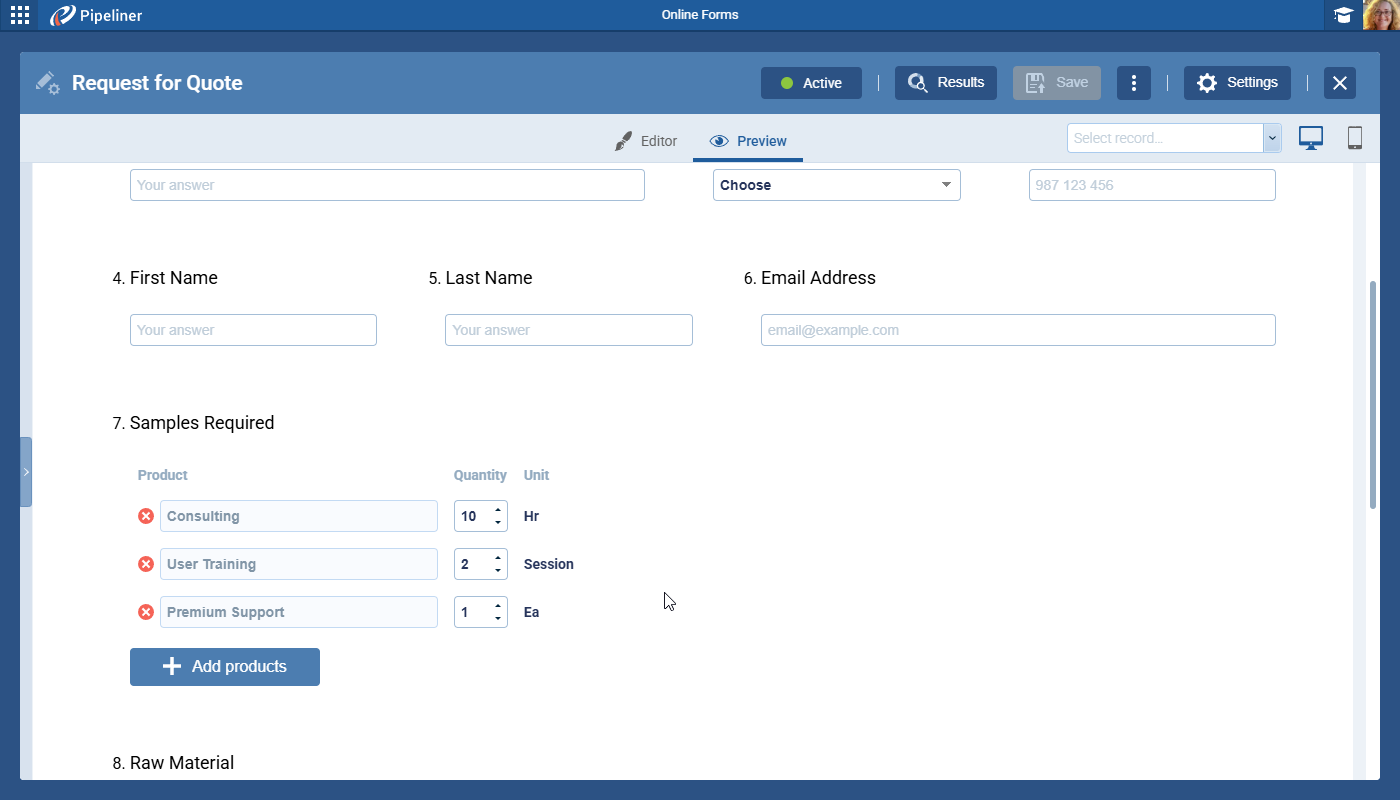
Using the Product Field on the Form
The respondent will see a selector that allows them to select one or more products from the list (depending on the limits the user may have chosen). As soon as the respondent selects a product, they can select the “Product Name“, “Quantity“, “Image” (if enabled), “Unit” and any “Additional Fields” that were added when the form was set up.
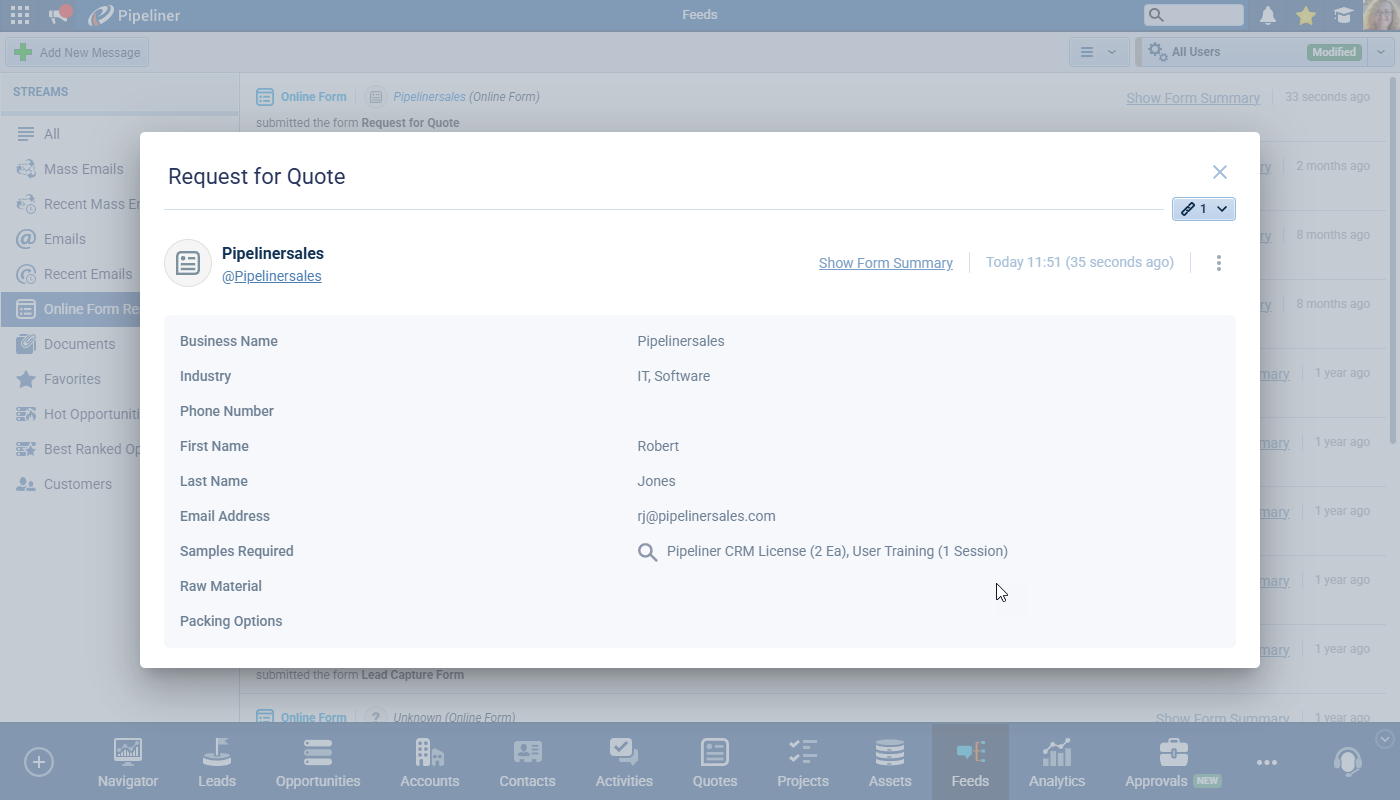
Online Form Response Detail in the Feeds
When the respondent submits the online form, the answers to the “Products” questions can be seen in the response detail in “Feeds“. The “Product Name“, “Quantity” selected and the “Unit” show by default in the response detail. Users can click on the magnifying glass icon to open a drilldown to view all products selected. The basic information can be exported or printed.
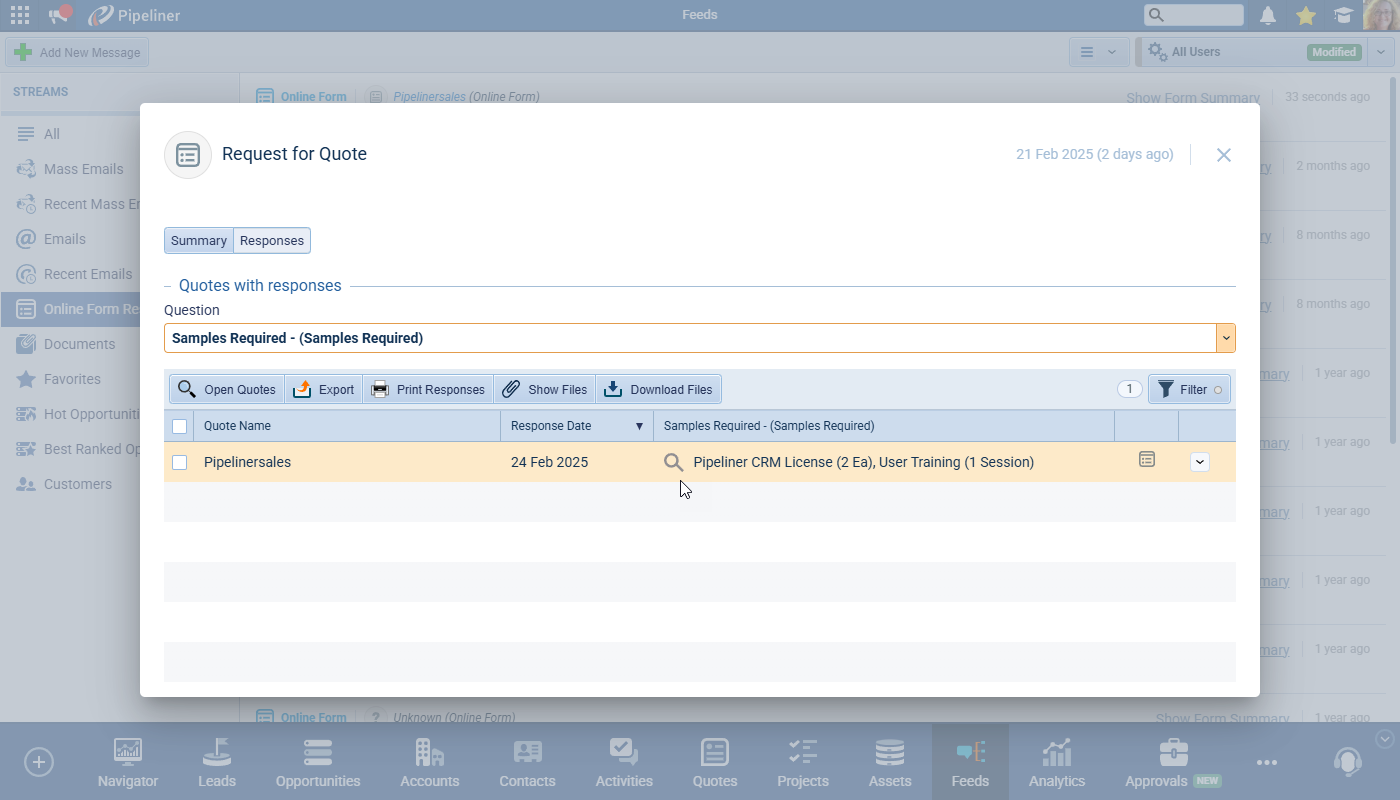
Responses in the Online Form Summary
The same information is shown in the “Online” form summary when the product question is selected. The user can see what products and quantity were selected by all respondents for the question. The magnifying glass icon opens a drilldown with all details.
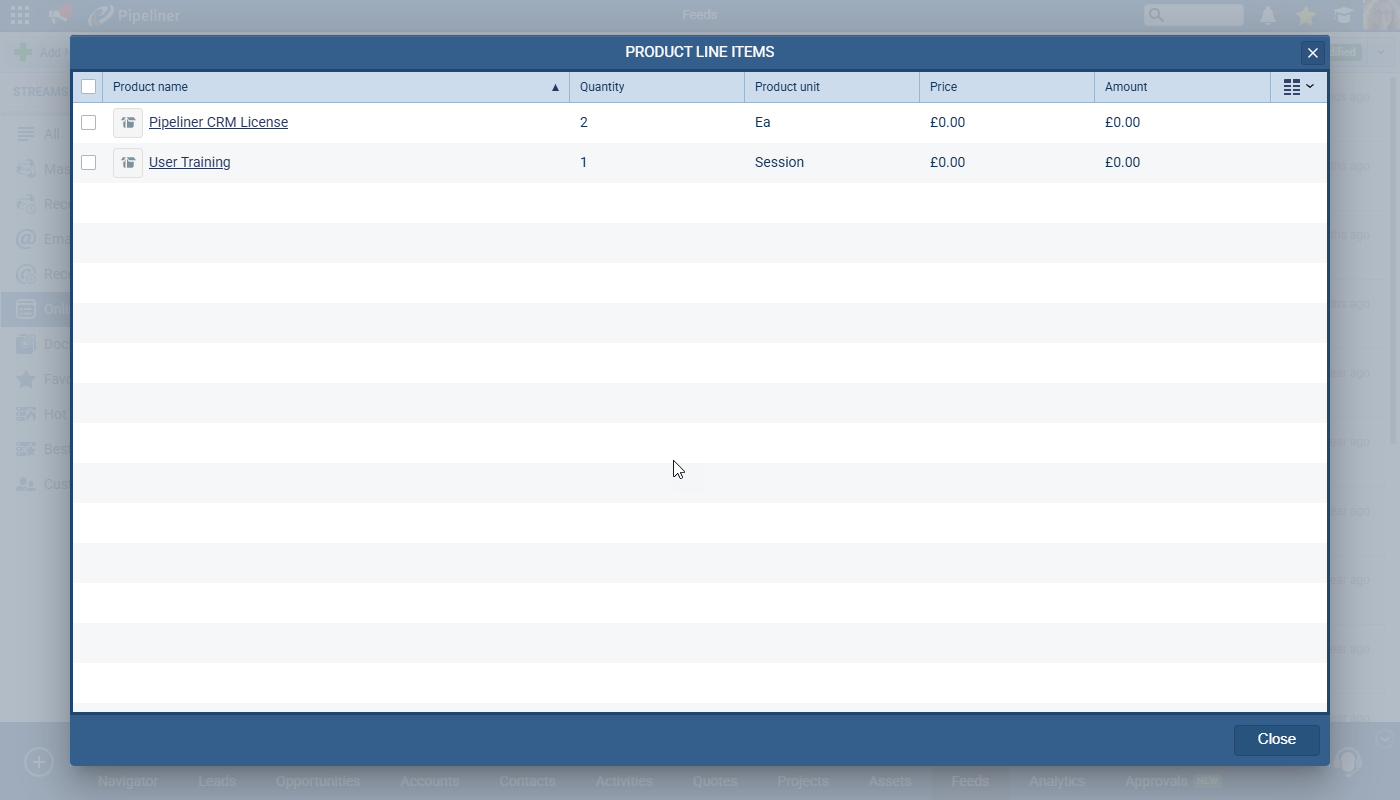
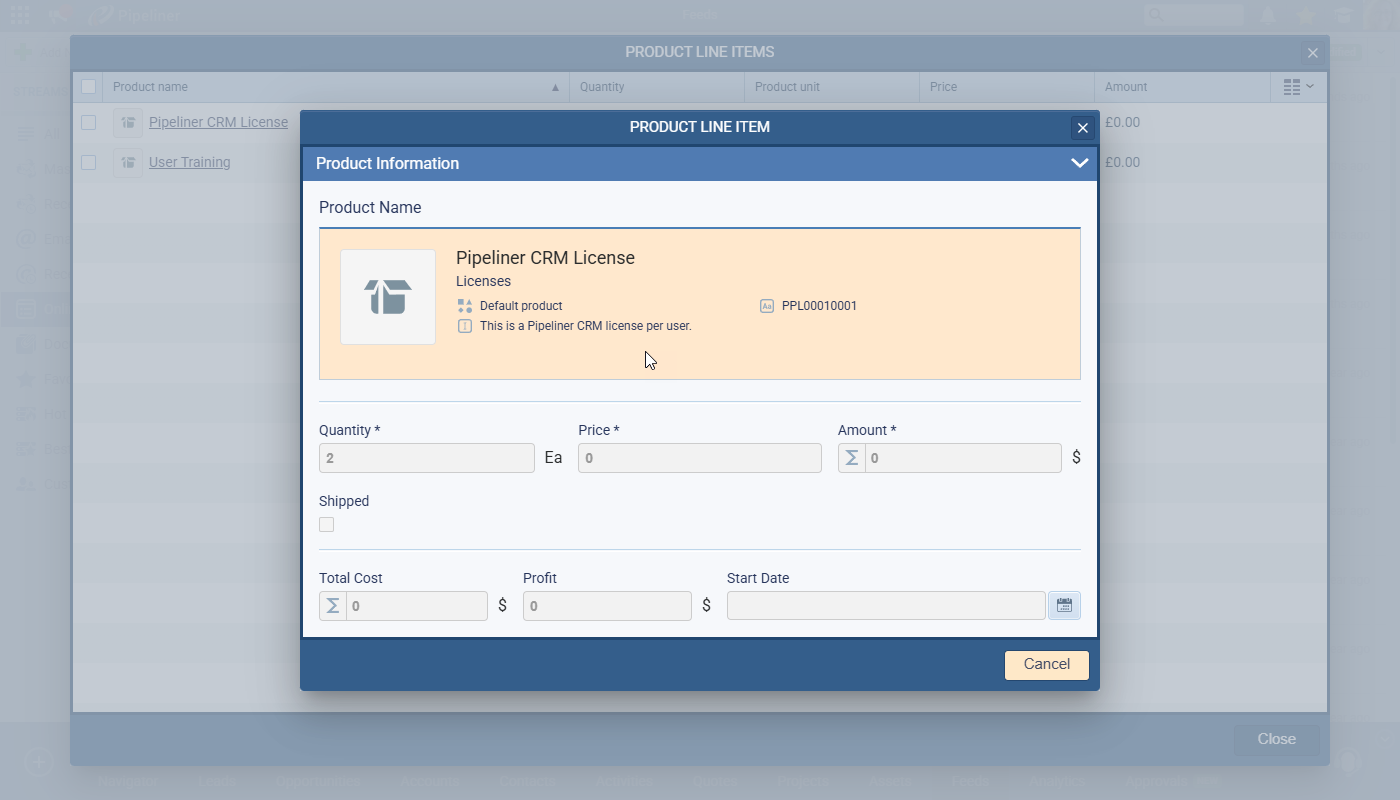
Product Line Item drilldown
When the user opens a drilldown with Products they can see the full detail, including what values the respondent selected for each product and, by clicking on an individual “Product” in the drilldown a “Product Line Item” view will open with each additional value for the product that the respondent selected.
Personalization
The user can fill the “Products & Services” section on a “Quote” or “Opportunity” record form using personalization by selecting the “Products” field(s) using the dropdown in the “Create Record” or “Update Record” forms. All products that were selected by a respondent in this question will be automatically added to the record form to the place where the dropdown is present.
Quantity Limits in Online Form Settings
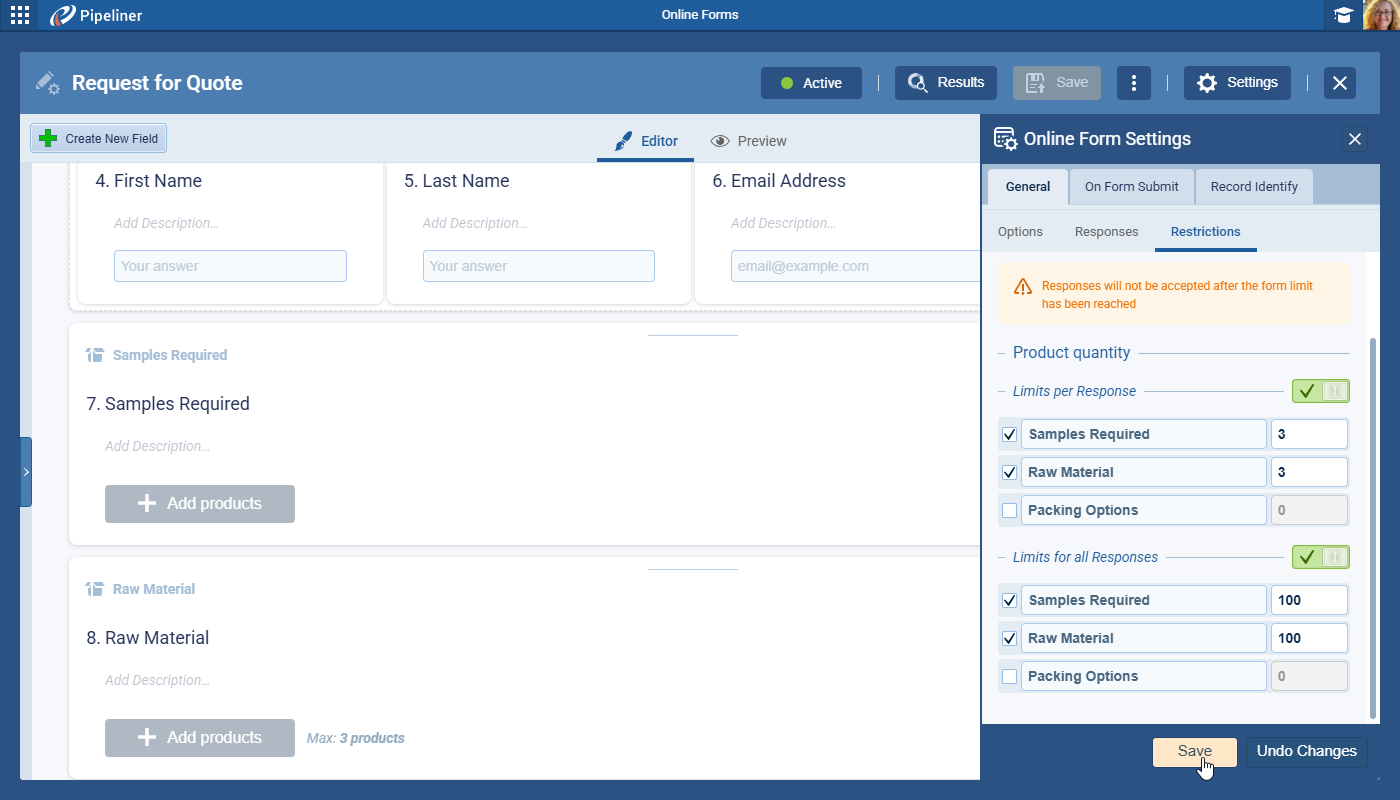
It is possible to restrict respondents from selecting a quantity greater than a selected value in the “Restrictions” sub tab under the “General” tab in “Online Form Settings“. When any restriction is turned on, all “Products” questions will be immediately shown and the user can select which restriction they want to enforce:
- Limits per Response › the quantity for the product question as a whole cannot be more than the set number for each individual response
- Limits for all Responses › the total quantity cannot be exceeded by all responses. This option simulates a “number in stock” with each response subtracting from the total quantity until it reaches 0.
The two options can be combined. When a respondent tries to submit a form with quantities that are above the set limits, they will be notified via an error message on the form.
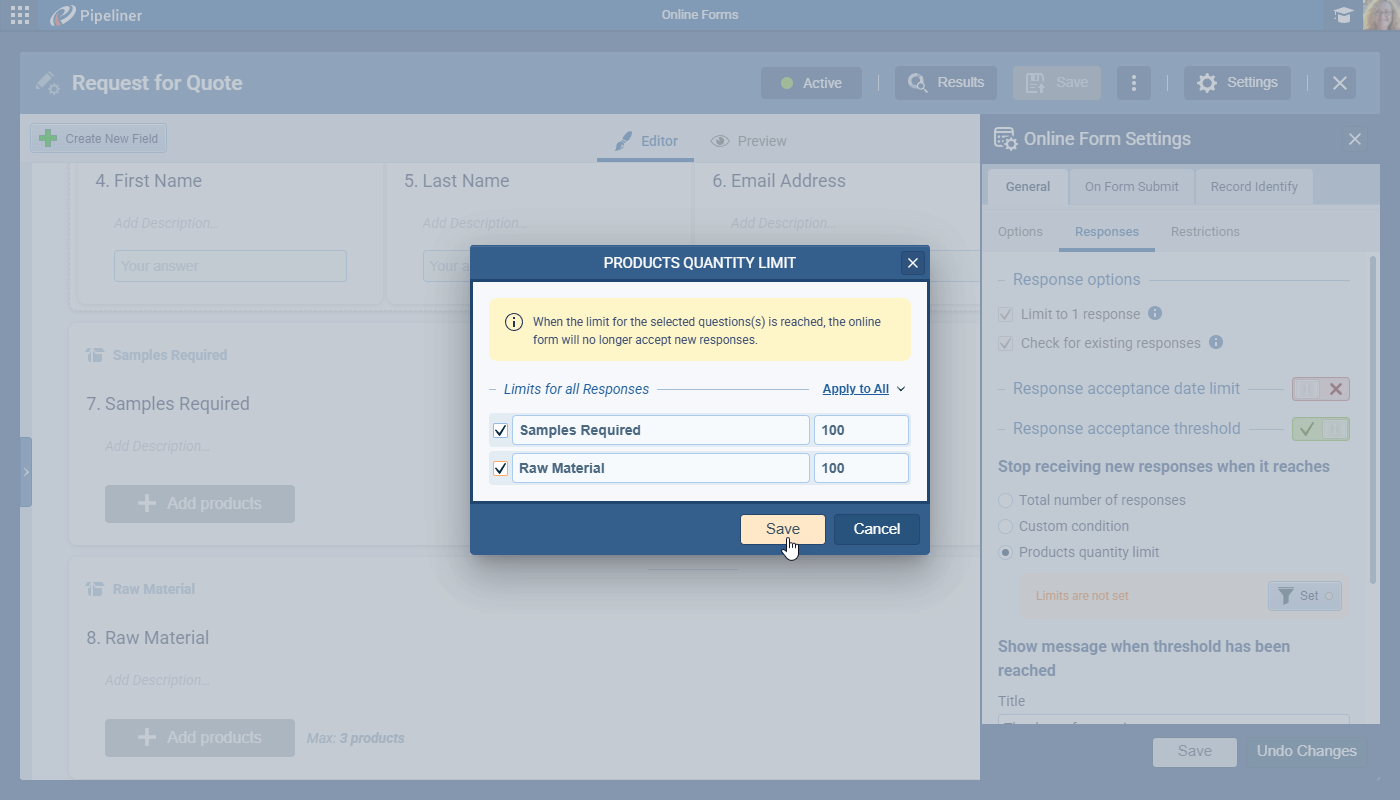
Form closure when product quantity limit is reached
It is also possible to stop receiving further responses when the product quantity limit is reached. This trigger can be set up onlyby enabling the “Response Acceptance Threshold” and choosing “Products Quantity Limit“. The user can select one or more “Products” questions and also whether “Any” or “All” limits must be reached in order to close the form. This window is read-only except the checkbox that selects which product question limit triggersTriggers Triggers are a set of signals or occurrences that meet certain criteria to be considered an opportunity to make a sale. the form closure. If the user wants to change the quantity number, they need to do so in “Restrictions” tab of “Online Form Settings“.
Fullsize Screenshots ⤵
Online Forms › Email Notifications Improvement
Since we have added various options for automatic online form closure when certain conditions or limits are met, we have now introduced the option to enable email notifications about these limits. Forms can stop receiving new responses when the form reaches:
- the set threshold for responses
- the expiration date (deadline)
- the total file size limit
- the product quantity limit(s)
Users have now the option to turn on notifications to receive email notifications when these limits are reached as well as when a new response is submitted.
From “Online Form Settings › General › Options“, enable the “New Response notification” toggle to choose who should receive email notifications when a new response is submitted.
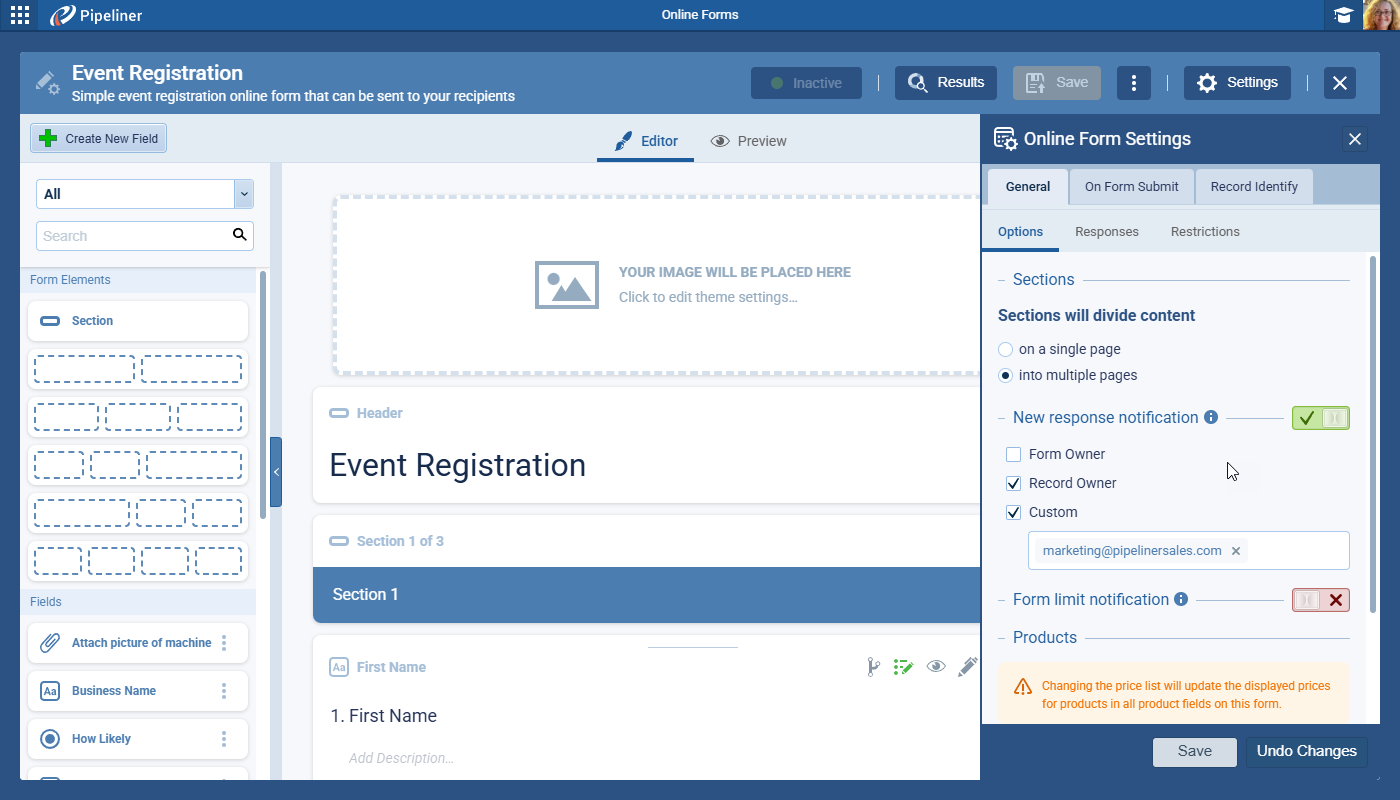
Enabling Form limit notification will trigger 2 types of email notifications about form limits:
- When set limit(s) are about to be reached › the selected recipients will be notified that a form will close soon – 2 days prior to the form deadline date if one is set or when “80%” of the set limit for “Response Threshold“, “Total File Size Limit” or “Product Quantity Limit” is reached
- When set limit(s) were reached and the form is closed › the notification will be sent when the form closes and no longer accepts new responses
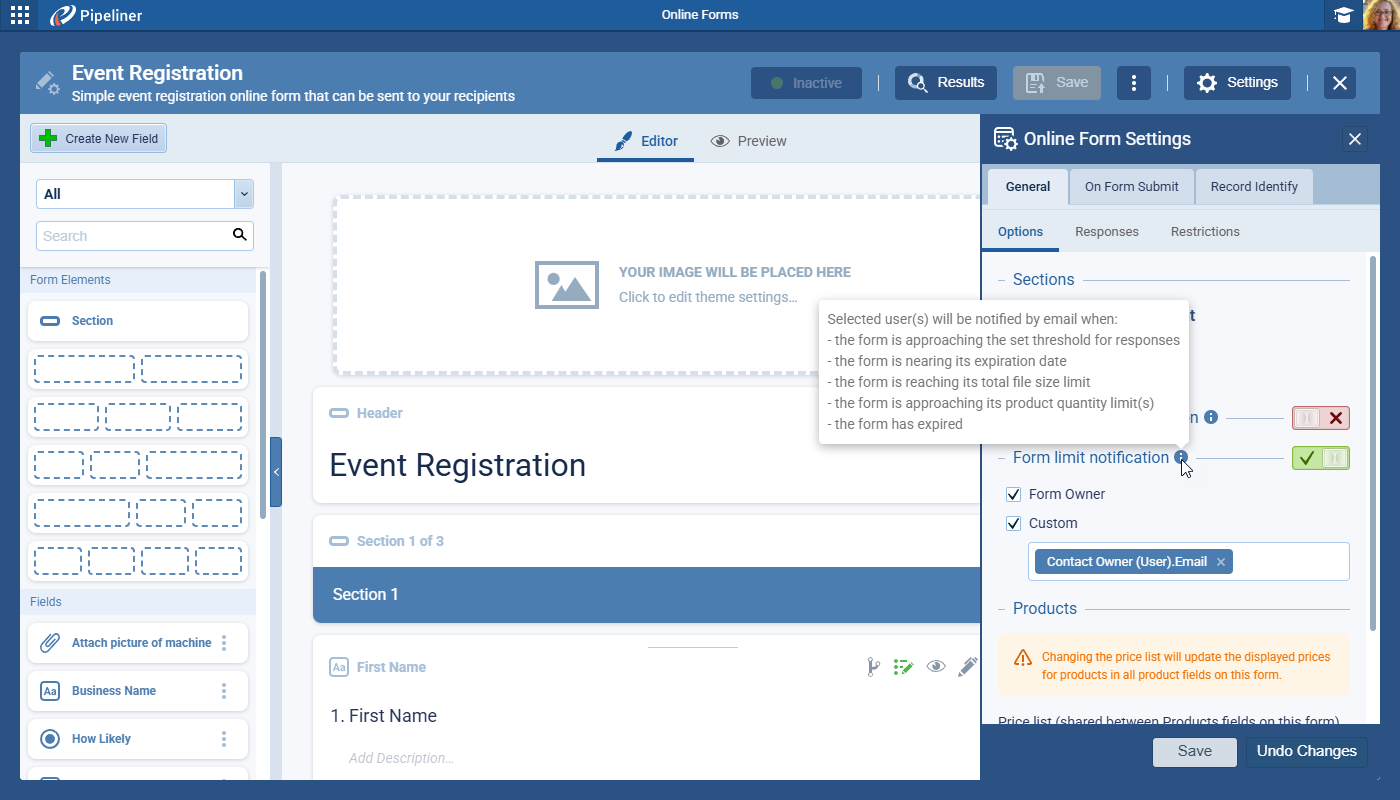
“Notification Emails” will be sent to the selected users and those users can click on the link in the notification to directly open the online formand adjust limits if necessary.
Fullsize Screenshots ⤵
Experience Pipeliner CRM Now
Automatizer › Process Tags
To facilitate the organisation of “Automatizer” processes, we’ve included the ability to add “Tag(s)” to each process. These are created in “Admin › Common Lists” menu
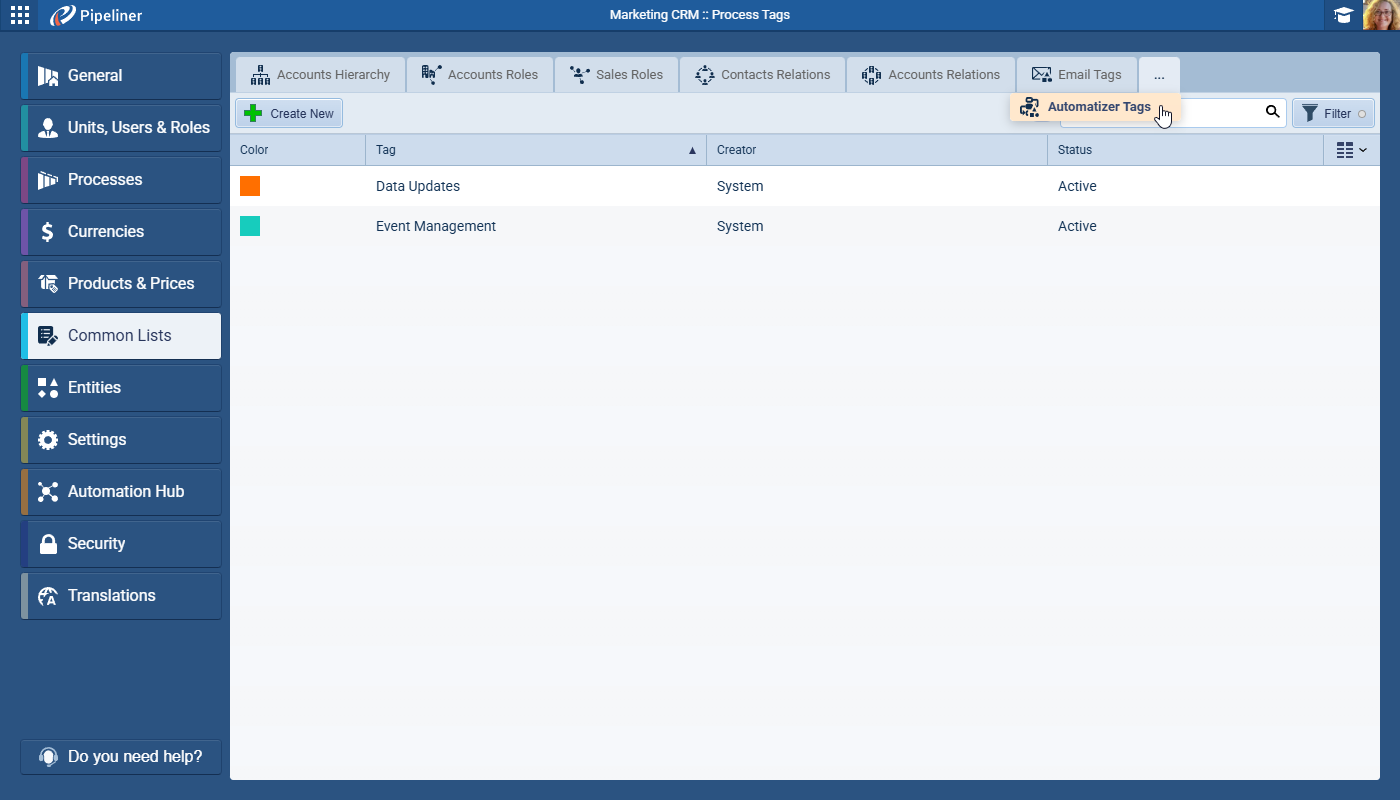
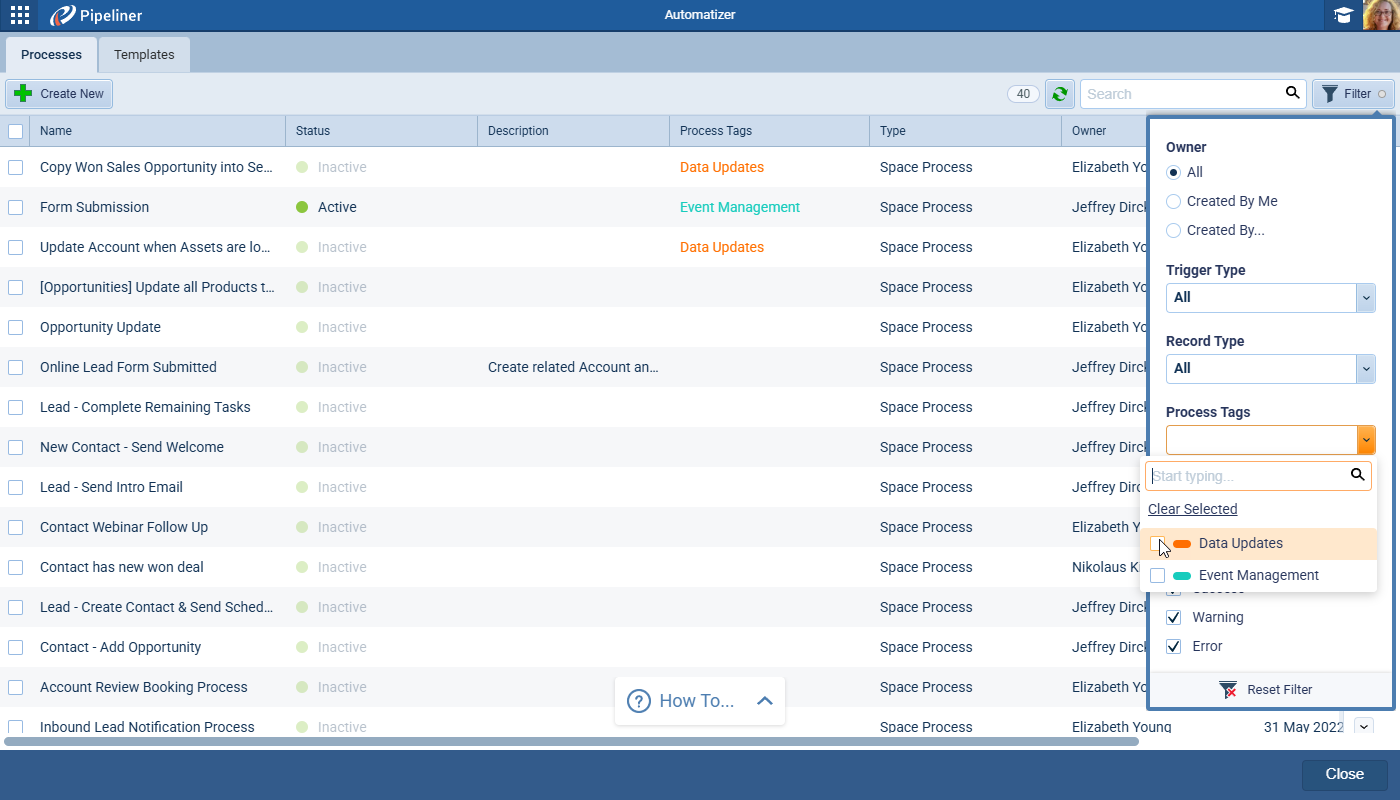
Users can add an additional column to the “List View” of processes and can add “Tags” using the inline editing view or by selecting a process and adding “Tags” in the right hand panel. “Tags” can also be used for filtering processes.
Fullsize Screenshots ⤵
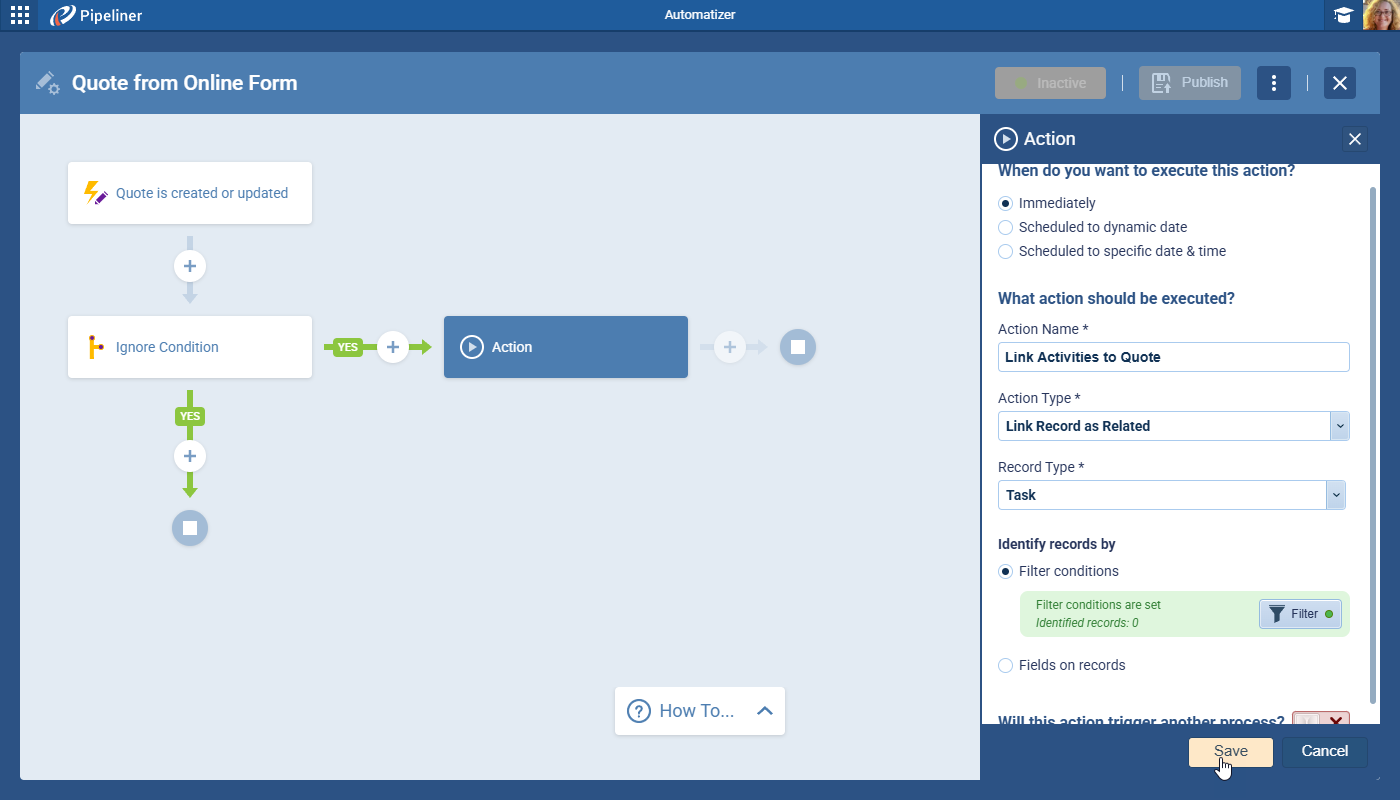
Automatizer › Link Existing Records
This release includes a new Action Type “Link Record as Related”. This action identifies records and subsequently Links them to the “Triggered Record“. The user will need to select:
- what type of entity should be linked
- how the related records should be identified using either “Filter conditions” or “Fields” on records
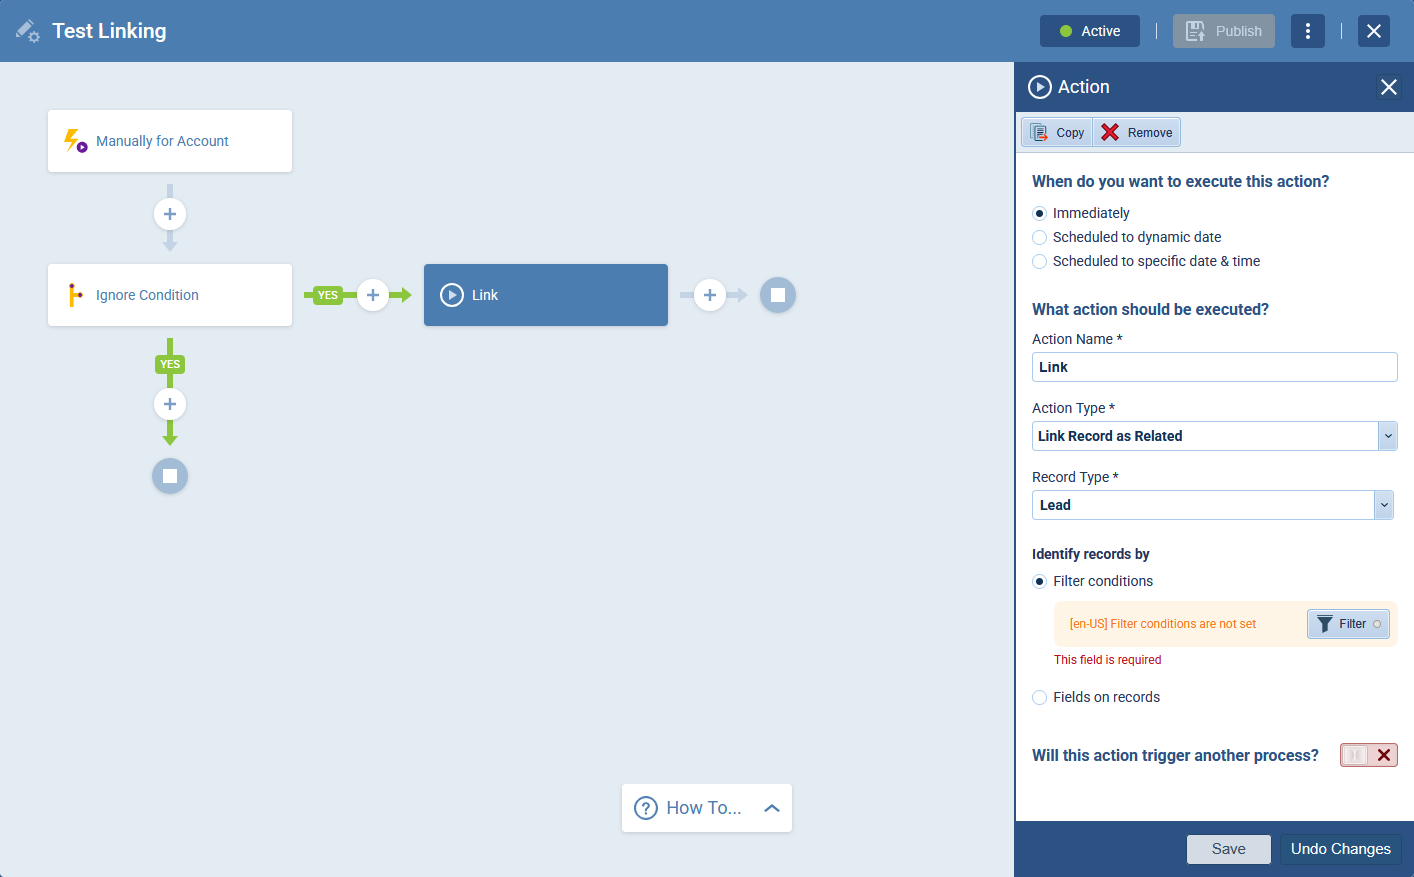
Identification by Filter Conditions
When using this option, the user will need to set the filtering criteria via the “Filter” button. All records of the selected entity that match the criteria will be linked as related to the triggered record. The number of records identified as matching the filter criteria are displayed in order to prevent unwanted record linking by inaccurate filter conditions.
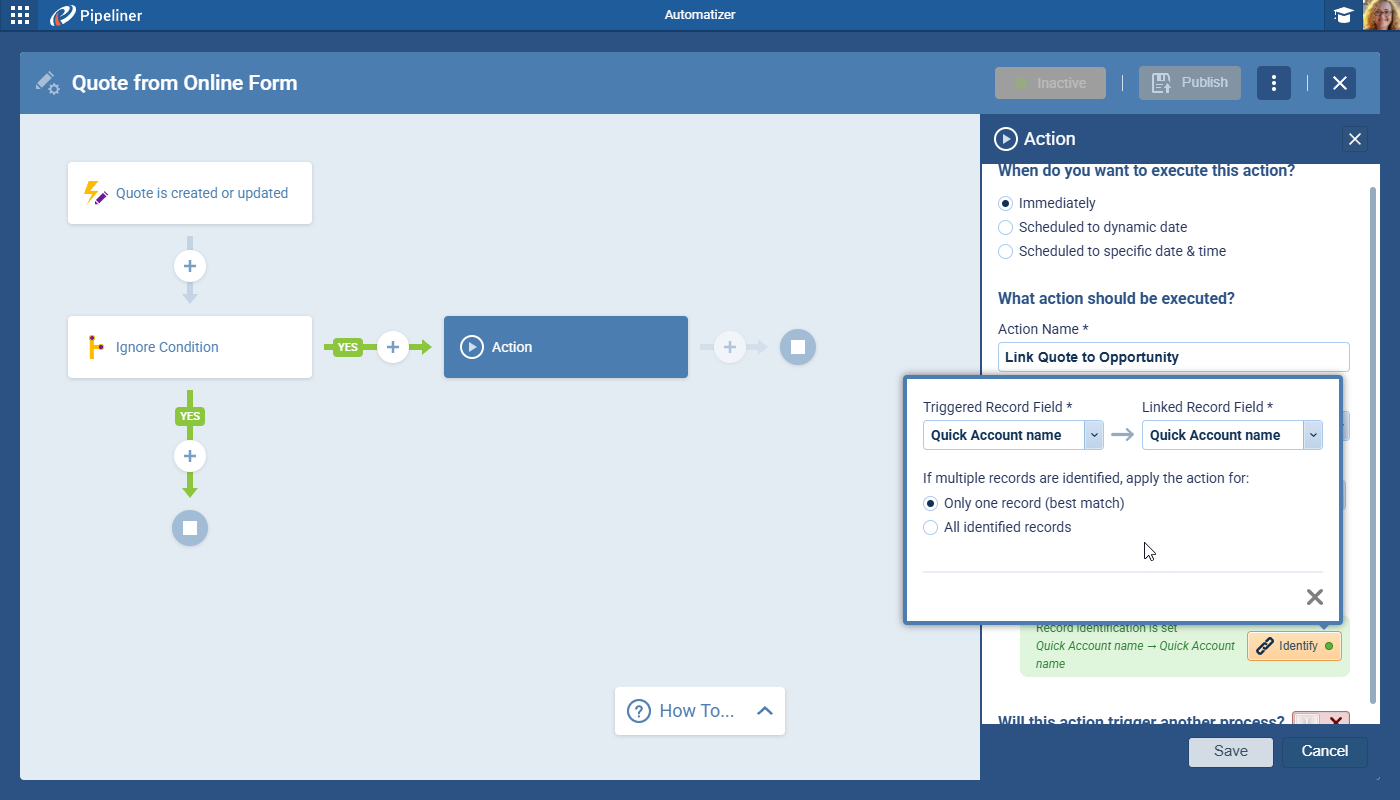
Identification by Fields on Records
When this option is selected, the user will need to manually choose which fields will be used to identify the records to be linked to the triggered record. In some cases, multiple records could be identified, so the user has the option to link only “1” record that is evaluated to be the best match or all identified records. When the values of the selected fields match, the record will be linked as related to the triggered record. The fields to be used will be displayed in the green infobox.
Check our Knowledge Base article to get more information about Automatizer › Link Existing Records ›
Fullsize Screenshots ⤵
Administration Improvements
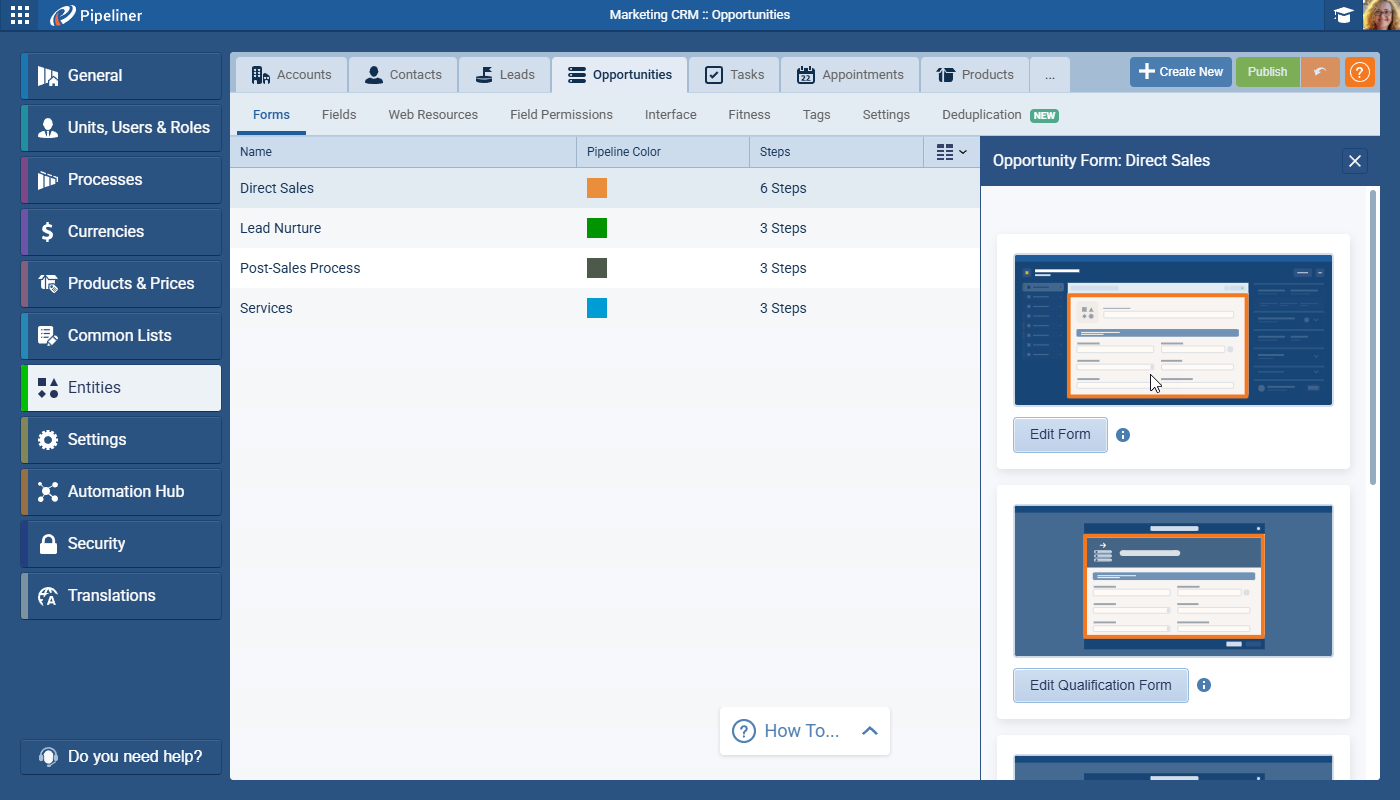
Administration › Form Layout Editor Improvements
Entity Form Editor
When editing a Form in the “Entities” menu:
- The panel with “Fields“, “Form Elements” and “Web Resources” has been moved to the left (without any functionality changes)
- When a field is placed on the form, field settings are opened automatically in the panel on the right side
- Fields placed on the form in Editor are now clickable and that is how field settings are accessed
The new “Field Settings” panel on the right hand side has 2 tabs:
- General › used to update the “Field’s Form Label” and “Description“
- Configuration › used to access “Visualization“, “Visibility” and “Validation” settings
When choosing a “Form” to edit, the placeholder images have been improved to better represent the associated form.
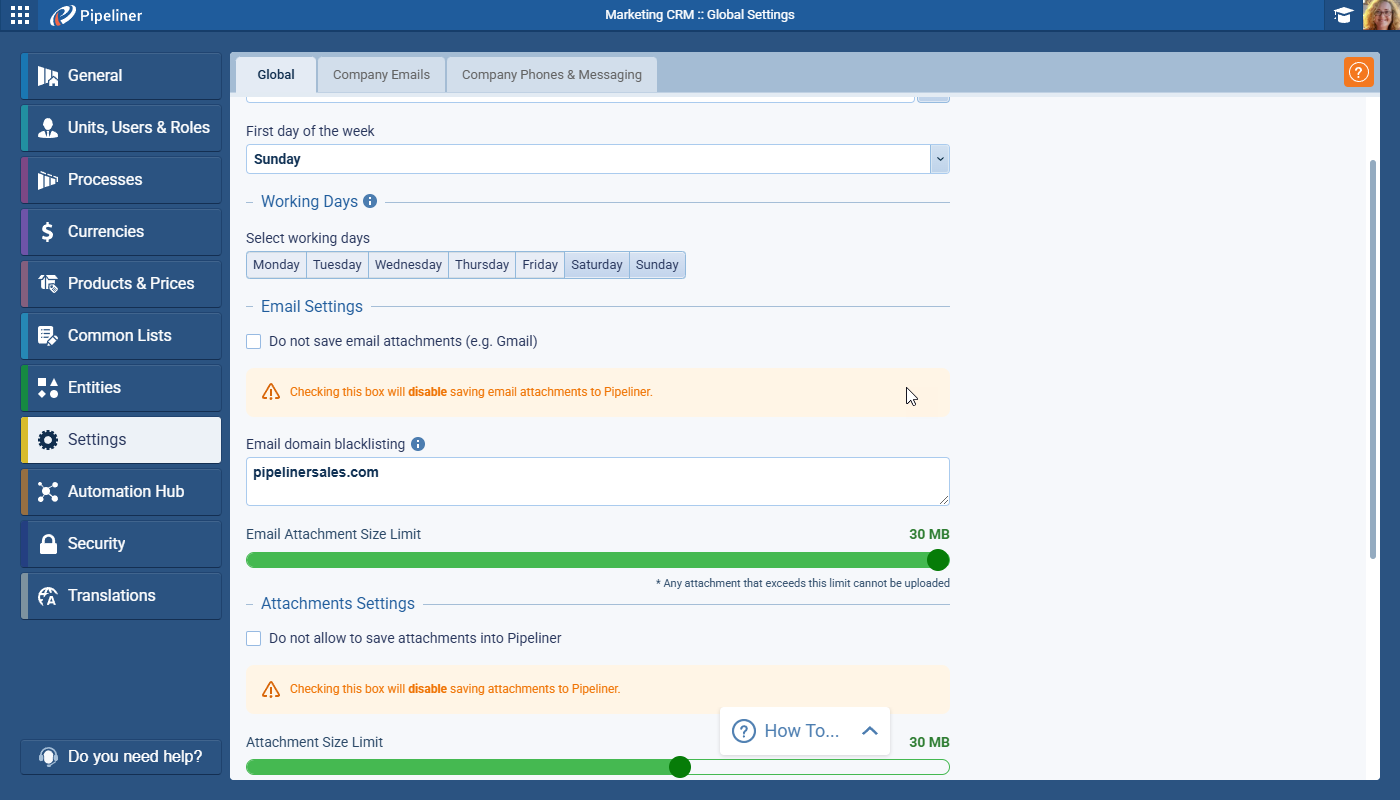
Settings Tab
We’ve reorganised the sections in the “Settings” tab and clarified the checkbox options for attachments.
Number of records in Admin Grids
The number of records now shows (subject to applied filters or searches) in all grids in the Admin module.

Fullsize Screenshots ⤵
Various Improvements
As part of our ongoing usability enhancement program, we’ve updated the following features.
Clickable Sales Step Activities
Users can now click anywhere on a sales step activity to action it rather than just on the icon.
Duplicate checker
The grid will not now reload each time changes are saved to “Merge” settings.
Forecasts
“Forecasts” › from now on, a drill-down opened from a chart will reflect this columns selected in the “Column Chooser“.
Multi-select component in filter
All multi-select components with visible categories for filtering will behave now have a “Select All” (select all items within the selected category) and Clear selected option (unselect all items within the selected category).
List View: Header Tooltip Support for Rollups & Formula
The column headers in “List Views” now clearly identify “Rollup & Formula” fields.
Fulltext search support for lookups in List Views
“Fulltext” search in “List Views” and drilldowns now supports “Lookup fields & Numeric fields” (integer, float, base currency).
Reports: Missing Email Fields in Charts
Charts in “Email reports” + other entities reports where emails are related now support these fields:
- From
- To
- TemplateTemplate Template is a generic file with a framework showing the standard sections or features of a specific kind of document, used to create a new document of the same type faster and easier.
- Parent email
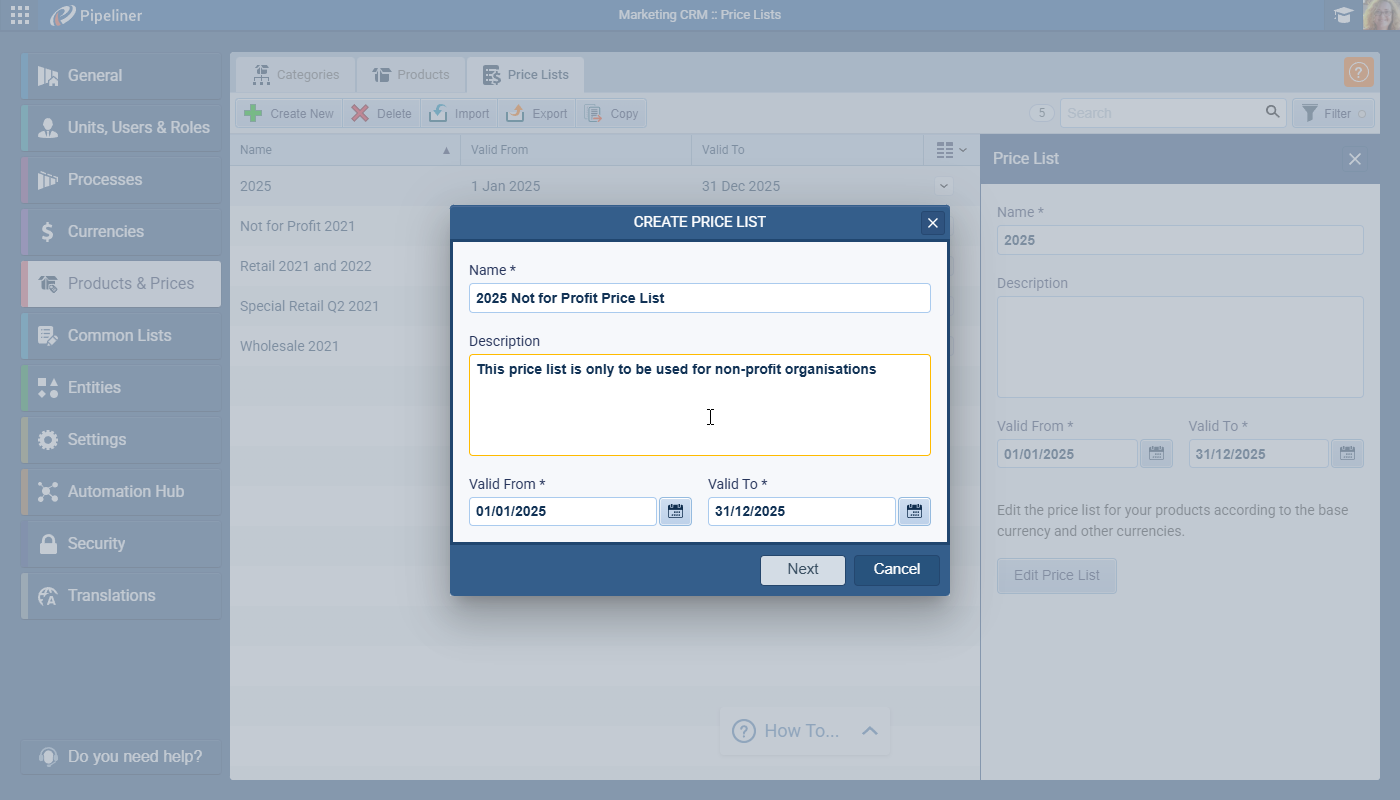
Price Lists
It is now possible to add a description when setting up “Price Lists“.
Linking records to Activities also links all Primary related records
When linking records via “Linked Items”, additional records will be linked (Primary AccountAccount Account refers to a record of primary and background information about an individual or corporate customer, including contact data, preferred services, and transactions with your company./Contact) without any restriction.
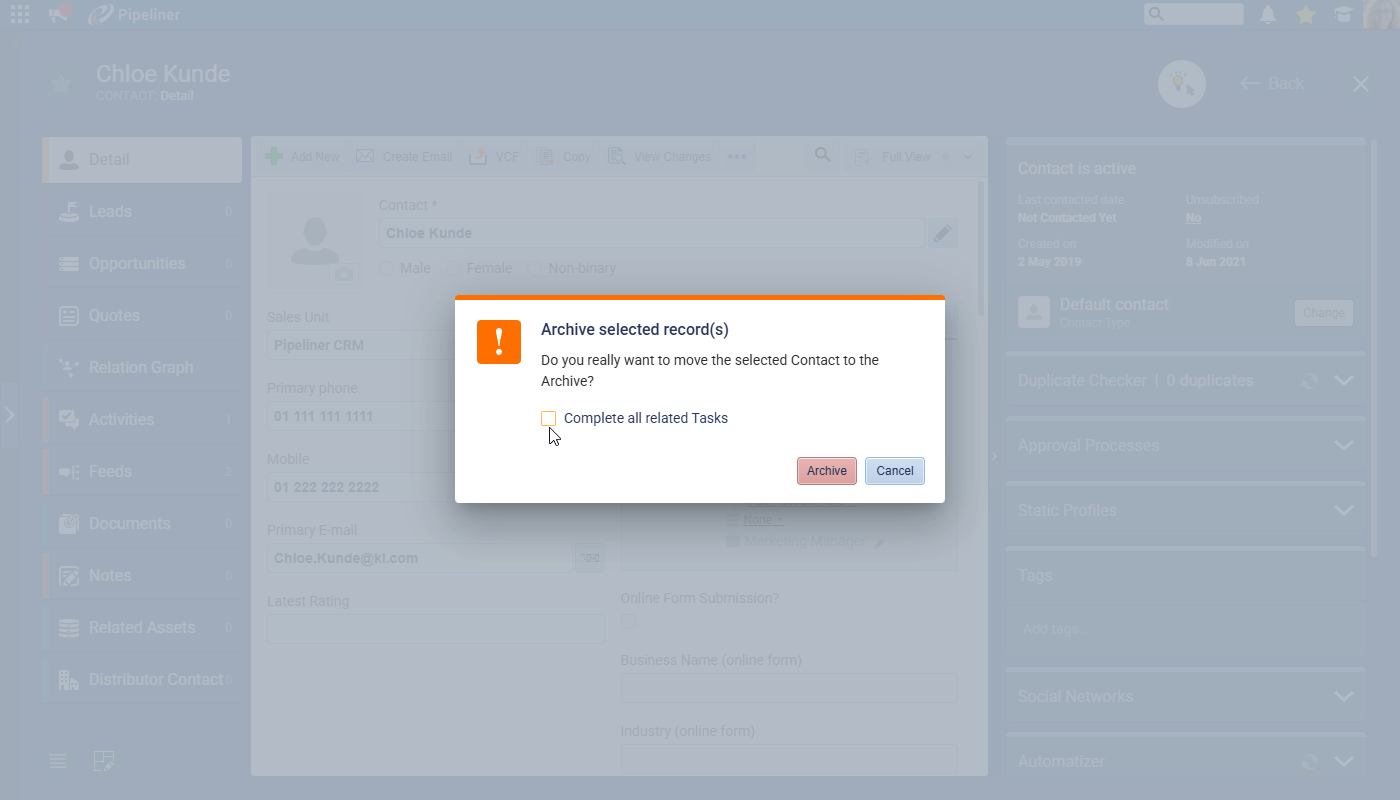
Deselecting or removing “Archive All Related {entity}” when archiving
Additional options (checkboxes) are unselected by default on “Archive” dialogs.
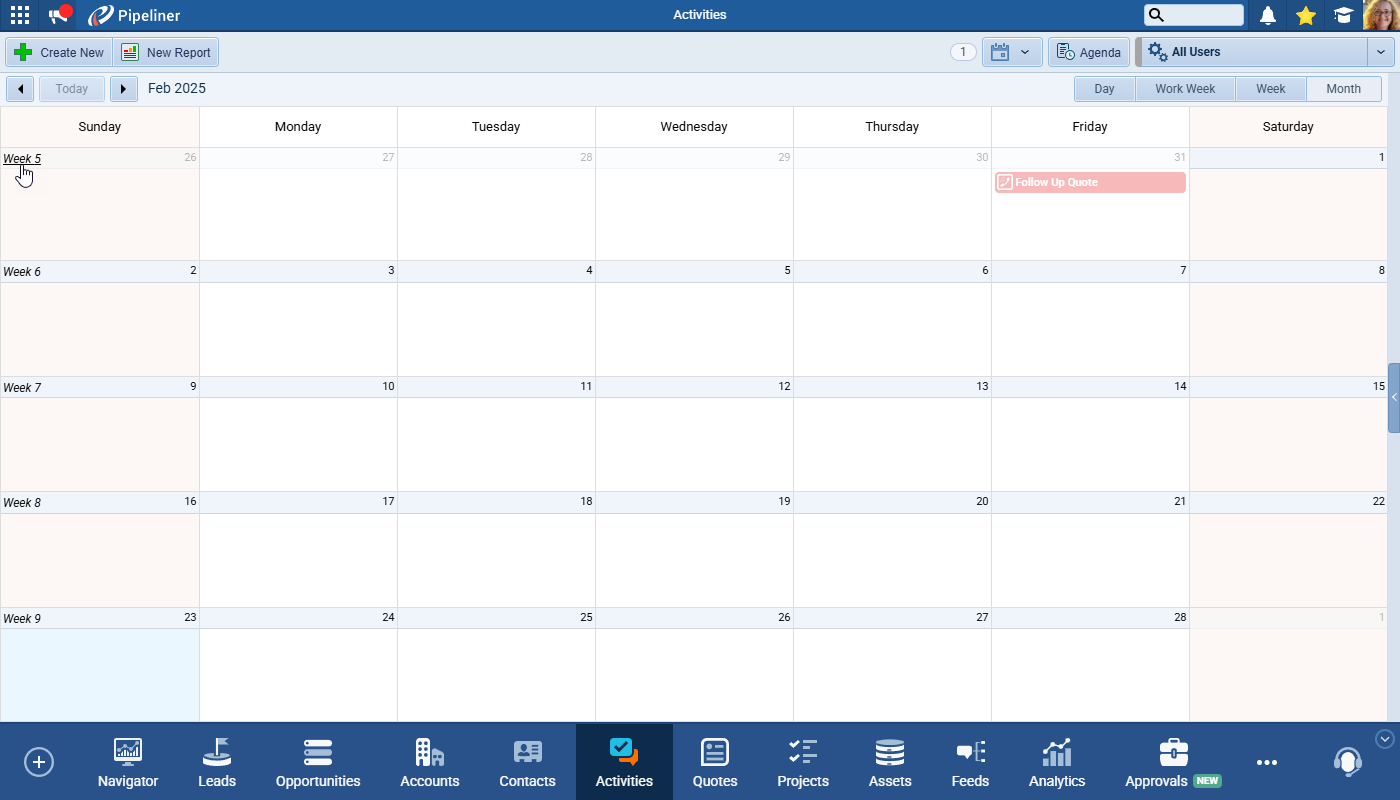
Ability to modify ‘Month View’ in Activities
We have added the “Week” text next to the numbers in the “Month” view.
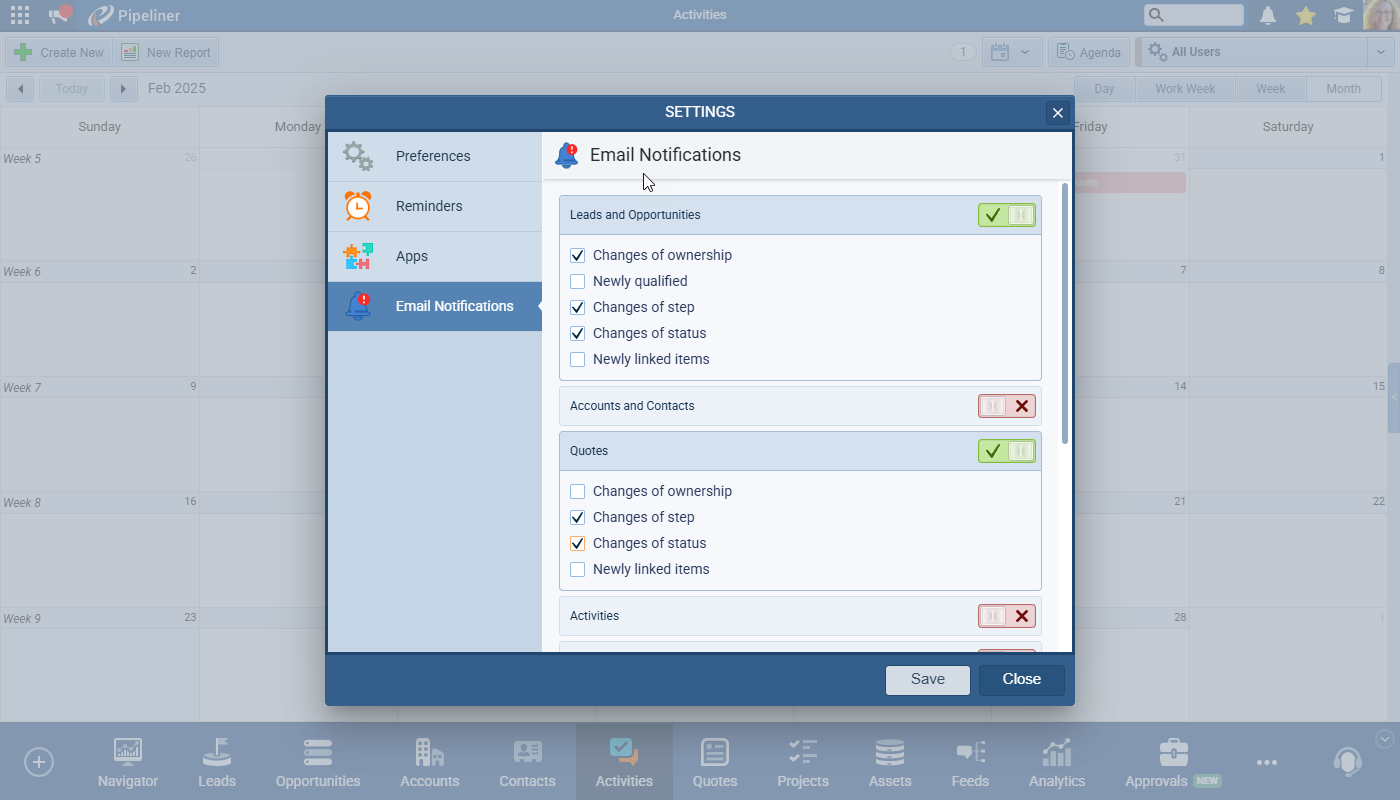
Differentiate Notifications in the App
In “Settings“, the tab has been renamed to “Email Notifications” to clearly reflect the type of notifications being managed, ensuring users understand that these settings apply specifically to email notifications. This change enhances clarity and prevents confusion between in-app and email notification settings.
Fullsize Screenshots ⤵